Additional User Administration Procedures
Prerequisites:
- System Manager is in Engineering mode.
- System Browser is in Management View.
- Project > System Settings > Users is selected.
- An own created user group is available.
You are not logged on with a Windows account but as a local user.
- In the Users list, select a user.
- In the Change Password expander, enter a new password.
- Confirm the new password.
- Apply is enabled if the password matches.
- Click Apply.
NOTE: The password cannot be saved with .
.
- The new password is saved.
Scenario: For security reasons, the DefaultAdmin account must be disabled when handing over a project to the customer.
- There is an administrator user account available that has the same comprehensive rights as the DefaultAdmin account.
- You are not logged in as DefaultAdmin.
- In the Users list, select DefaultAdmin.
- Clear the Enabled check box.
- Click Save .
- The DefaultAdmin user is disabled and cannot log on to Desigo CC.

NOTE:
You can re-enable the DefaultAdmin account at any time with the appropriate user rights.
- In the Users list, select a user or use multi-select by pressing the CTRL or SHIFT key.
- Clear the Enabled check box for the user.
NOTE: When you use multi-select, the check box next to the last selected user takes on the master function. Checking or clearing it, checks or clears the check boxes of all selected users.
- Click Save .
- The user is disabled and cannot logon to Desigo CC.
- A history log entry is created for each disabled user.
NOTE:
You cannot disable the account you are logged on with.
- In the Users list, select a user.
- Change the desired settings for the user.
- Click Save .
- The user is modified.
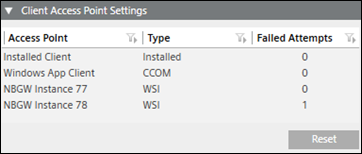
Scenario: The user has entered an incorrect password multiple times. When he exceeds the number of logon attempts configured in the Attempts allowed field, the user account is locked for 5 minutes. To unlock his account, the user needs to wait for 5 minutes or contact the Desigo CC administrator to have his user account unlocked.
NOTE:
a. After the waiting period of 5 minutes, only one logon attempt is possible. If an incorrect password is entered, the account will be locked for another 5 minutes.
b. Every successful logon attempt on an access point will reset the value of the Failed Attempts field, for that particular access point only.
c. If a user using a WSI type of access point is locked, then still the same user can logon to the another WSI/AFW/CCOM access point.
- You have the adequate level of Application Rights for the Users Configure application.
- In the Users list, select the locked user.
- In the Client Access Point Settings expander, click Reset.
- Click Save .
- All the failed attempts for all the access points, used by a Desigo CC. user is reset to zero and the user is unlocked for all the access points.
NOTE 1:
After the waiting period of 5 minutes, only one logon attempt is possible. If an incorrect password is entered, the account will be locked for another 5 minutes.
NOTE 2:
Every successful logon attempt on an access point will reset the value of the Failed Attempts field, for that particular access point only.
NOTE 3:
If a user using a WSI type of access point is locked, then still the same user can logon to the another WSI/AFW/CCOM access point.
An existing local user can be changed to a Windows user (or vice versa). The existing user settings are retained.
- In the Users list, select a user.
- Click Edit
 .
.
- Select one of the following user types:
- Desigo CC : see New Local User
- Windows: see New Local Windows User
- Click OK.
- Click Save .
- The user account is changed and you can log on to Desigo CC.
- Click the Users column header.
- Users are sorted alphabetically from A-Z.
- (Optional) Click the Users column header again.
- Users are now sorted alphabetically from Z-A.
- In the Users list, select a user.
- In the User Configuration expander, highlight the appropriate user group.
- Click Remove.
- Click Save .
- The user no longer has any rights from the unassigned user group.
- Click User with no groups
 .
.
- The users without user group assigned are filtered.
- In the Users list, select a user or use multi-select by pressing the CTRL or SHIFT keys.
- Click Delete
 .
.
- A confirmation message box displays with the number of selected users.
- Click Yes.
- The user is deleted and can no longer logon.
- A history log entry is created for each deleted user.
Scenario: In a distributed system, a local user must be promoted to a global user.
- In the master system, select Project > System Settings > Users.
- Select the Users tab.
- In the Users list, select a user.
- Click Promote
 .
.
- Click Yes.
- The promoted user has access to the distributed system.
Scenario: In a distributed system, a global user must be demoted to a local user.
- In the master system, select Project > System Settings > Users.
- Select the Users tab.
- In the Users list, select a user.
- Click Demote
 .
.
- Click Yes.
- The demoted user has access to the local system only.
- You have requested an account by an identity provider and have received the required information.
- Select Project > System Settings > Users.
- Select the Identity Provider tab.
- In the Domain field, enter the domain link, for example, abc.def.xyz.
- In the ID Server Domain field, enter the ID Server domain, for example, abc.def.xyz.
- In the Client ID field, paste the client ID information received by email from the identity provider.
- In the Client secret field, paste the client secret information received via email from the identity provider.
- (Optional) To set a code endpoint as a token endpoint, clear the Default properties check box.
a. In the Code endpoint field, enter the required information.
b. In the Token endpoint field, enter the required information.
c. In the Logout endpoint field, enter the required information.ot
- Click Save .
NOTE 1:
Desigo CC only supports Auth0 Identity Provider.
NOTE 2:
The URL links refer to API addresses. When clicked, a browser window with an error message will display. It is, however, possible to check the connection to the server.