Recipient Editor Tab
In the System Browser, when you select Applications > Notification > Recipients, the Recipients Editor tab displays, allowing you to configure recipients, recipient group and so on using the following expanders along with the toolbar controls listed below:
Toolbar | ||
Icon | Name | Description |
| Save | Saves the configuration settings. |
| Add user | Adds a new recipient user. |
| Add group | Adds a new recipient group. |
| Contact list(Available for Reno Plus and MNS license users) | Adds a contact list. |
The Recipients expander lists the configured recipients with details:
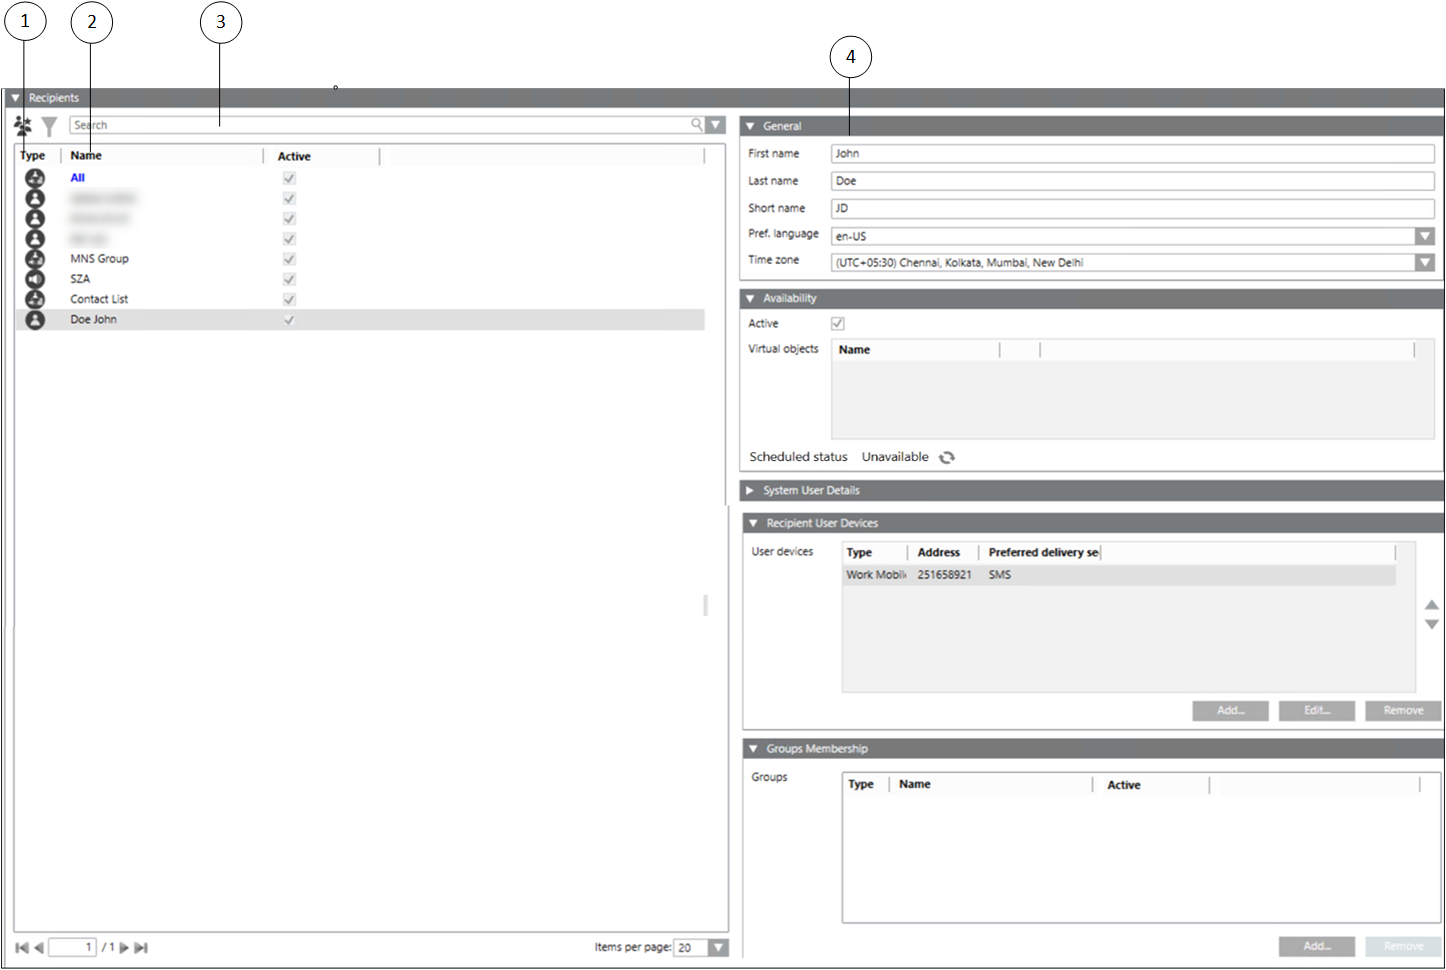
| Name | Description |
1 | Type | Displays the recipient user type. Following are the different recipient types |
2 | Name | Displays the recipient name. |
3 | Search | Filters the recipients based on the search string. |
4 | General | Displays the configuration details for the selected recipient. |
The General expander for the recipients depends on the type of the recipient selected.
Recipient Contact List
The recipient contact list section displays the details of the contact list.

NOTE:
The recipient contact list is available only for Reno Plus and MNS license users.
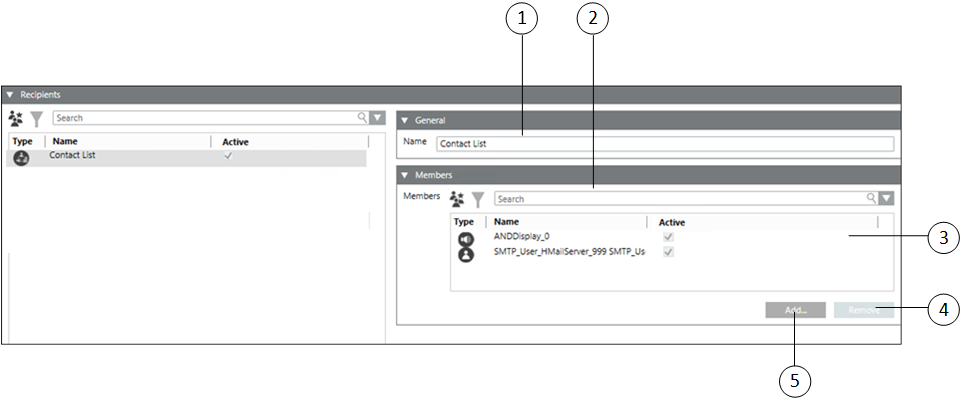
| Name | Description |
1 | Name | Displays Contact List by default. Optionally, the user can edit this name. |
2 | Search | Enter a search string. Recipients containing a matching character string will be displayed. |
3 | Members | Displays the recipients that a part of the contact list with the user type and name information. |
4 | Remove | Remove recipients from the contact list. |
5 | Add | Add recipients to the contact list. |
Recipient Device Details
Displays the list of recipient user devices and delivery methods with additional configuration options.
The recipient device details are displayed if a recipient device is selected from the recipients list:

- Devices: Displays the name of the recipient device.
- Groups: Displays the list of groups that the selected recipient device is a member of.
- Add: Adds the recipient device as a member of a recipient group.
- Remove: Removes the recipient device as a member of a recipient group.
Recipient Group Details
The recipient group details are displayed if a recipient group is selected from the recipients list:
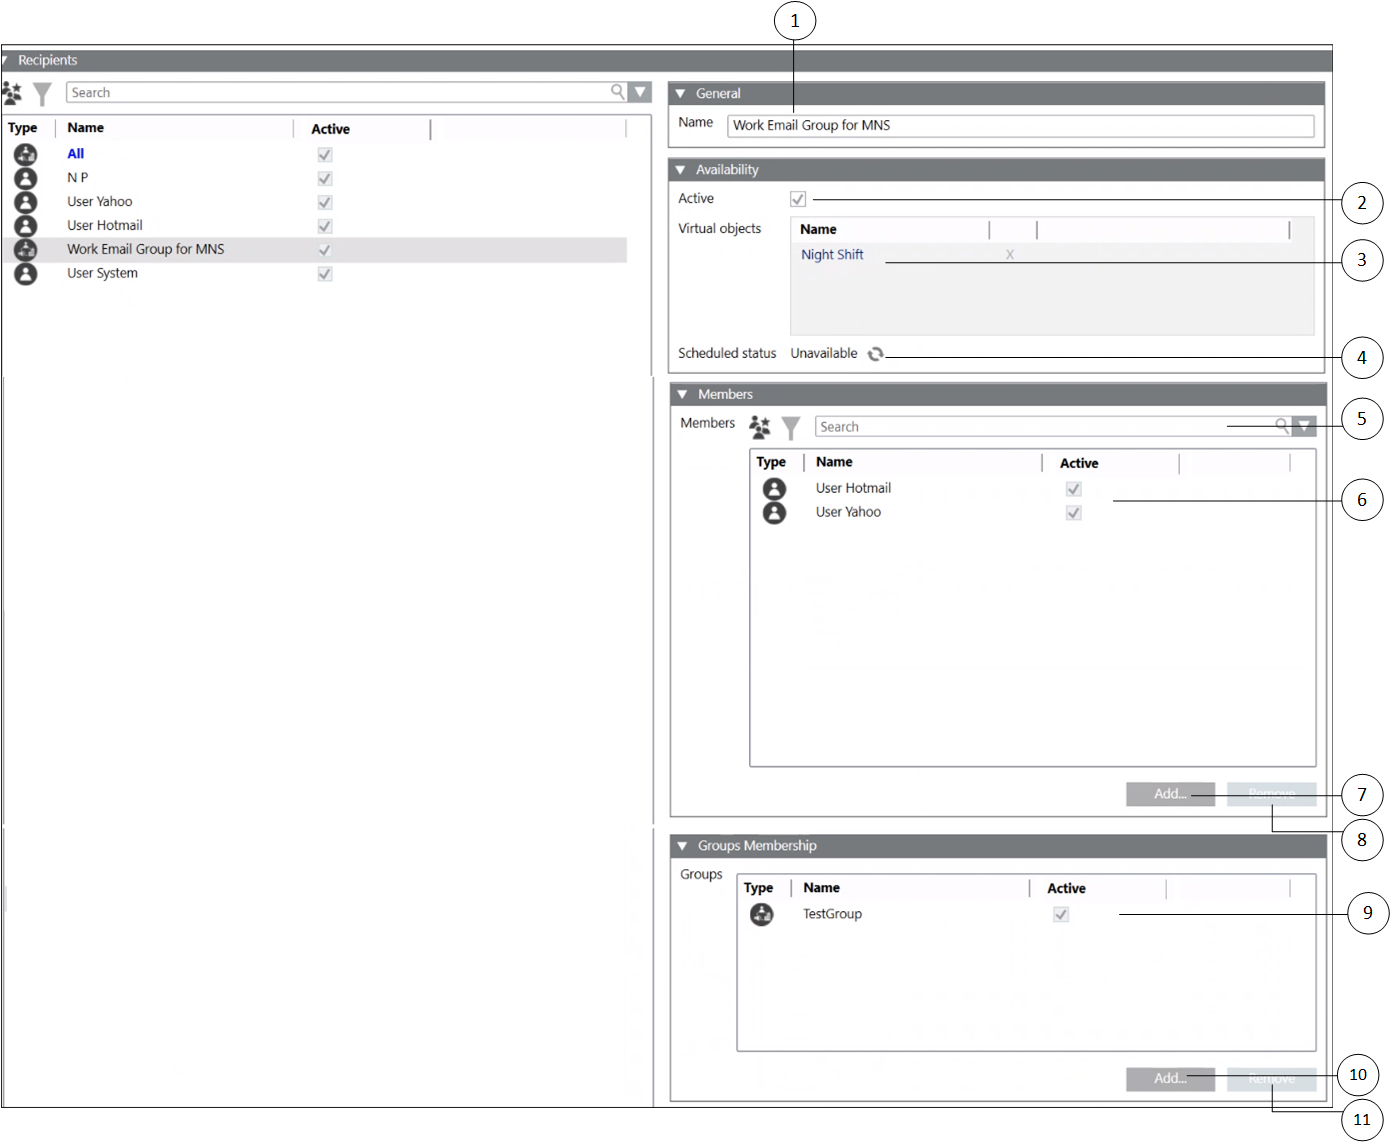
| Name | Description |
1 | Name | Displays the recipient group name. |
2 | Active (Available only for Reno Plus and MNS license users) | Check this option to activate the recipient and send message to the recipient. |
3 | Virtual objects | Allows you to drag and drop virtual data points from the available list. The virtual data points are located under Applications > Logics > Virtual Objects. For more information on virtual objects, refer to the Virtual Objects topic. In addition, refer to the Management Station Schedules topic. |
4 | Scheduled status | Displays the status of the schedule. |
5 | Search | Enter a search string. recipients containing a matching character string will be displayed. |
6 | Members | Displays the list of recipients belonging to the group with the user type and name information. |
7 | Add | Add recipients to the group. |
8 | Remove | Remove recipients from the group. |
9 | Groups | Displays the list of groups that the selected recipient group is a part of. |
10 | Add | Add the group as a member of another group. |
11 | Remove | Remove the group from the selected group. |
All Group
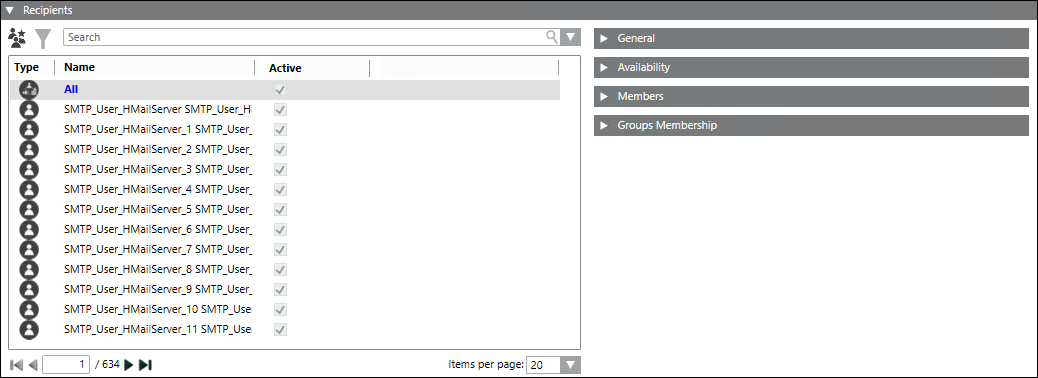
All group is a special (default) group that consists of all the recipients present in the system. All group is used to send the notifications to all the recipients. All group is non-editable. It cannot be modified or deleted.
All group allows user to:
- Send a notification to all recipients: To send the notification to all recipients, add the ‘All’ group as a recipient to the notification.
- Send a notification to all devices of specific device types: To send a notification to all devices of specific device types, add the ‘All’ group as a recipient to the notification. Select only the required device types from the Channel Selection dialog of the message or live announcement template snap-in, or the Initiate Incident Wizard.
NOTE: Channel selection is available only for Reno Plus and MNS license users.
Recipient Location Details
The recipient location details are displayed if a recipient location is selected from the recipients list:

- Location: Displays the name of the recipient location.
- Groups: Displays the list of groups that the selected recipient location is a member of.
- Add: Adds the recipient location as a member of a recipient group.
- Remove: Removes the recipient location as a member of a recipient group.
Recipient User Details
The recipient user details are displayed if a recipient user is selected from the recipients list.
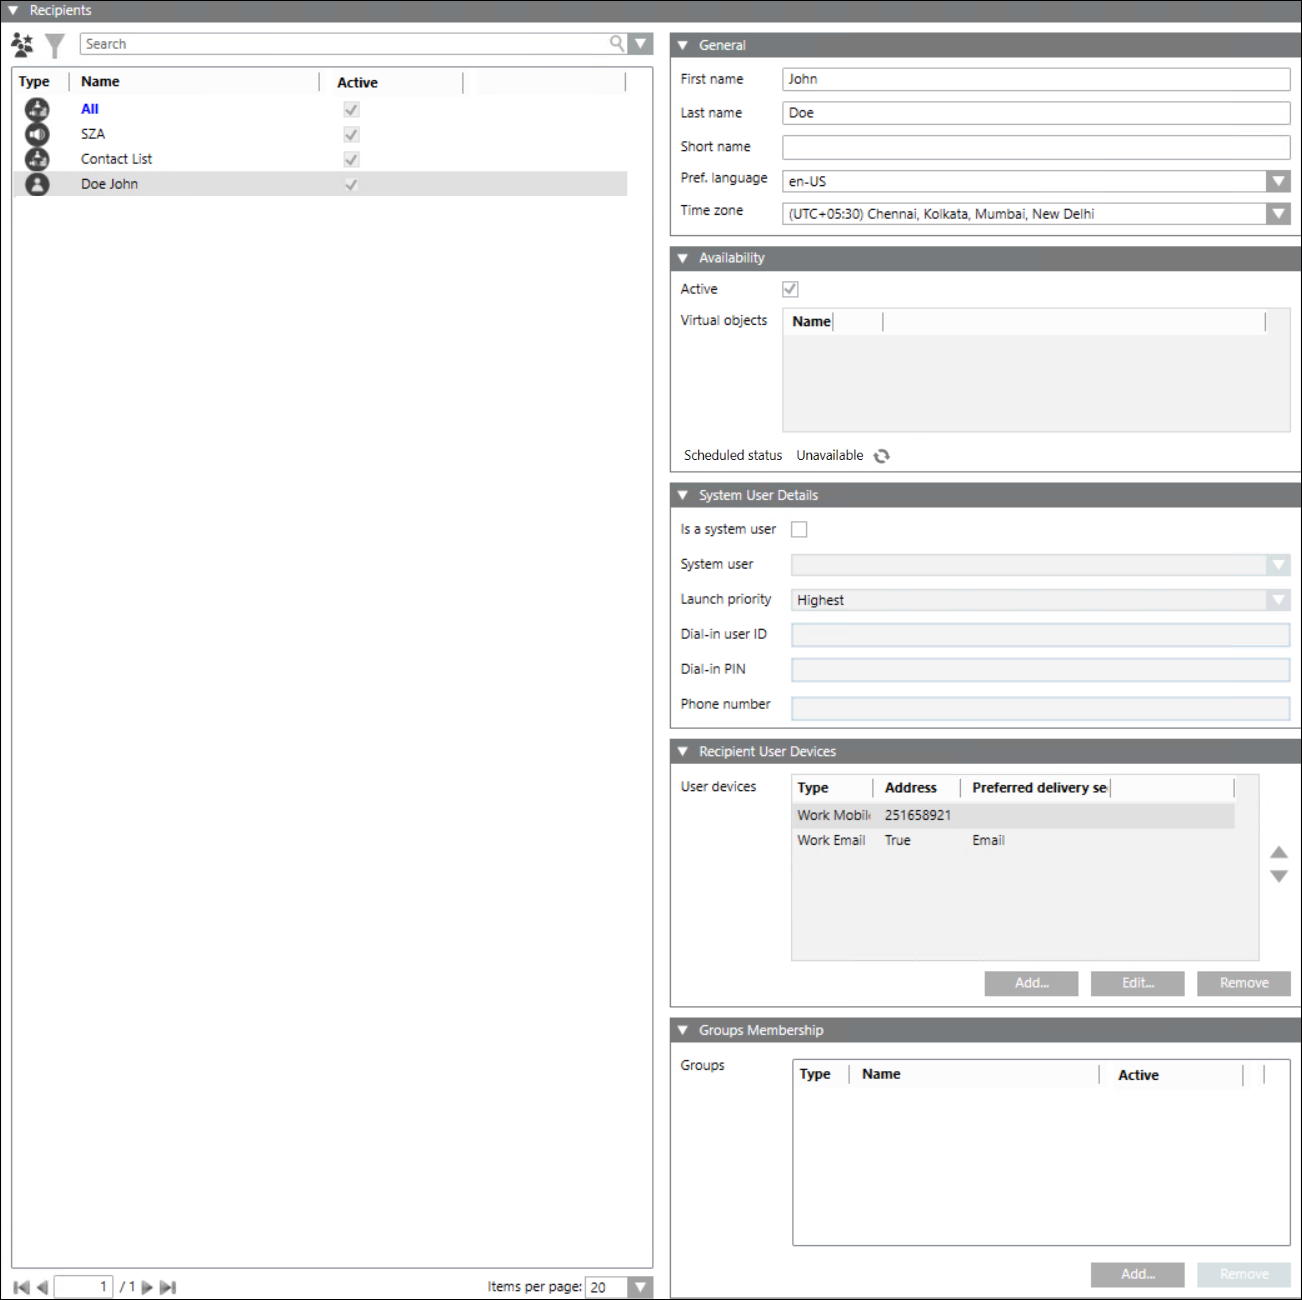
| Name | Description |
1 | First name | Displays the first name of the recipient user. |
2 | Last name | Displays the last name of the recipient user. |
3 | Short name | Displays the short name of the recipient user and it is not a mandatory field. Its value can be null. |
4 | Pref. language | Displays the selected preferred language for delivery of notifications for the recipient user. |
5 | Time zone (Available only for Reno Plus and MNS license users) | Time zone is local time of a region or a country of a recipient user. Date and time format would be as per the preferred language selected. |
6 | Active (Available only for Reno Plus and MNS license users) | Check this option to activate the recipient and send message to the recipient. |
7 | Virtual objects | Allows you to drag and drop virtual data points from the available list. The virtual data points are located under Applications > Logics > Virtual Objects. For more information on virtual objects, refer to the Virtual Objects topic. In addition, refer to the Management Station Schedules topic. |
8 | Scheduled status | Displays the status of the schedule. |
9 | Is a system user (Available only for MNS license users) | Associates recipient user details with a system user account and enables delivery of notifications to this system user. |
10 | System user (Available only for MNS license users) | Displays the system user name. |
11 | Launch Priority (Available only for MNS license users) | Displays the selected launch priority. |
12 | Dial-in User ID (Available only for MNS license users) | Displays the Dial-in User ID. |
13 | Dial-in PIN (Available only for MNS license users) | Displays the Dial-in PIN. |
14 | Phone number (Available only for MNS license users) | Displays the phone number of the user. |
15 | Recipient user devices | Displays the list of user devices for the selected recipient user. Each user device configuration consists of device type, address, and the preferred delivery method. |
16 | Add | Adds new recipient user device for selected recipient user. |
17 | Edit | Edits the user device details for the selected recipient user. |
18 | Remove | Removes a user device for the selected recipient user. |
19 | Groups | Displays the list of groups that the selected recipient user is in. |
20 | Add | Adds the recipient user as a part of a group. |
(This expander is available for Reno Plus and MNS license users)
The User Device Types expander lists the available recipient user devices and their associated delivery methods:
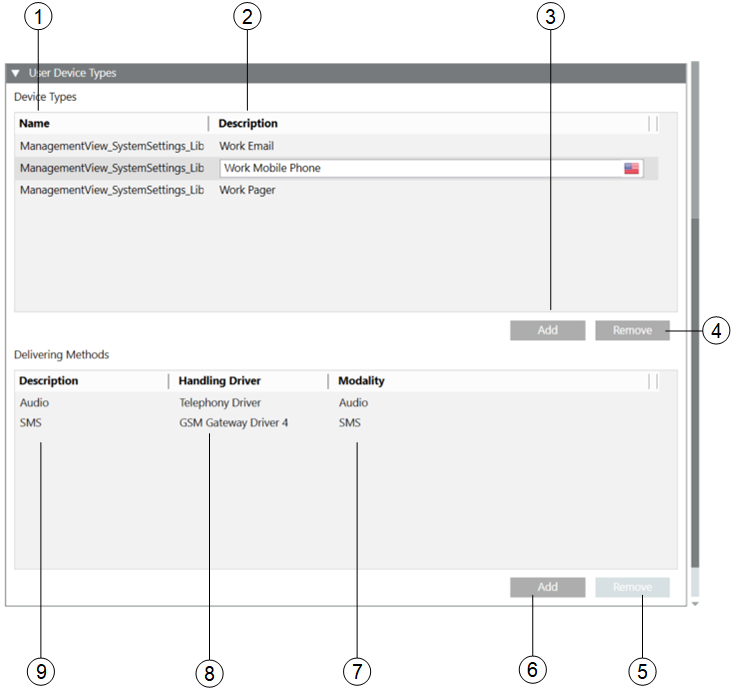
| Name | Description |
1 | Name | Displays the name of the user device types. |
2 | Description | Displays the description of the user device type. |
3 | Add | Add new user device types. |
4 | Remove | Remove the selected user device type. |
5 | Remove | Remove the selected delivery method. |
6 | Add | Add a new delivery method to a user device type. |
7 | Modality | Select a modality supported by the handling driver for the corresponding delivery method. |
8 | Handling Driver | Select a handling driver for the corresponding delivery method. |
9 | Description | Displays the description of the delivery method for a selected user device type. |
Displays the list of recipient user languages with additional configuration options.
The Recipient Languages expander lists the available recipient user languages.
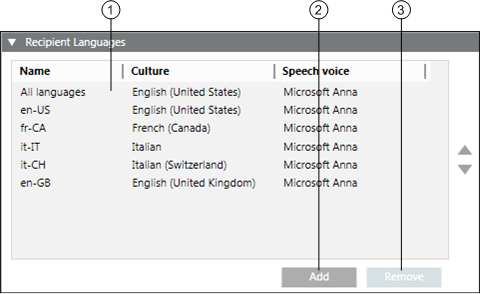
NOTE: Speech voice is available only for MNS license users.
| Name | Description |
1 | Recipient Languages | Displays the list of recipient user’s languages with the name, culture, and the speech voice. |
2 | Add | Add a new recipient user language. |
3 | Remove | Remove the selected recipient user language. |


 - Recipient users
  - Recipient groups
  - Recipient devices
  - Recipient locations