Overview of the Standard UI Client
This section provides an overview of the main elements of the Desigo CC user interface.
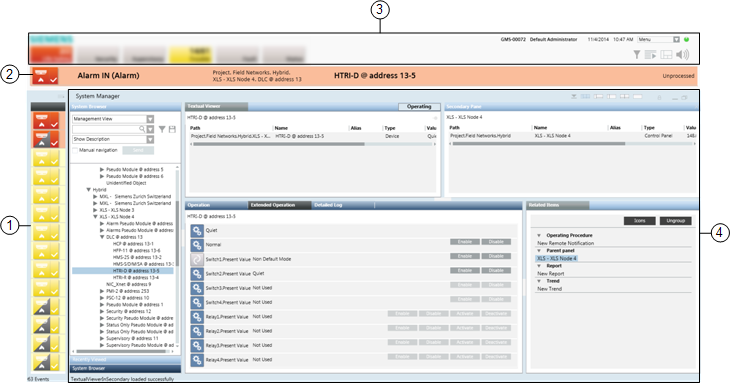
1 | Event bar | Provides a compact view of the events in the system, where each event displays as a button along the left-hand side. |
2 | Event Detail bar | Present in some configurations only. Highlights the most critical event in the system. |
3 | Summary bar | The main point of entry to all the functions of the software. It may be collapsed in which case you must click the down icon |
4 | Work area | Large central portion of the screen below the Summary bar. The window displayed here will vary depending on the system function that is being used. It will typically contain the Event List or System Manager window. It can also display the Investigative or Assisted Treatment windows, the system help, and external documents or applications. |
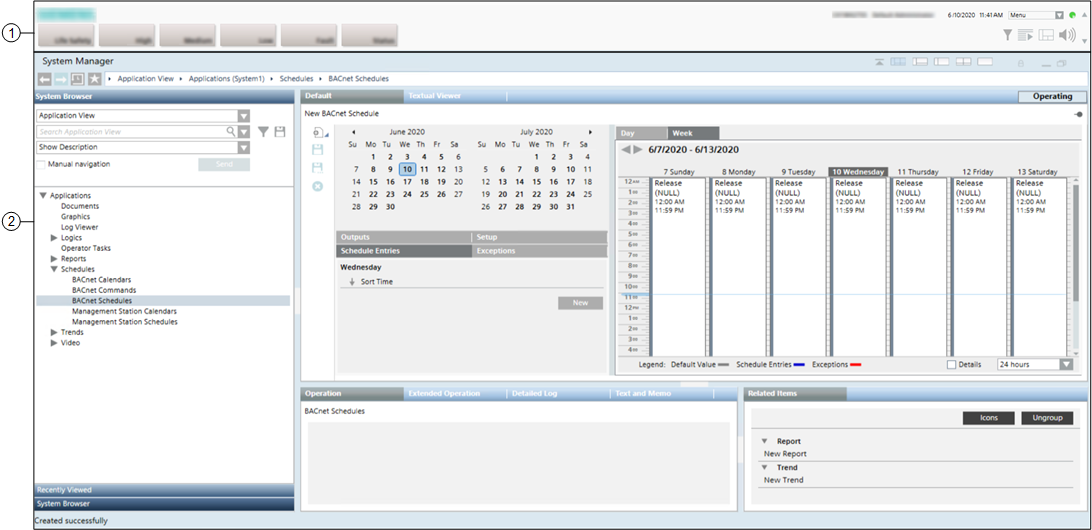
1 | Summary bar | The main point of entry to all the functions of the software. It may be collapsed and you must click the down icon |
2 | Work area | Large central portion of the screen below the Summary bar. The window displayed here will vary depending on what system function is being used. It will typically contain the System Manager window. It can also display the Event List, or Investigative or Assisted Treatment windows, the system help and external documents or applications. |
The system screen can display many windows, some of which are made up of multiple panes, divided by splitters. A window can contain up to four panes. Each pane houses a functional component of Desigo CC (such as a browser for navigating and selecting system objects, a viewer for displaying site floor plans or tools for inspecting the properties of objects).
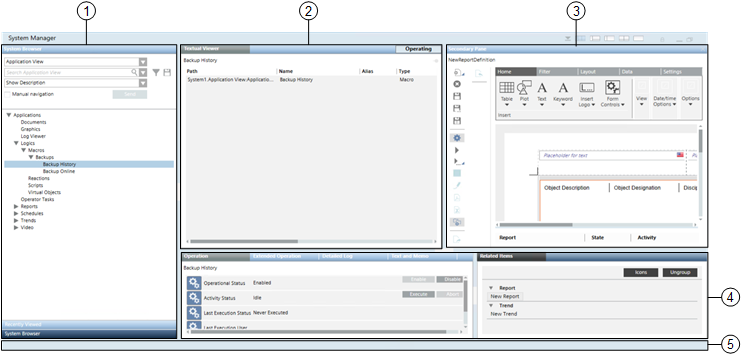
1 | Selection pane (vertically along the left). Also referred to as Navigation pane. |
2 | Primary pane (to the right of the Selection pane). |
3 | Secondary pane (opens when required, alongside the Primary pane). |
4 | Contextual pane (underneath the Primary and Secondary panes, divided into two parts). |
5 | Status bar (along the bottom of the window). This bar displays status/update messages ( |
You can arrange panes of a window in different layouts or interact with a window and its panes in various ways. These include:
- Click the icons on the window title bar top to
 minimize,
  restore down, or
  maximize the window.
 - Click the icons on the window title bar to quickly switch between the available preset layouts:
 : Selection, Primary, and Contextual panes. The Secondary pane displays only if it is already open.
 : Selection, Primary, and Contextual panes
 : Selection and Primary panes
 : Primary, and Contextual panes. The Secondary pane displays only if it is already open.
 : Primary pane only
- Resize the panes in a layout by dragging the splitters, or expand/collapse a pane by clicking the button on the splitter
 .
. - Click the icon to lock the window layout
 . When the layout is locked, clicking one of the layout icons will not have any effect; this means that you cannot change the current layout, and resize, expand, or collapse the panes of the window.
 - Normally, the Secondary pane opens on demand, when you make a selection that requires it.
- When the Secondary pane opens, it takes up half the space that would otherwise be allotted to the Primary pane.
- You can prevent the Secondary pane from opening by clicking the pushpin icon
 and locking the Primary pane. When the Primary pane is locked
  , any selections (such as Related Items) that would normally display in the Secondary pane are instead redirected to the Primary pane.
The following graphic shows the typical workflow for navigating the system:
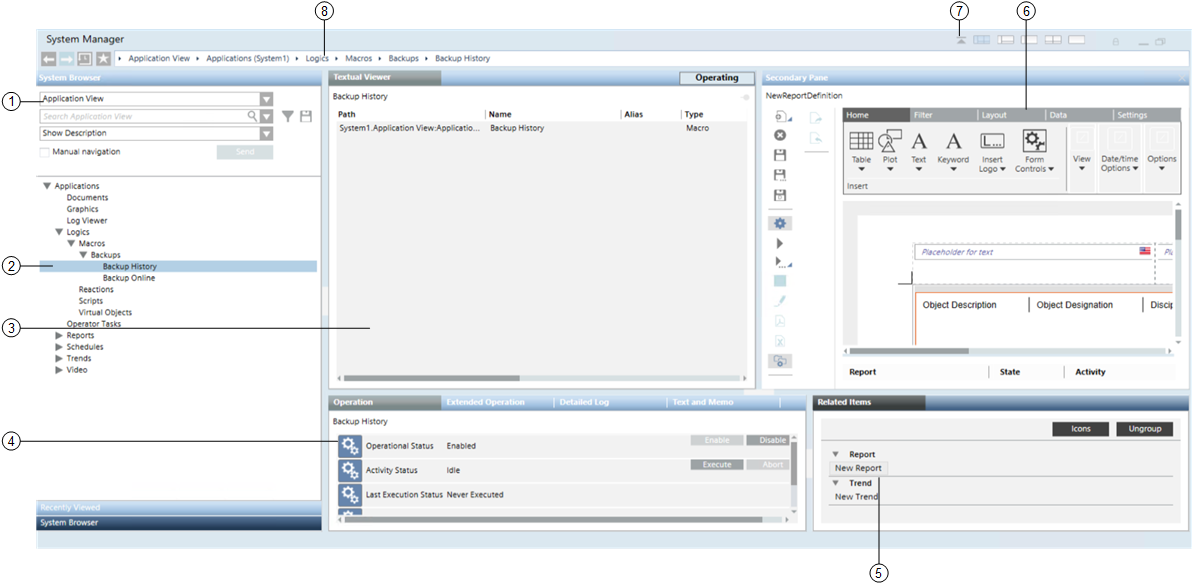
- Select a view (1) in System Browser, in the Selection pane, such as Application View.
- The selected view displays in the System Browser tree.
- Navigate the tree and select the object (2) you want to work with.
NOTE: Alternatively, right-click the object (2) and select Send to the Primary Pane.
- The information about the selected object displays in the Textual Viewer (3), in the Primary pane.
- The properties of the selected object display in the Operation tab (4), in the Contextual pane.
- Links to additional resources associated with the selected object display in the Related Items tab (5), in the Contextual pane.
- Click a related item link (5), such as New Report, to open that resource in the Secondary pane.
- The selected related item displays in the Secondary pane (6).
- If necessary, click the icon (7) to display the navigation bar (8) with icons for moving back and forth between the most recent screens in the Primary pane and going back to the favorite location.
The following graphic shows the typical workflow for manual selection and drag-and-drop, in order to associate two objects:
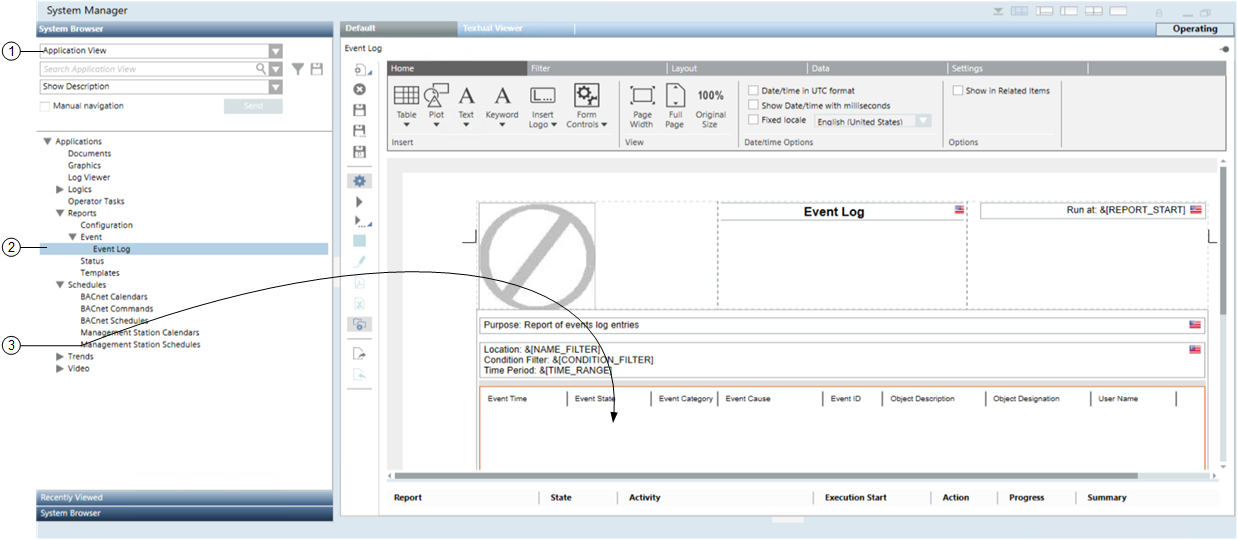
- Select a view (1) in System Browser, in the Selection pane, for example Application View.
- The selected view displays in the System Browser tree.
- Navigate the tree to select the object (2) you want to work with, for example Event Log.
- The application for the selected object displays in the Default tab, in the Primary pane.
- Drag and drop the selected object (3), for example Management Station Schedules, to the reports area.
 on the top right to display it.