Troubleshooting Projects
The following are the most common errors and problems that occur during Server, Client/FEP project configuration. This section provides information related to their causes and methods to resolve them.
It is recommended to see the SMC.log file available at
[installation drive:]\[installation folder]\GMSMainProject\log for all SMC-related troubleshooting issues and to ensure that the MS Windows Pmon Service for a project is started.
The following table should help you while starting up, editing, restoring, upgrading, activating and deleting a project.
Problem | Troubleshooting |
Creating the project failed. When selecting a project, the Start icon is | Check whether the Win CC OA Console or Win CC OA Log Viewer is open. If yes, close them. Ensure that the project folder is not open in Windows Explorer, and that its content is not being used by any application. |
Creating the project failed with the message |
|
Cannot access Desigo CC client application on the client/FEP stations. |
|
Starting, Upgrading, Adding to a project fails. |
|
Saving the System account user fails with a message |
|
You selected a project in the SMC tree that has a corrupt project database, indicated by the status | Perform the steps to repair the project database of the stopped project. |
You want to change the language setting after the project is created. |
|
You are working with the Web application, but the Web application user does not have permission on the virtual directories of the server project. An error message displays |
|
If the destination machine, where you are restoring the project backup contains BACnet field points for the extension module standard third-party BACnet, is not the same machine you performed the backup. |
|
After restoring the project backup, the Project status is |
|
You cannot work with projects in SMC; the Projects node does not display any existing projects. |
|
If the running project suddenly displays the Project Status as |
|
On change of the installation drive, you cannot start the old projects created on a different installation drive. |
|
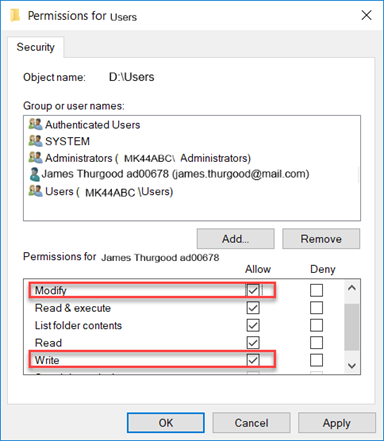
Cannot start the project and the Data manager is in the Initializing state. | Verify the Pmon user has Read permissions along with Write and Modify permissions on the project folder of the project you are about to start. To set the write and modify permissions, perform the following steps:
|
The following table may help you to resolve possible errors during working with the distributed systems.
Problem | Cause | Resolution |
Only one system is visible in the Views list box of the System Browser, even if the distributed environment is configured using SMC. |
|
|
Not able to log into the Partner system in distribution after changing the System Name or System ID. |
|
|
Binding/security mismatch between sender and receiver error displays when: |
|
|
Problem: When you launch the Desigo CC client application on the client or FEP station, the logon box, does not display.
Solution:
- On the client or FEP, select C:\Windows\System32\drivers\etc and open the hosts file. You need administrator rights to do this.
- At the end of this file, add an entry in the following format:
[IP address of the server system] [Full name of the server system].
For example, if your complete hostname is ABCXY022PC.don01.company.net and the IP address of the server is 123.456. 789.10, you must add the entry as follows 123.456. 789.10 ABCXY022PC.don01.company.net.
3. Save the hosts file. Updating the hosts file with the IP address and full name of the server resolves this issue.
4. Launch the Desigo CC client application on the client or FEP station.
Problem: You have shared a project with local/domain user while working in domain environment. You have changed from domain environment to workgroup. The old sharing is not visible in Project Shares expander in SMC. The same is applicable if you are working in workgroup and change to domain environment.
Cause: On environment change from domain to workgroup or vice versa, SMC fails to map this path to any existing shares of the project, thus displaying that the project is not shared.
Solution 1: Change the project’s share name and then share the project again by adding the user.
- Select the project under Projects node in SMC tree.
- Open the Project Shares expander.
- Change the share name to a unique name other than the default.
- Click Add to add the user you want to share the project with.
- Click Save.
Solution 2: Removing the project shares for the project using Windows files shares and share the project using Project Shares expander in SMC with the user.
- On the disk, go to the project folder path
For example, [Installation Drive]:\[Installation Folder]\[Project Name]. - Right-click the project folder to open the Properties window.
- Select the Sharing tab and then click Advanced Sharing.
- Remove the existing shares by clearing the Share this folder check box.
- Click Apply.
- Click OK.
- Share the project using Project Shares expander in SMC.
Problem: You want to create a website and the website creation fails or you want to share the project folder and the sharing fails. You have opened the SMC log and the SMC log displays: Unable to set security permissions.
Solution:
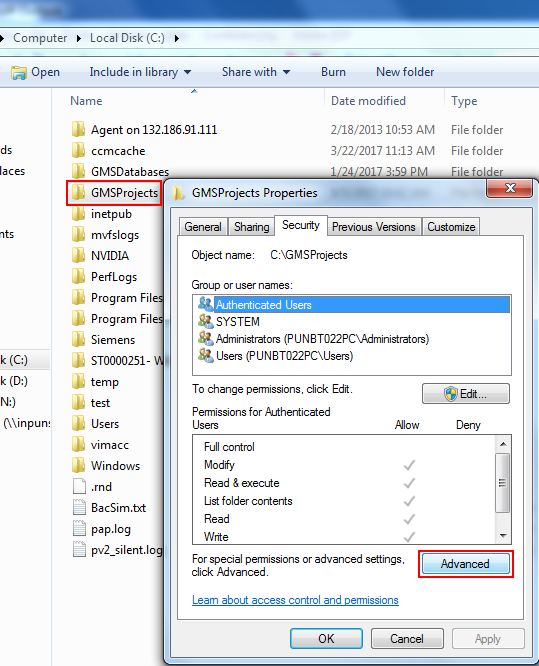
- On the Desigo CC server, in Windows Explorer, navigate to the GMSProjects folder.
NOTE: We recommend to set permissions on the parent folder of the project or Websites, thus solving the problem as one time activity.
- Right-click GMSProjects folder, and select Properties.
- The [folder name] Properties dialog box displays.
- Select the Security tab and click Advanced.

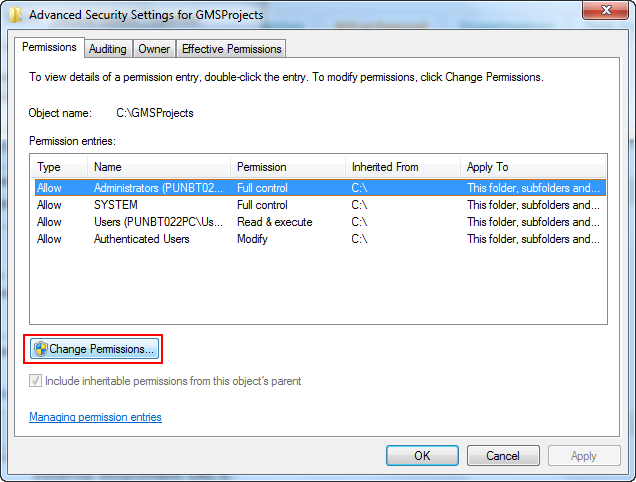
- The Advanced Security Settings for [folder name] dialog box displays.
- In the Advanced Security Settings for [folder name] dialog box, click Change Permissions.

- A Windows Security message displays.
- Click Reorder.
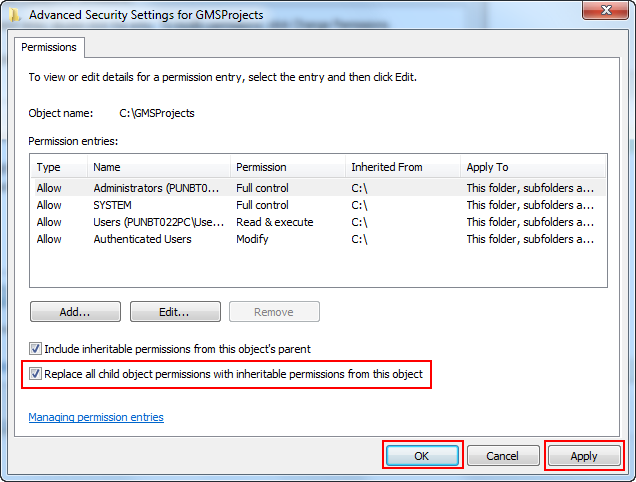
- In the Advanced Security Settings for [folder name] dialog box that displays, click check box for Replace all child object permissions with inheritable permissions from this object.
- Click Apply.

- Security permissions are set.
- Click OK till you close [folder name] Properties dialog box.
Problem: On a Domain Controller Machine, you are unable to configure Domain user as a System account user.
Cause: The Domain User has no User Principle Name (UPN) logon settings.
Solution: Check if Domain user on the domain controller machine has a UPN; otherwise perform the following steps to add UPN settings:
- On your Domain Controller, open Active Directory Users and Computers from
ControlPanel > All Control Panel Items > Administrative Tools > Active Directory Users and Computers or
Go to Start > Run, and type dsa.msc and press Return.
- In the Active Directory Users and Computers window that displays, locate the domain user account, right-click and choose Properties.
- In the [domain user] Properties window that displays, select the Account tab.
- In the Accounts tab, under User logon name, ensure that both fields that make up the UPN are populated.
For example, where the pre-Windows 2000 account format is:
domain1\svcDatabase, the UPN format would be: svcDatabase@domain1.local, where domain1.local is the fully qualified domain name.
Problem: Upon sudden restart of the machine during post-installation step execution or during creation of a project, website, web application, HDB, after a windows update, or an automatic reboot; the project, website, web application, HDB created does not work properly.
Cause: Machine reboot, windows update, power failure and so on.
Solution: Check if the project node, website or web application node is present in the SMC console tree. If present, perform the following clean up steps by deleting them from the SMC console tree:
- You have identified the related artifact such as the project/website/web application created manually or using post installation step that does not work properly.
- In the SMC tree, select the project, website, web application, or HDB.
- Perform either of the following:
- To delete a project, website, web application, click Delete
 .
.
- To delete an HDB, click Drop

- Manually create the project, website, web application, HDB or re-run the installer to run the post installation steps as required.
 not enabled and project displays the status:
  and select the desired language.
 to activate the project on a different drive than the installation.
