Website Procedures
This section provides additional procedures related to websites configuration.
- You have the prerequisite Application Request Routing (ARR) available on the Desigo CC software distribution.
- Copy the Gms.ARRInstaller.exe file from the
….\InstallFiles\EM\Installer\Prerequisites\Application Request Routing to the desired location on the third-party (target) machine.
- Go to the location where you have copied the Gms.ARRInstaller.exe file, right click and select the Run as administrator option to install the prerequisite Application Request Routing on the third-party machine.
- The prerequisite Application Request Routing (ARR) is installed successfully.
Verify Existing ARR Installation
Perform the following procedure to verify the existing ARR installation.
- Open IIS Manager in one of the following ways:
- From the Windows Start menu, type inetmgr in the Search Programs and files field. Press ENTER.
- Select Control Panel > Administrative Tools > Internet Information Services (IIS) Manager.
- The IIS Manager window opens.
- In the IIS Manager window, verify if Application Request Routing Cache is present. Otherwise, re-run the Gms.InstallerSetup.exe file that installs the prerequisite ARR.
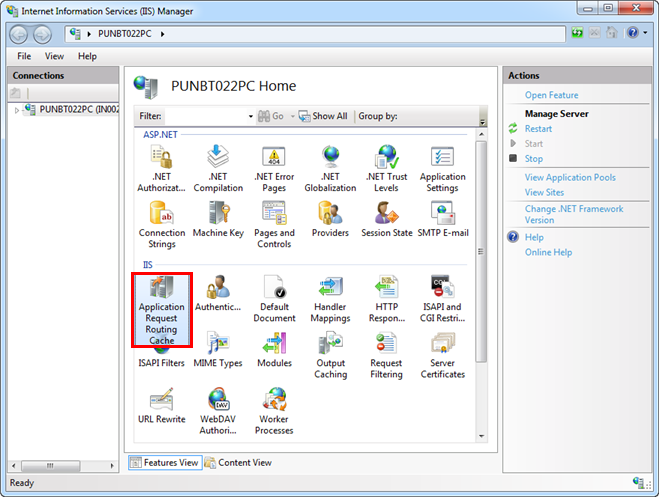
- Application Request Routing (ARR) is installed on your system.
- To open IIS Manager, do any of the following:
- From Windows Start menu, enter inetmgr in the Search Programs and files field. Press ENTER.
- Select Control Panel > Administrative Tools > Internet Information Services (IIS) Manager.
- The IIS Manager window opens.
- In the IIS Manager window, double-click Application Request Routing Cache.
- The Application Request Routing (ARR) Cache page displays.

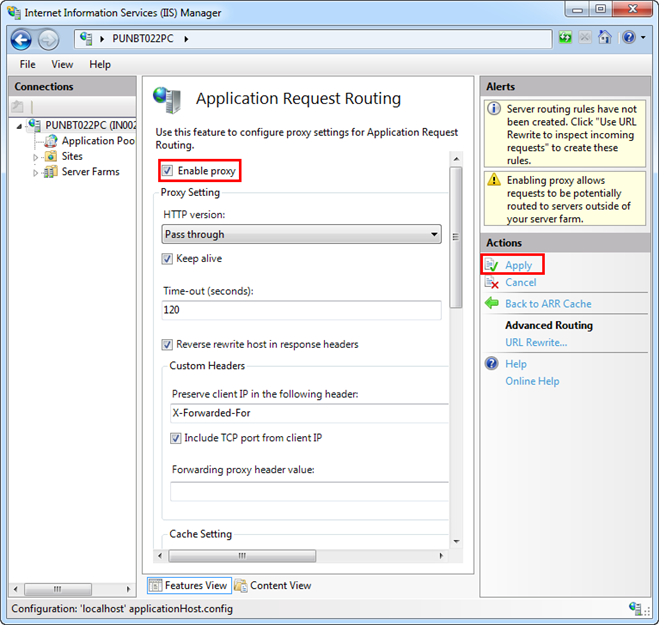
- Click Server Proxy Settings in the Actions pane.
- In the ARR page for proxy settings, select the Enable proxy check box.
- Click Apply in the Actions pane.
- The proxy settings that you have just entered are applied and saved.
- In the Connections pane of the IIS Manager window, select the root node (http://local host/) and click Restart in the Actions pane to restart IIS.
- Now, launch the SMC.
- Create website and web application linked to a project.
- Browse the website and web application URL and launch the Web/Windows App client.
For detailed information, see Microsoft help.
- Run Computer Management from the Start menu.
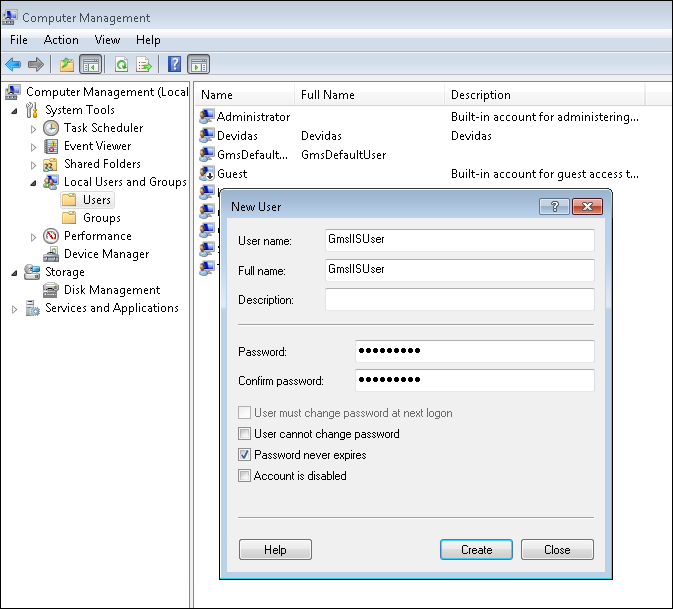
- From Local Users and Groups and in the context menu, select New User and do the following:
a. Enter a user name. For example, GmsIISUser.
b. Enter a full name.
c. Enter and confirm the password.
d. Select Password never expires if appropriate for the requested IT security.
e. Click Create.
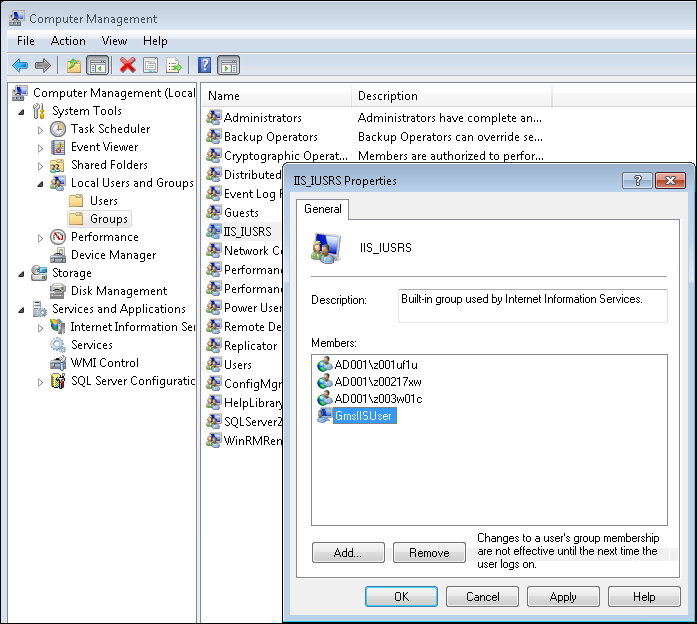
- Once the user account is visible in the Users folder, assign the GmsIISUser to the IIS_IUSRS group by performing the following steps:
a. From Groups folder, select IIS_IUSRS group and right-click to open a menu.
Click Add to Group to open the IIS_IUSRS Properties dialog box.
b. Click Add to open Select Users, Computers, Service Accounts, or Groups dialog box.
c. Enter the created IIS user name.
d. Click Check Names and check if the correct user was found.
e. Click OK and close the IIS_IUSRS Properties dialog box.
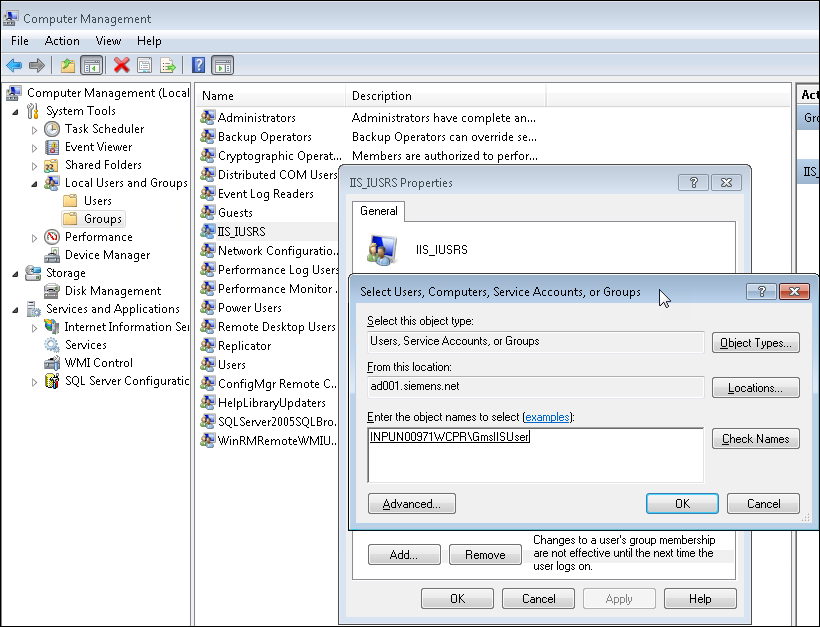
- Verify that the GmsIISUser is added to the IIS_IUSRS group.
When you install and configure IIS, a default website is created. It uses the default ports (HTTP and HTTPS).

Corruption of other Products
Do not delete the default website created by IIS if other products are installed on the same system where you have installed IIS.
This is because these products use the default website, such as VMS, and deleting the default IIS website may corrupt them.
You must create a new website on different port.
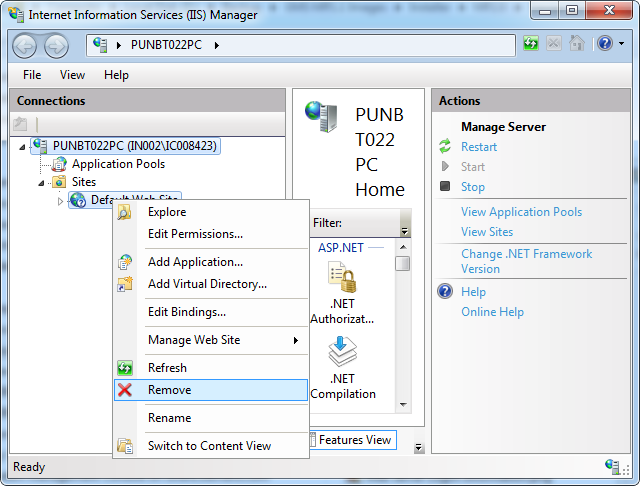
You cannot use the SMC to delete websites that are created by other applications. You must delete the third-party or default website using Microsoft Internet Information Services (IIS) Manager.
- To open IIS Manager, do one of the following:
- From the Windows Start menu, type inetmgr in the Search Programs and files field. Click ENTER.
- Select Control Panel > Administrative Tools > Internet Information Services (IIS) Manager.
- The IIS Manager window opens.
- Expand the Web Server computer node, and the Sites folder.
- Select the Default Website and right-click, and then select Remove.
- Click Yes.
- Close the IIS Manager window.
You need to upgrade a website when you upgrade a management station or an extension.
- The website status indicates
Outdated(in red).
- In the SMC tree, select Websites > [website].
- Click Upgrade
 .
.
- Click OK.
- A message displays.
- Click OK.
- The selected website is upgraded.
- At least one website is available under Websites and it is started.
- In the SMC tree, select Websites > [website].
- Click Stop
 .
.
- A confirmation message displays.
- Click OK to stop the started website.
- The selected website is stopped.
- At least one website is available under Websites and is
Stopped.
- No web application is available under the website that you are about to delete.
- In the SMC tree, select Websites > [website].
- Click Delete
 .
.
- Click OK.
NOTE: A third-party website (a website not created using the SMC) cannot be deleted using the SMC.
- If confirmed, the selected website is deleted from the Websites tree in the Console, from the disk location at the path specified when the website was created, and from IIS.
- You have created a website or modified the website parameters.
- Click Save
 .
.
- A message displays if any of the following is true:
- A website already exists.
- Http and https ports already exist and are in use. Other websites might be using them.
- The website user is not a member of IIS_IUSRS Group.
- The password does not match the selected user's password.
- Click OK.
- Click Edit
 to edit the website details.
- Click Save
 .
.
- The website is saved. On successful saving, the website URL displays with the specified port numbers for HTTPs in the format:
https://[Host name]:[HTTPS port number]/name].
- At least one site is available under Websites and it is stopped.
- In the SMC tree, select the Websites > [website].
- Click Start Website
 .
.
- The website starts.
Tips
- When you create a website, it is started by default.
- Multiple websites can be started, each website on a different port.
- After re-starting the Desigo CC server, all the websites started in the SMC remain in the
Startedstatus and all the stopped websites remain in theStoppedstatus. - If the website hosting a web application is stopped, the web application page does not display and an error message displays.
- You cannot start a website that has the same port numbers as that of the another website that is started.
