Setting up an Identified Flex Client
Scenario: You want to be able to logon and work with Desigo CC as a secure Identified Flex Client hosted on a remote computer, from a computer that identifies itself as the Desigo CC server.
Reference: For details about how these clients operate, see Types of Management Station.
Workflow diagram:
Prerequisites:
- Server Station
- Desigo CC server with web server (IIS) installed.
- A project is configured with Web Service Interface (WSI) extension and is started and activated.
- WSI application is created in SMC.
- A Flex Client extension is installed and is set up using SMC and the Flex Client URL is available for starting the Flex Client
https://[complete hostname]:[port]/[flex client app name] - Certificate Deployment on Server Station
- A root certificate (.cer + .pfx files), that identifies the source of certificates used for communication between Server and Identified Flex Client is acquired from CA or created using SMC and is available at a known location for importing into Windows certificate store.
- A host certificate (.cer + .pfx files) along with its private key, generated from the Server root certificate that you have acquired from CA or created using SMC is available at a known location for importing into Windows certificate store.
- The host certificate must be specific client certificate for the computer where you want to run the Identified Flex Client.
- The Identified Flex Client host certificate must be specific for each logged-in user on the Identified Flex Client computer who wants to run the Identified Flex Client. This user also must have the password for the private key of the Identified Flex Client Host certificate.
- Remote Flex Client Station as an Identified Flex Client
- On the computer where you want to run Identified Flex Client, you have installed the latest versions of Chrome, Firefox, and Safari. This is tested on Microsoft Windows, MacOS, iOS, and Android operating systems.
- When using Firefox web browser, disable the setting Use hardware acceleration when available for proper visualization of graphics.
- The same root certificate (.cer + .pfx files) and the host certificate (.pfx file along with its private key) generated from the root certificate are available at a known location.
- Even if the logged-on user on the Identified Flex Client computer is included in the Administrators group and the Administrator group has rights on the private key of the host certificate, explicitly you have assigned rights to the user of the host certificate’s private key.
- The logged-on user on the Identified Flex Client computer has Read rights on the host certificate.
Steps:
- On the Server station, from Windows, start the Microsoft Management Console (MMC) and set it to view and manage the Local Computer certificates (Certificates > Computer account) and Current User (Certificates > Current User). For instructions on how to do this, see:
https://msdn.microsoft.com/en-us/library/ms788967(v=vs.110).aspx
- In the Console Root window, select Certificates (Local Computer) > Trusted Root Certification Authorities folder.
- Right-click the Certificates folder and select All Tasks > Import.
- The Certificate Import Wizard starts.
- Click Next.
- In the File to Import dialog box, browse to your Certificates folder, select to display the Personal Information Exchange file type, and select the root certificate .cer file.
- Click Open.
- Click Next.
- The Trusted Root Certification Authorities store as location for the certificate is already selected.
- Click Finish to complete the operation.
- When the certificate import is successfully completed, the root certificate is stored in the Local Computer Trusted Root Certification Authorities Certificates store of the Desigo CC server.
- Repeat the steps 2 to 7 for to import the root certificate (.cer file) into the Certificates (Current User) > Trusted Root Certification Authorities.
- When the certificate import is successfully completed, the root certificate is stored in the Current User > Trusted Root Certification Authorities Certificates store of the Desigo CC server.
- In the Console Root window, select Certificates (Local Computer) > Personal folder.
- Right-click the Certificates folder and select All Tasks > Import.
- The Certificate Import Wizard starts.
- Click Next.
- In the File to Import dialog box, browse to your Certificates folder, select to display the Personal Information Exchange file type, and select the host certificate .cer file.
- Click Open.
- Click Next.
- The Personal store as location for the certificate is already selected.
- Click Finish to complete the operation.
- When the certificate import is successfully completed, the root certificate is stored in the Local Computer Personal Certificates store of the Desigo CC server.
- Repeat the steps 2 to 7 for to import the host certificate (.cer file) into the Certificates (Current User) > Personal.
NOTE: Only importing into Certificates (Current User) > Personal store will not be sufficient; however if you do so you must set Pmon user as the current logged-in user for the Server computer in the SMC > System snap-in.
- When the certificate import is successfully completed, the host certificate is stored in the Current User > Personal Certificates store of the Desigo CC server.
- On the identified Flex client station, from Windows, start the Microsoft Management Console (MMC) and set it to view and manage the Local Computer certificates (Certificates > Computer account) and Current User (Certificates > Current User). For instructions on how to do this, see:
https://msdn.microsoft.com/en-us/library/ms788967(v=vs.110).aspx
- In the Console Root window, select Certificates (Local Computer) > Trusted Root Certification Authorities folder.
- Right-click the Certificates folder and select All Tasks > Import.
- The Certificate Import Wizard starts.
- Click Next.
- In the File to Import dialog box, browse to your Certificates folder, select to display the Personal Information Exchange file type, and select the root certificate .cer file.
- Click Open.
- Click Next.
- The Trusted Root Certification Authorities store as location for the certificate is already selected.
- Click Finish to complete the operation.
- When the certificate import is successfully completed, the root certificate is stored in the Local Computer Trusted Root Certification Authorities Certificates store of the Desigo CC server.
- Repeat the steps 2 to 7 for to import the root certificate (.cer file) into the Certificates (Current User) > Trusted Root Certification Authorities.
- When the certificate import is successfully completed, the root certificate is stored in the Current User > Trusted Root Certification Authorities Certificates store of the Desigo CC server.
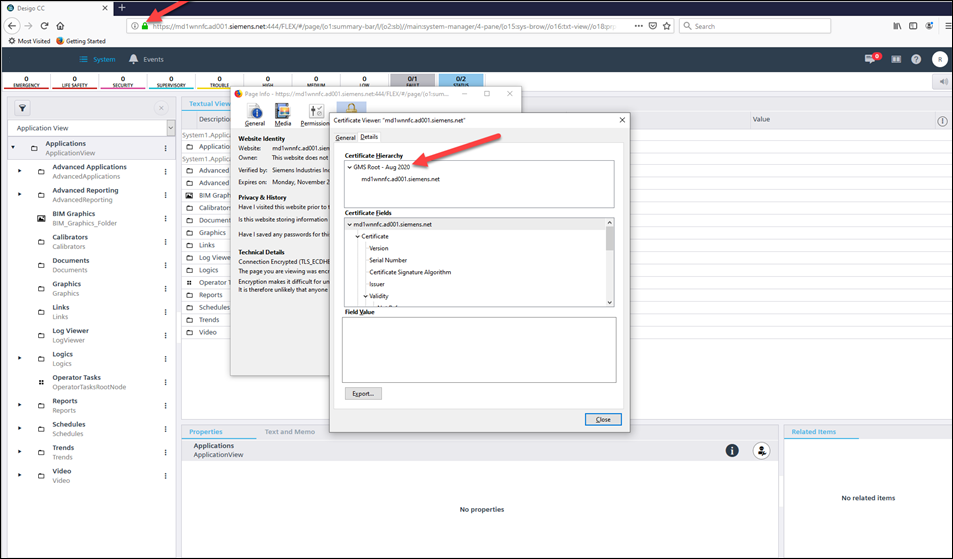
- Once the root certificate is imported into the remote Flex Client station, in order that the Firefox recognizes the issuer of the certificate for securing the communication, you must import the root certificate of the host certificate used for securing the website/web application in the Firefox certificate store. This is because the Mozilla Firefox browser maintains its own certificate store from which the certificate must be selected. IIS does the certificate chain validation to identify a Trusted CA. Without importing the Root certificate that chain validation fails.
For more information on how to import the certificate into the Firefox store, see Install Client Digital Certificate - Firefox for Windows. Settings for importing the certificate might be different based on the version of Mozilla Firefox browser you are running!
Once the host certificate is imported into the remote Flex Client station, in order to work with Mozilla Firefox browser, you need to follow the steps as described in the Install Client Digital Certificate - Firefox for Windows. This is because the Mozilla Firefox browser maintains its own certificate store from which the certificate must be selected. Settings for importing the certificate might be different based on the version of Mozilla Firefox browser you are running.
- In the Console Root window, select Certificates (Current User) > Personal folder.
NOTE: It is important to ensure that the certificate is imported into the (Current User) > Personal store of the Windows Certificate store, since the browser looks for the same store when working with Identified Flex Client.
- Right-click the Certificates folder and select All Tasks > Import.
- The Certificate Import Wizard starts.
- Click Next.
- In the File to Import dialog box, browse to your Certificates folder, browse and select the host certificate .pfx file.
- Click Open.
- Click Next.
- Type the password for the private key.
- Click Next.
- The Personal store as location for the certificate is already selected.
- Click Next.
- Click Finish to complete the operation.
- When the certificate import is successfully completed, the host certificate is stored in the Certificates (Current User) > Personal Certificates store of the Desigo CC server.
- System Manager is in Engineering mode.
- In System Browser, select Management View.
- Select Project > Management System > Clients.
- The Object Configurator tab displays.
- Click New
 and select New Station.
- In the New Object dialog box, enter a name and description and click OK.
- The new station object is added to System Browser.
- Select the System Management tab.
- Specify the Host name in one of the following ways:
- Manually enter the computer host name.
NOTE: Host name without domain suffix needed.
- Search for a computer on the network:
a. Click Browse.
b. In the Browse for computer network dialog box, select a host name from the network.
c. Click OK.
NOTE: Hostname without domain suffix needed.
- Click Current Station to obtain the host name of the current computer.
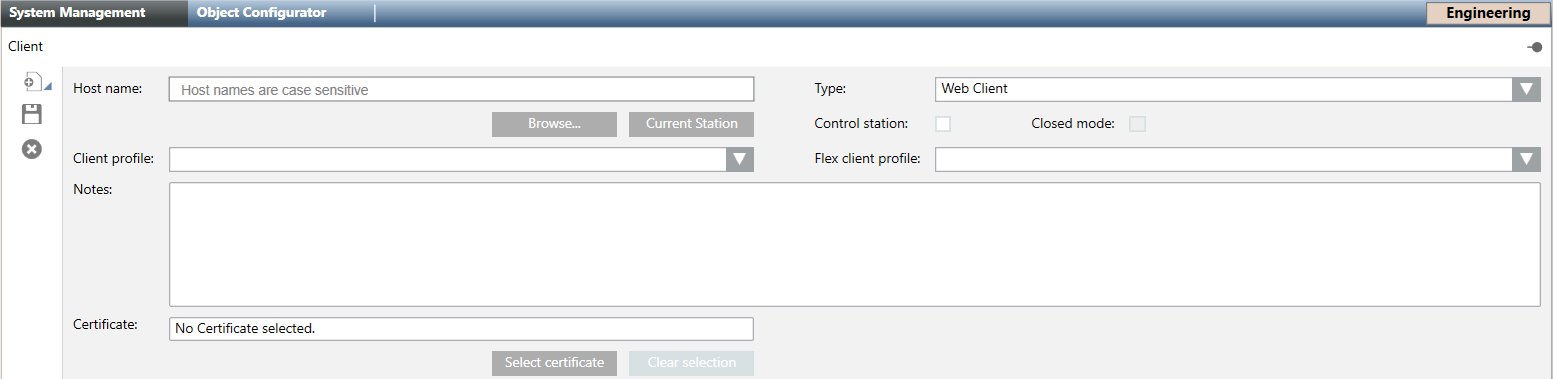
- From the Type drop-down list, select Web Client.
- If the web client is able to control fire panels, select the Control station check box.
- Specify the host certificate as follows:
a. Click Select Certificate.
b. In Select Certificate dialog box that shows the certificate store, locate and select the host certificate for the identified web client that was previously imported into the server station. Select the host certificate from the Certificates (Current User) > Personal Certificates store.
- The selected certificate appears in the Certificate field.
- Specify the Flex client profile as Default.
- (Optional) In the Notes field, enter any additional information.
- Click Save
 .
.
- In the Extended Operation tab, the Operational Status property indicates
Enabled. This means that logging onto Desigo CC from that Flex Client is allowed.
- Define the scope and application rights for this identified Flex Client as follows:
- Set up a station group for identified Flex Client web clients, if one does not already exist, and define appropriate scope and application rights for that group. Also, add the identified Flex Client you created here to that group. See New Station Group for Identified Web Clients.
Perform this procedure to start the Flex Client application.
- You checked the compatibility requirements. See Browsers Compatibility and Access.
- The Client certificate, a type of digital certificate that is used by Flex Client on the computer to make authenticated requests to a remote server, was previously installed on your computer or mobile device.
- Open the latest version of the browser on your computer or mobile device.
- In the address bar of the browser, enter the Flex Client application website address.
NOTE: If you do not have this information, contact your system administrator for assistance.
- The Flex Client application page opens in the browser.
- In the login fields, enter your username and password.
- Click Login.
- The Select a Certificate dialog box displays.
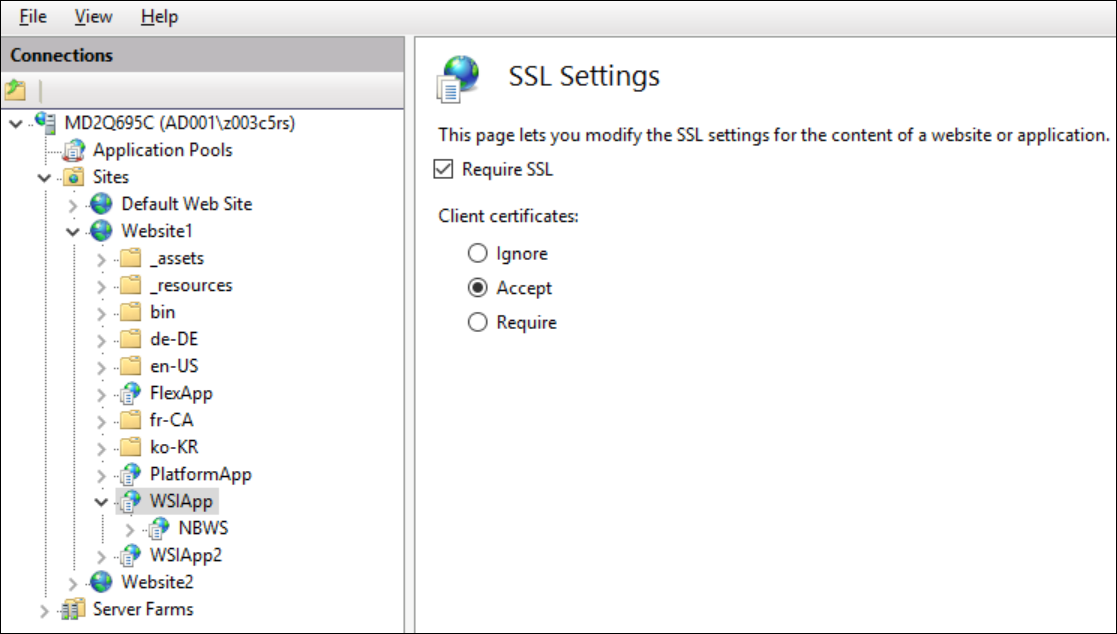
NOTE: This dialog box displays due to the required mutual client authentication between IIS and browser on the remote Identified Flex Client computer. When these settings for IIS (website and web application) are set to Accept, then this Select a Certificate dialog box displays.
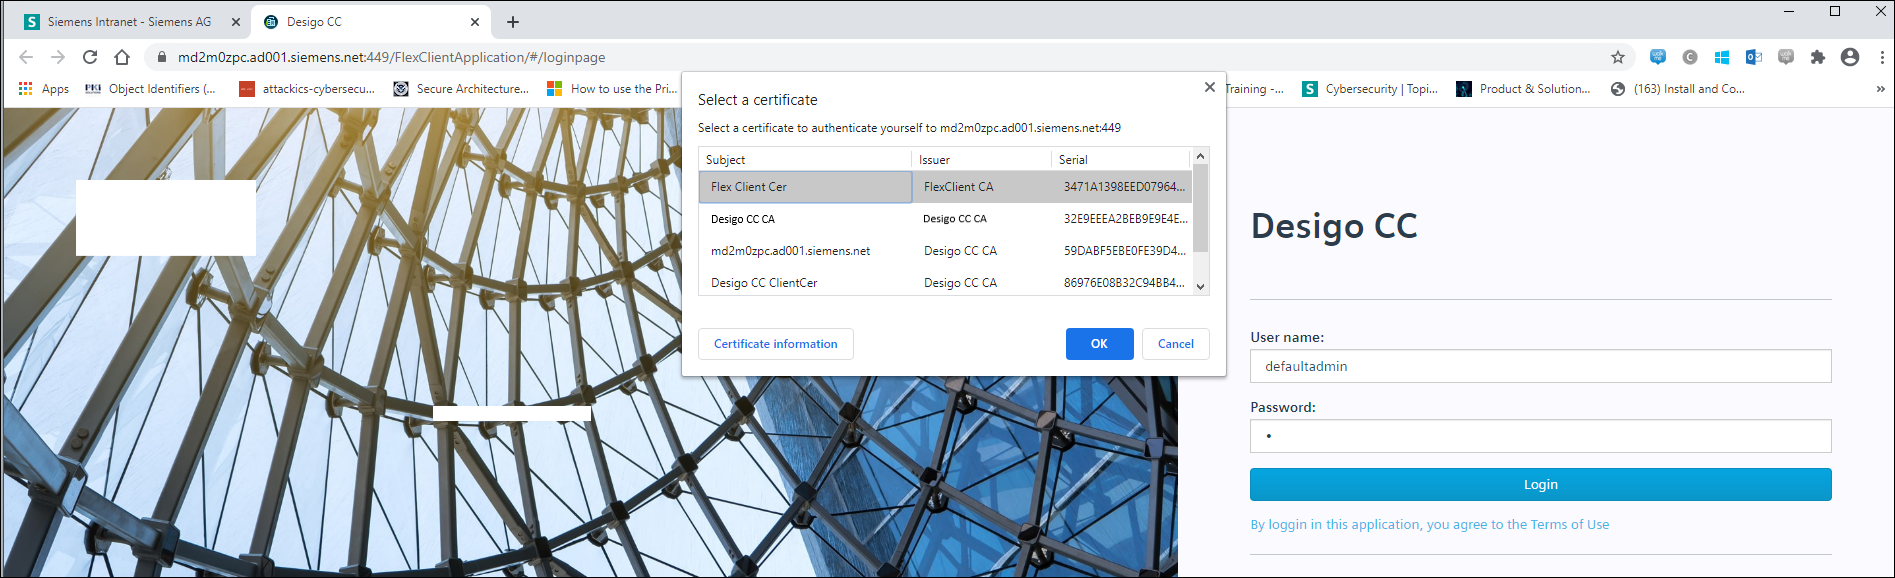
- Select the Identified Flex Client certificate and click OK.
- If you click Cancel: If you have Anonymous Flex Client configured (a station with Default Web Client assigned) you can work with the configured Anonymous Flex client.
- If there is no Anonymous Flex client configured and available, the client identification is skipped and you can proceed with logon procedure into the Flex client.
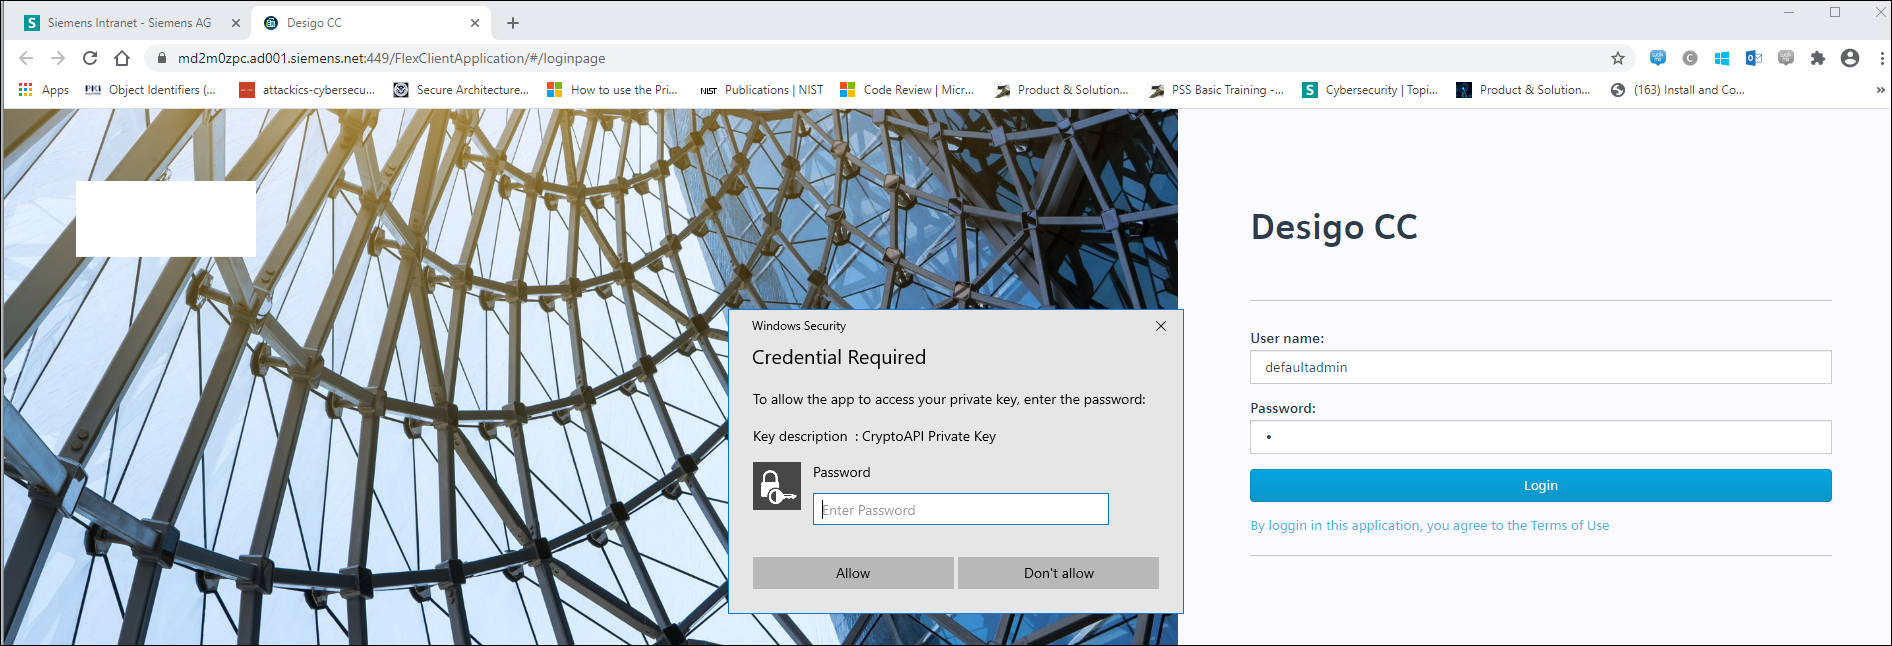
- A dialog box displays. Enter the Password for the Flex client host certificate.
This is the same password that you have provided when importing the host certificate using MMC.
NOTE: If you enter a wrong password for the certificate, an error displays and you need to re-enter the correct password.
If you do not know the correct password, you can click Don’t allow and work with the Anonymous Flex Client.
- Click Allow.
- You can now to login into the Identified Flex Client and work with it.
The following table demonstrates behaviors of SSL settings (Require SSL and combination of Client Certificate settings) for Chrome. This is mainly for TLS/SSL settings of WSI app and not for Client Identification.
SSL Settings | No Certificates with Private Key Installed on PC | One or more Certificates with Private Key Installed on PC | Deployment Scenario |
Require SSL- Not Selected | No pop up displays and no client identification necessary as the host is same as server. | No pop up displays and can be ignored as no client identification necessary as the host is same as server. | Standalone Server |
Require SSL + Ignore Client Certificate | No certificate popup will display and no client identification possible. WSI communication will remain secure. | No certificate popup will display and no client identification possible. WSI communication will remain secure. | Server and a Remote Web Server (IIS) |
Require SSL + Accept Client Certificate | No certificate popup displays and no client identification possible. WSI communication will remain secure. | Certificate pop-up displays with all certificates installed and having the private key. In this case certificate should be selected and a private key is necessary for Client Identification otherwise client will be treated as anonymous. WSI communication will remain secure. | Server and a Remote Web Server (IIS) |
Require SSL + Require Client Certificate | No certificate popup displays and no client identification possible. WSI communication will remain secure. | Certificate pop-up displays with all certificates installed and having the private key. In this case, a certificate should be selected and a private key is necessary for Client Identification. Working with anonymous client is not possible. Here if no certificate selected, you cannot logon. WSI communication will be secure in case of successful logon to the system. | Server and a Remote Web Server (IIS) |
The following table lists the supported browsers for Identified Flex Client on the specified operating systems.
Operating System | Browser | Certificate Selection Popup | Password for the Certificate Popup | Client Identification | Remarks |
Windows 10 | Chrome | Yes | Yes | Yes |
|
Firefox | Yes | No | Yes | Need to install client certificate explicitly in the Firefox browser | |
Edge | Yes | Yes | Yes |
|
Operating System | Browser | Certificate Selection popup | Password for the certificate popup | Client Identification | Remarks |
Android 10 | Chrome | Yes | No | Yes | Need to install client certificate on Android device first |
Firefox | No | No | No | Authentication will be successful, but only anonymous client will work | |
Edge | Yes | No | Yes | Need to install client certificate on Android device first |
Operating System | Browser | Certificate Selection popup | Password for the certificate popup | Client Identification | Remarks |
MacBook Pro | Safari | Yes | No | Yes | Need to provide the user credentials (fingerprints) of the Apple logged in user |
Chrome | Yes | No | Yes | Need to provide the user credentials (fingerprints) of the Apple logged in user | |
Firefox | No | No | No | Need to provide the user credentials (fingerprints) of the Apple logged in user | |
Edge | Yes | No | Yes | Need to provide the user credentials (fingerprints) of the Apple logged in user |
Operating System | Browser | Certificate Selection popup | Password for the certificate popup | Client Identification | Remarks |
IOS | Safari | Yes | No | Yes | Need to install certificates on IOS and enable trust for Root. Certificate selection popup is asked first time after deleting browser history every time. |
Chrome | No | No | No | Authentication will be successful, but only anonymous client will work | |
Firefox | No | No | No | Authentication will be successful, but only anonymous client will work | |
Edge | No | No | No | Authentication will be successful, but only anonymous client will work |