Additional BACnet Server Procedures
Complete the following procedures as needed:
Prerequisites:
- System Manager is in Engineering mode.
- System Browser is in Management View.
Delete a Device
- The device is stopped.
- Select Project > Management System > Servers > Main Server > BACnet Server > [name of device].
- In the BACnet Server tab, click
 .
.
- Click Yes.
- The device is removed from the BACnet Server list of devices in System Browser.
Stop a Device
- Select Project > Management System > Servers > Main Server > BACnet Server > [name of device].
- In the BACnet Server tab, click
 .
.
- The Status property changes to
Stopped, and the Status Bar displaysCommand Success.
Start a Device
- Select Project > Management System > Servers > Main Server > BACnet Server > [name of device].
- In the BACnet Server tab, click
 .
.
- The Status property changes to
Running, and the Status Bar displaysCommand Success.
Restart a Device
- The device is started.
- Select Project > Management System > Servers > Main Server > BACnet Server > [name of device].
- In the BACnet Server tab, click
 .
.
- The Status property briefly changes from
StoppedtoRunning, and the Status Bar displaysCommand Success.
NOTE: If you made changes to the device prior to restarting, it will take some time for the change to take effect. For small configurations, the changes might take only a few seconds. For large configurations, the changes might take a couple of minutes.
Create a Notification Class and Recipients
- Select Project > Management System > Servers > Main Server > BACnet Server > [device].
- Click the BACnet Server tab.
- Expand the Notification Classes section.
- Click Add, and the select the newly added row.
- The Notification Properties section expands and displays default settings.
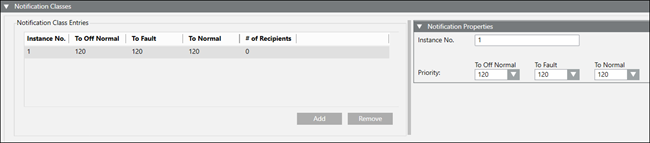
- (Optional) Modify the Instance No. and Priority for the various alarm states.
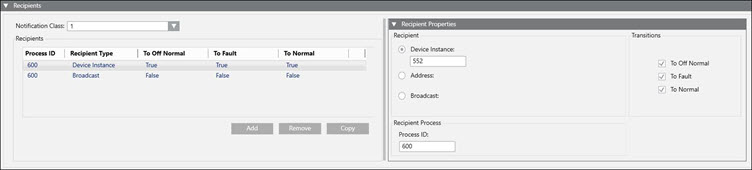
- Expand the Recipients section.
- Click Add, and then select the newly added row.
- The Recipient Properties section expands and displays default settings.

- Accept the defaults, or modify the settings as needed.
- Repeat Steps 7–8 to add more recipients to this Notification Class.
- Click Save
 .
.
Remove or Copy a Recipient
- Select Project > Management System > Servers > Main Server > BACnet Server > [device].
- Click the BACnet Server tab.
- Expand the Recipients section.
- Select the recipient you want to remove or copy.
- Do one of the following:
- To remove a recipient click Remove, and then select the desired option from the drop-down list.
- To copy a recipient click Copy, and then select the desired option from the drop-down list.
NOTE: There are scenarios in which the copied recipient will overwrite an existing recipient in another notification class. This applies to each of the recipient types—Device Instance, Address, and Broadcast. For example, you copy Device Instance 552 (which has To Fault selected) to another notification class with a recipient that also has Device Instance 552 in it (with To Off Normal, To Fault, and To Normal transitions selected). The result is that the copied recipient overwrites the existing recipient data. In other words, the To Off Normal and To Normal transitions will no longer be selected, and you will need to manually select those transitions if you still want them.
- Click Save .
- Repeat Steps 5 and 6 to remove or copy more recipients.
Add a Trend Log
- You have verified that there is trend data in the HDB for the object you want to export. BACnet Server needs this information to find the point that the trend log is mapped to. This applies to all offline trend definitions.o
- Select Project > Management System > Servers > Main Server > BACnet Server > [device].
- Click the BACnet Server tab and expand the Trend Logs section.
- In System Browser, select Manual navigation, and then navigate to the location of the Trend Logs you want to add.
- Drag the desired trend objects to the Trend Logs section.
NOTE: The monitored object must also be in the same device. If it is not, BACnet Server will add it.
- Click Save .
- The trend objects are now ready to be configured.
(Optional) Configure Library Mapping
- You want to make a template that automatically maps Desigo CC object models to BACnet object models.
- Select Project > System Settings > Libraries > L1 Headquarter > Global > BACnet Server.
- From the Library Configurator tab, click Add new object
 , and then select New BACnet Server Mapping.
- NOTE: If you are not an HQ Librarian, you must customize the library to the project level and add the New BACnet Server Mapping library block before continuing.
- In System Browser, select Manual navigation.
- Select Project > System Settings > Libraries > L1 Headquarter > BA > Device > [device name].
- Expand Object Models.
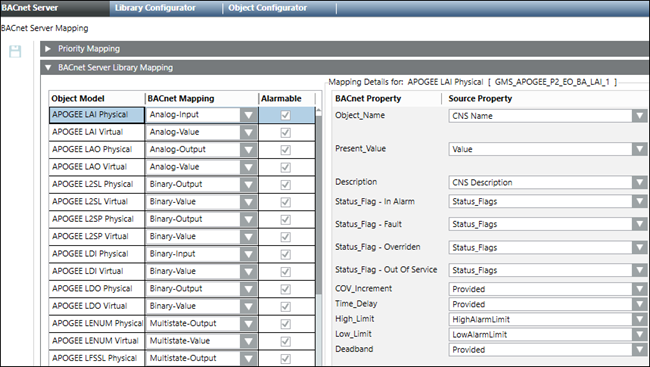
- Drag the object model(s) to the BACnet Server Library Mapping section.
- Do the following as needed:
- For each source object, select a corresponding object from the BACnet Mapping list.
- Select or clear the Alarmable check box.
NOTE: Selecting the Alarmable check box displays all available source properties. Clearing the check box displays only non-alarmable source properties.
- For each BACnet Property, select a corresponding property from the Source Property lists.
- Click Save .
(Optional) Create Library Mapping for a Subsystem
- You want to create and deliver a mapping template for several object models belonging to a subsystem.
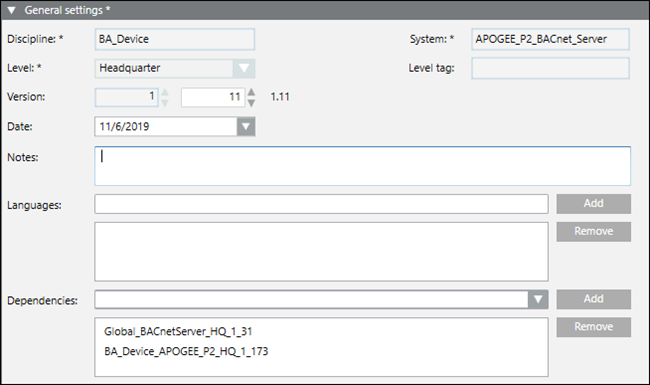
- Create a library and set the dependencies to your subsystem library and BACnet Server. The following image shows an example for the APOGEE subsystem:
- Add a BACnet server mapping section to the library.

- From the object models folder of the subsystem library, drag and drop object models you want to use with the BACnet server. Map the properties of the BACnet objects to the properties of your source objects. The following image shows an example of mapping to the APOGEE subsystem. You can provide specific values, or you can mark properties as not applicable if your subsystem does not have an equivalent property.
- Once you complete the mapping, you can export the template as a .gms file and do one or both of the following:
- Import the file into other projects.
- Provide the file to an Application Center Librarian for bundling into an extension module.
(Optional) Customize the Library Mapping Template
- You would like to customize the Library Mapping Template so that you can add object models and properties.
- Select Project > System Settings > Libraries > L1 Headquarter > Global > [library name].
- From the Library Configurator tab, click Add new object , and then select New BACnet Server Mapping.
NOTE: If you are not an HQ Librarian, you must customize the library to the project level and add the New BACnet Server Mapping library block before continuing.
- Click Save.
- The Library Mapping Template is cloned under the allowed customization level and can now be modified.