Overview of Text Localization
Desigo CC is distributed with English-US texts. The activity required to translate the English-US texts is called localization.
Desigo CC localization process includes:
- Export of texts to localize
- Translation of system views texts
- Translation of system libraries texts (including text groups, name of the property in the object models, and name of the property in the function models)
- Import of localized texts

You can do localization activities only from the Desigo CC server station.
Desigo CC exports and imports texts in XML file format.
XML files are suitable for the localization tool (for example, Catalyst). Once texts are translated into another language, you import the related XML files back into Desigo CC.
You can selectively export texts of system views and libraries only in the language of the current user (for example, en-US by default). For instructions see Exporting Texts to Localize.
The export process generates the following:
- A single views XML file (for example, Views (en-US).xml) containing both the standard and user views selected for the export.
- Multiple libraries XML files, one for each Library to export (for example, BA_Device_APOGEE_HQ_1.xml or Fire_Detection_HQ_1.xml).
Localization Export Workspace
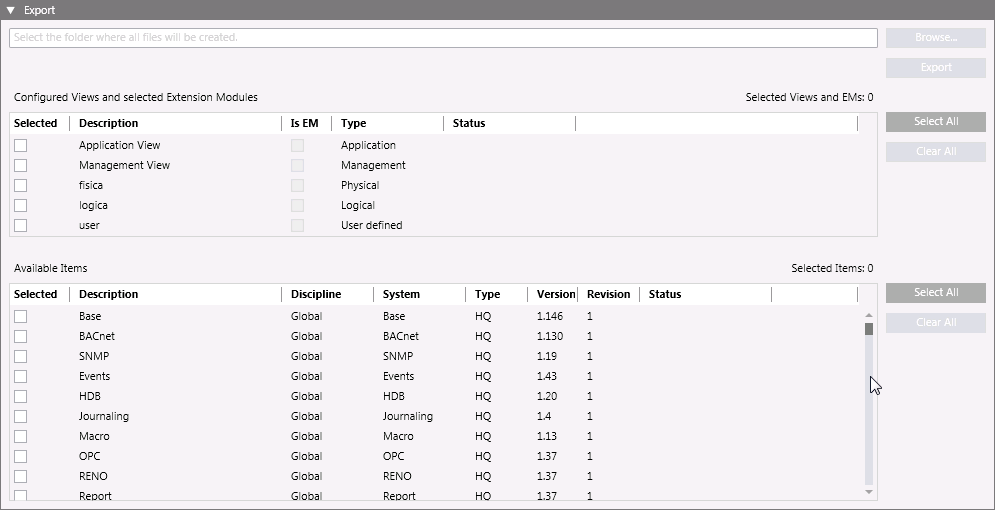
In Engineering mode, when you select the main Project node, the Localization tab provides an Export expander where you can select the texts data to export for translation into a different language.

When the export is complete, the Export dialog box displays a summary of the export results.
Items in the expander:
Configured Views and selected Extension Modules
Select the check box alongside each view whose texts you want to export.
Available Items
Select the check box alongside each item whose texts you want to export.
Browse
Select the folder where you want to save the exported XML files. This button becomes available when you selected at least one item in the list.
Select All and Clear All
Select or deselect all the items in the list.
Export
Export the selected items into one or multiple XML files. This button becomes available only when you select at least one item and the target path for the files to export. When the export is in progress, this button is replaced by Cancel to allow you to abort the operation at any time.
Status
Indicates the progress or outcome of exporting an item (Not processed, Started, percentage of operation, Completed, Failed, or Cancelled).
The process status information also displays in the status bar.
XML files to be translated must be included into the localization project.
- Translators must modify the Culture attribute in the root node of the files to indicate the target language for the localization. This attribute will be used during the import to select the language to overwrite. For example, assuming a translation into Canadian French, en-US must be modified to fr-CA.
- Translators must localize each Text attribute in the file that represents the text translated with the localization tool.
You can import localized texts for system views and libraries from the translated XML files. Views texts are included in a single XML file, while libraries texts are included in separate files (one per library). For instructions, see Importing Localized Texts.
You may optionally modify file names before importing; the language is identified by the Culture attribute in the XML file’s contents.
Import of translated texts populates the system views and/or libraries according to the new language, which will be available for users associated to it.
Localization Import Workspace
In Engineering mode, when you select the main Project node, the Localization tab provides an Import expander where you can select translated XML files to import into the system.

When the import is complete, the Import dialog box displays a summary of the import information.
You can also view the import log file which contains details of the import operation. The filename is TextImportLogFile_xxx_y.txt, where xxx represents the date and y a number, if more than one file has been created in the same day. This file is saved in the Windows temp folder for the current user.
Items in the expander:
Views and EMs
Lists all the system views and extension modules contained in the selected system views XML file.
Libraries
Lists all the system library files selected for the import.
Browse
Opens the Select the files to import dialog box, where you can select the View and EMs and Libraries XML files to import.
Import
Starts the import of the localized texts related to the selected files.
Status
Indicates the progress or outcome of importing an item (Not processed, Started, percentage of operation, Completed, Failed, or Cancelled).
While the import is progress, files are imported in the order in which they were selected. The process status information also displays in the status bar.
