New Station Group for Identified Web Clients
Scenario: You want to create a new station group for identified web clients.
Reference: For general information on user administration, see User and User Group Administration.
Workflow diagram:
Prerequisites:
Steps:
- System Manager is in Engineering mode.
- In System Browser, select Management View.
- Select Project > System Settings > Security.
- Click the Security tab.
- Click New
 .
.
- In the New Group dialog box:
a. In the Group type field, select Management Station.
b. Enter a group name. The name must be unique.
c. Click OK.
- In the Group Configuration expander, enter a description for the new management station user group in the Group information field.
- Select the Configured Management Stations expander, and then select a client and assign it to the Management Station Members.
- Open the Scope Rights expander.
- Define the scope rights as:

You will no longer be able to work on the assigned management station if you have not previously assigned scope rights and application rights to the management station group. A restore of a project backup is required in this case!
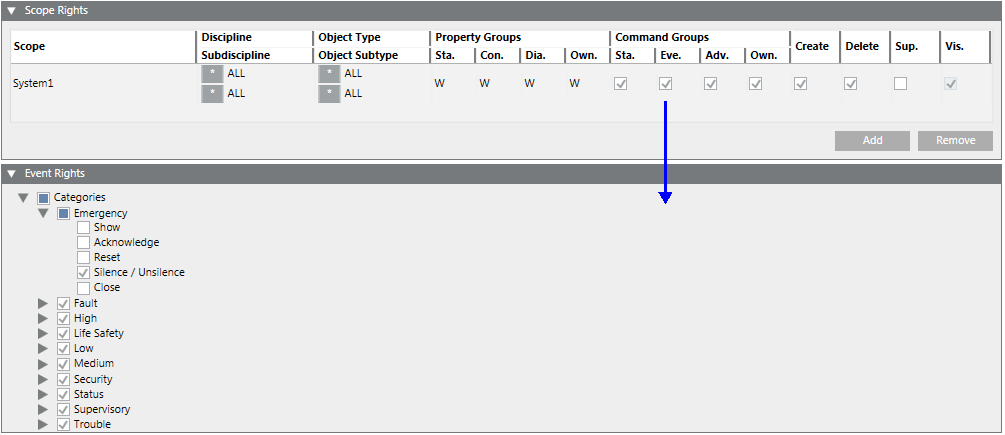
- In the Scope Rights expander, the Event check box in the Command Groups section must be enabled to activate the event rights.
- In the Security tab, select the appropriate user group.
- Open the Event Rights expander.
- Click the Splitter button
 to hide the Operation/Related Items pane.
- Select the Categories check box for the corresponding alarm category, for example Emergency, to be enabled for this user group:
- Show
- Acknowledge
- Reset
- Silence / Unsilence
- Close

- Select or clear the required functions. By default, all check boxes are checked when you create a new project or upgrade a 3.x project.
- Repeat steps 4 and 5 for each alarm category.

NOTE:
When you change the event rights for a user group, the changes take effect immediately, even if those users are currently logged on and using the system.
Display States
Check box key:
 The subordinate folders have active and inactive states.
- State
 active (True)
 - State
 inactive (False)
- Open the Application Rights expander.
- Select the check box for the corresponding applications to be enabled for this user group.
- Select or clear the required functions.
NOTE: See the table in Application Rights.
- Repeat step 2 for all applications.
- Click Save
 .
.
- A new management station group is created.

NOTE:
When you change the application rights for a user group, the changes take effect immediately, even if those users are currently logged on and using the system.
