Project Creation Settings
In SMC, on Server, Client/FEP you can create a new project using the toolbar in the Management tab.
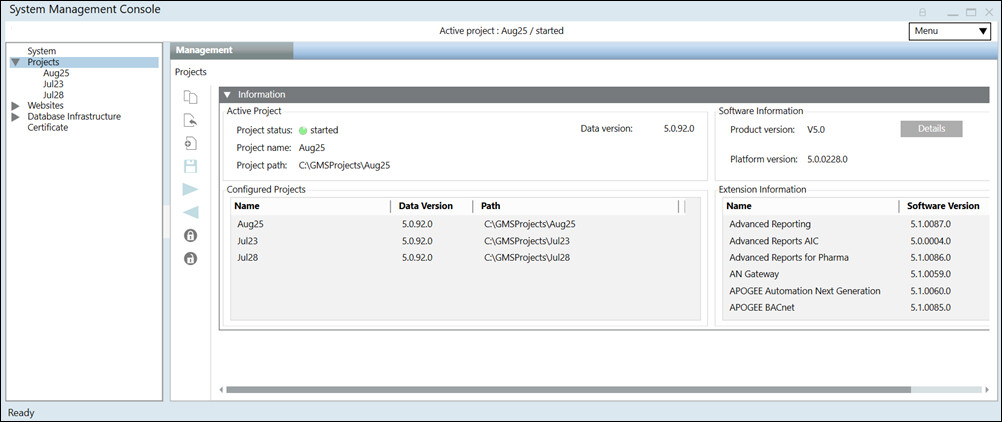
In SMC, when you select Projects in the SMC tree, it provides you with a quick summary of the currently active project in the Information expander. This includes the following:
- Active Project: Displays information about the active project, including the following:
- Project Status:
started, stopped, stopped - last repair failed(in red), stopped - repair on next start,and so on, along with the project status indicator. - Project name: Name of the active project.
- Project path: Location of the project on the disk.
- (Only on Server installation) Data Version: Project data version.
- Configured Projects: Displays the list of configured projects and their details, including the following:
- Name of the available project.
- (Only on Server installation) Data version of the project: Version of the project data as mentioned in the config file located at
[Installation drive:]\[Installation folder]\[project name]\config. - Path: Location of the available projects on the disk.
- Software Information: Displays information about the system including platform build version, product version and details of extensions that are installed. Additionally, it also displays information on any quality updates (QU) and patches.
- If platform build is installed with SR, it displays the Product version, the platform build version in Platform version.
- If QU build is installed, QU version displays in the Product version field; otherwise it is not displayed.
- Product version: Displays the installed version of Desigo CC and the version of the patch (if installed). For example, if quality update 1 (QU1) is installed on top of V5.0, the Product version displays as V5.0 QU1. In addition to SMC, the QU version also displays in the About page of the Installed Client, Web/Windows App Client, and Flex Client.
Click Details to display information about the system including platform build version, product version and details of extensions fetched from the file Software Information.txt located at
[Installation drive:]\[Installation folder]\GMSMainProject. - Platform version: Displays the version of the Desigo CC platform. For server installations, this information comes from the BuildInformation.ini file located at [Installation drive:]\[Installation folder]\GMSMainProject.
- Extension Information: Displays the list of installed extension and their versions. This information comes from the ExtensionModuleDependency.xml file located at [Installation drive:]\[Installation folder]\GMSMainProject\_Extensions.
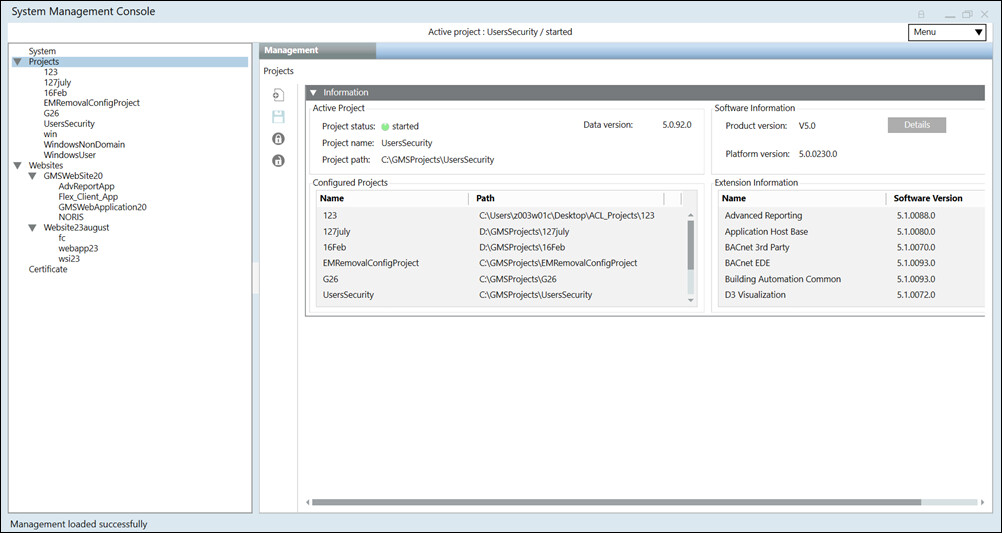
Depending on the installation type (Server, Client or FEP), the Management toolbar icons vary as indicated in the following table.
Management Toolbar | ||
Icon | Name | Allows you to… |
| Create a project from the template available at | |
| Restore a backed-up version (1.1, 2.0 and 2.1) of a project. | |
| Create Project | Create a new project on Server or Client or FEP. |
| Save the project configuration. | |
| Next | Navigate to the next page. This icon is available only when you have installed at least one EM and you have some configuration steps specific to that EM. |
| Back | Navigate to the previous page. This icon is available only when you have installed at least one EM and you are on the next page. |
| Create a compressed project backup zip file, encrypted with a password at a specified folder. | |
| Decompress and decrypt a compressed encrypted project backup zip file at a specified location. | |
Server Project Creation Settings
You can create a project in SMC on the server using the following:
When you click Create Project  , the Select Project Extensions dialog box allows you to select and include the extensions out of the installed extensions on your system.
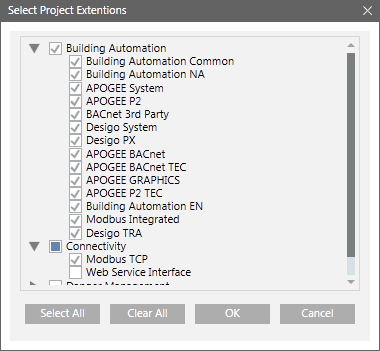
Select All: Selects all the extensions available under all the listed suites.
Clear All: Clears all previous selections.
OK: Closes the dialog box and proceeds with the project creation.
It is recommended to include only required extensions in the project by expanding the extension suite and then selecting the required extensions for adding them in the project that you are about to create.
Mandatory extensions and the extensions on which the mandatory extension depends, both are not available for addition/removal in the Select Project Extensions dialog box. Such extensions are always included to the project during creation or upgrade.
The Server Project Information expander allows you to configure the general details of the project that you are about to create.


NOTE 1:
In the entry fields of the management platform, you must not use any characters other than A through Z, numbers 0 through 9, and a hyphen (-).
NOTE 2:
If the installation path (shown in the Project path field) includes certain illegal character sequences this will not be detected by the Installer. However you will not be able to launch the System Management Console. Similarly, if you include illegal characters in the Project Name field while creating a project in the SMC, you cannot create the project.
Item | Description |
Project name | Allows you to assign a name to the project. |
Project path | Displays the default project path [installation drive:]\[installation folder]. You can change this path by clicking Browse. |
Languages | (Optional) Make sure that you have selected the desired languages in addition to the default (en-US). To save space, only install the languages that will be used at your site. Once a project is created, only the librarian can change the language settings. |
Default: Allows you to set the project language as the default language that the Server components will use to produce language-dependent contents. For example, in Journaling, the Date/Time fields are printed in this project language. By default, the project language en-US is set as default. You may edit this language after project creation by clicking Edit from the Project Settings tab. | |
Linked HDB | Allows you to link a history database to the project for keeping a log of the project’s data. By default, the database selected, if any, for the currently configured project. If the selected database is no longer available (deleted), the Linked HDB drop-down list displays Unknown (in red). |
System name | Allows you to add the name of the system associated with the project. The default system name is System1. For example, in the following path—WillisTower.Bldg.Zone.RoomTemp—WillisTower represents the system name. |
System ID (1 through 2048) | Allows you to assign a unique identifying (ID) number to the system. Valid values are 1 through 2048. Accept the default ID of 1, unless you are installing multiple servers on the same site. In this case, give each server a unique number. |
Port Information | Pmon port is on the server, client and FEP and is used to communicate with the project's Process Monitor. The SMC communicates with projects through the Pmon port for various functionalities including monitoring project status ( |
Data port is on the server and is used to communicate with the data manager of a project. For example, the Data port is used for communication between the data manager and other managers of the same project. | |
Event port is on server and is used to communicate with the Event manager of a project. For example, the Event port is used to communicate between Event manager and other managers of the same project. | |
HDB Reader port is on the Desigo CC server and is used to communicate with the HDB Reader manager of a project. | |
Dist Port is on the server and is used to set up distribution between two systems (projects). | |
CCom port is used by the CCom manager of the project to communicate with IIS. This allows you to work with web/Windows App clients. |
Technical Tips For Configuring Ports
- The default port values are the same as those in the config file in the installation path
[installation drive:]\[installation folder]\GMSMainProject\_DefaultProject\config. - No two started projects can have the same port numbers. Also, you cannot start a project that has the same data and event port numbers as the currently active project.
- The SMC allows you to configure the ports during project creation, editing, and upgrade and during web site configuration. If you try to configure a port that is already being used by another project, the SMC detects it and prompts you to edit the port number. You must edit the port numbers within the specified range for that port.
- You can edit the port values using Edit
 only when the project is stopped.
The following table shows the meaning of the color codes used during port configuration. Note that the port color codes apply to the project as well as to the web site ports on the server, including the web site ports on the remote web server.
Note that the color coding only appears for projects on a Server. Projects configured on a Client/FEP station do not display color coding.
Color for a Port | Meaning | Example |
Black | Port bound to the local machine (not network visible). No need to open this port in the Windows firewall. | The Pmon port is bound to the local host. Therefore, it always displays in black. |
Grey | Port not in use. No need to open this port in the Windows firewall. | The CCom port displays in grey when the Web Server Communication is disabled. |
Blue | Port is in use and secured. The port must be opened in Windows firewall. | The Proxy port displays in blue, if the server/client communication is secured. |
Red | Port is in use but local. It can be opened in the Windows firewall. | The CCom port displays in red if the Web Server Communication is Local. |
The User Credentials expander allows you to configure the DefaultAdmin and the Root user password fields (administrative purposes).

Item | Description |
Default Admin as Desigo CC user | (Default selection) Enter the name for the Desigo CC user to change the default value DefaultAdmin. |
Default Admin as Windows user | Select the radio button Windows user to set the Default Admin as the Windows user. Browse for the Default Admin Windows user from Current station or from Other Domain. It could be the windows local user or a domain user. |
Password | Enter the DefaultAdmin’s password for the Desigo CC user. |
Confirm password | Re-enter the DefaultAdmin password for the Desigo CC user to confirm it. |
Root user password | Enter the Root user password. |
Confirm password | Re-enter the Root user password to confirm it. |
The Web Server Communication group in the Communication Security expander allows you to configure secure web communication between Server project and IIS (typically remote web server) that takes place over the CCom port. The communication is secured using host certificate.
For securing the communication between Server and the local web server, you can set the web server communication as Local which indicates that the communication is without certificates.
You can configure the web server communication during project creation and modification on Server, Client/FEP installations.

NOTE:
With Version 5.0, the Unsecured communication type is replaced with Local. It is recommended to configure the communication of all remote web applications to Secured as Unsecured communication will not work.

Communication Security Expander | |
Item | Description |
Communication | Allows you to secure the communication between the Server and web server (IIS) by configuring the CCom port and the host certificate. The web server (IIS) may be installed on the same computer as the Server (as a local web server) or it may be installed on a separate computer (acting as a remote web server). |
CCom port | (Available only on Server SMC) Default port number is 8000 and the support range is 1 through 65535. The CCom port is used by the CCom manager of a project to communicate with web server (IIS), which is required for working with Web client or Windows App client. |
Host certificate | This field is enabled only when you select secured from the Web communication drop-down list. By default, it displays the host certificate that you have set as default. However, you can browse and select another host or self-signed certificate using the Select Certificate dialog box. |
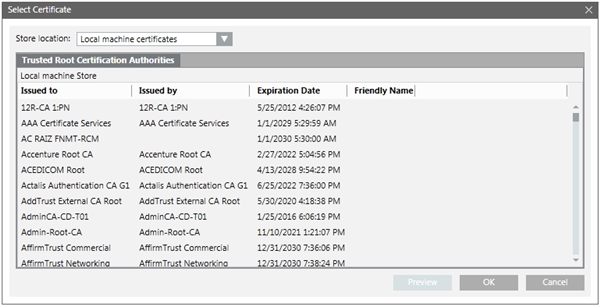
Select Certificate Dialog Box
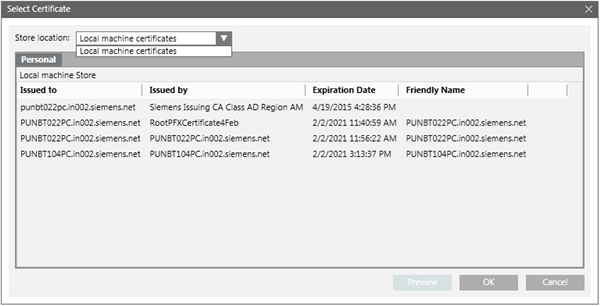
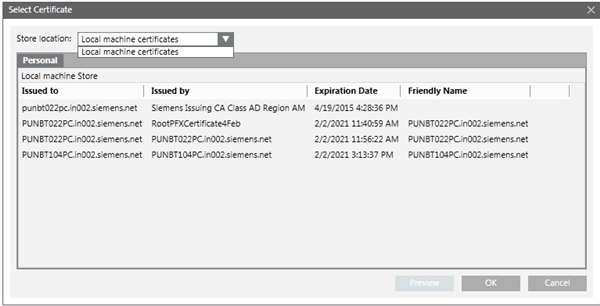
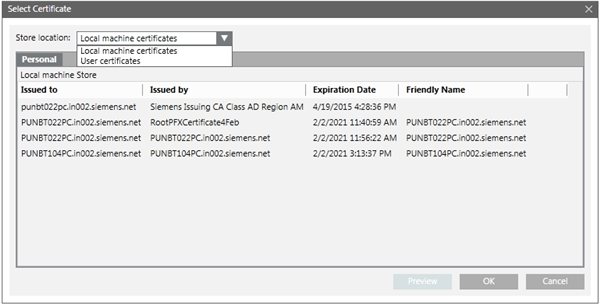
The Select Certificate dialog box lists all available certificates for the selected store. It allows you to select a certificate that you have previously imported into the Windows Certificate store.
You can also select the store location from the available stores. It lists all the certificates available in the selected store. You can preview the certificate details by clicking Preview.
The Select Certificate dialog box consists of the following elements.
Select Certificate Dialog Box | |
Name | Description |
Store Location | Allows you to select a certificate store from the list of available certificate stores. |
Personal Tab/Trusted Certification Root Authorities Tab | Displays the logical stores. If no certificate is available for a specific logical store, the tab is not displayed. Allows you to select a certificate from the list of available certificates. |
Issued to | Displays the Issued to value for all listed certificates. |
Issued by | Displays the Issued by value for all listed certificates. |
Expiration Date | Displays the expiration date for all the listed certificates. Make sure that the certificate you select is not expired. |
Friendly Name | Displays the friendly name for all the listed certificates. |
OK | Closes the dialog box. If a certificate was selected, it is added to the Host certificate field of the Communication Security expander of the Project Settings tab. |
Cancel | Closes the dialog box. |
Preview | Clicking this button displays the details of the selected certificate, such as the private key for a host certificate, or the root of a host certificate. |
Tips for Selecting a Certificate for Web Server Communication (CCom port)
- To secure the Web server communication you can only use a host certificate or a self-signed certificate available in the Personal store of the Local machine certificates store of the Windows Certificate store.
- The default certificate used for securing the Web server communication is the host certificate, which is set as default certificate. However, you can modify this to select another host/self-signed certificate available in the in the Personal store of the Local machine certificates store of the Windows Certificate store.
- The certificate (host/self-signed) must have a private key and be marked as exportable. The host certificate (along with its private key, which is marked as exportable) or the self-signed certificate must be imported in the Personal store of the Local machine certificates store of the Windows Certificate store and set as default.
- This certificate will be used to secure the communication between the local/remote web server (IIS) and the CCom port on the Desigo CC server.
- The certificate used for securing a Web communication must be issued to the full computer name of the Desigo CC server, short name or an IPv4 IP address.
- For example, it can be ABCXY022PC.dom01.company.net. Note that the Issued To field of such a certificate will be a full computer name.
- It can also be a wildcard certificate issued to the full computer name, for example, *.dom01.company.net.
- It can also be a multi-host certificate, but it must contain the host name of the Desigo CC Server in the Subject Alternative Names property of the certificate.
- If the web server (IIS) is installed on the same computer as the Desigo CC server hosting the CCom port then you must ensure that the root of the host certificate configured for secure web communication is available in the Trusted Root Certification Authorities store of the Windows Certificate store on the server.
- If the web server (IIS) is installed on a different computer than the Desigo CC server, and the server project secures the web communication using:
- a host certificate, then the root certificate of the host certificate must be available in the Trusted Root Certification Authorities store of the Windows Certificate store of the web server (IIS) computer.
- a self-signed certificate, that self-signed certificate must be available in the Trusted Root Certification Authorities and Personal store of the Windows Certificate store of the web server (IIS) computer.
Tips for Selecting a Certificate for Client/Server Communication
- To secure the communication between a server project and the client connecting to the server project during the Client/Server setup, you can either used certificates from Windows store or File (.pem) based certificates.
- Once created using SMC, the File (.pem) based certificates, root, host, and host key are available on the disk for further use during project modification.
- You need to import the Windows store certificates in the appropriate Windows Certificate stores for further use during project modification.
- The root certificate must be imported in the Trusted Root Certification Authorities of the Local machine certificates store of the Windows Certificate store and set as default.
- The host certificate (along with its private key, which is marked as exportable) must be imported in the Personal store of the Local machine certificates store of the Windows Certificate store and set as default.
- Ensure that the host certificate is created using the root certificate provided.
- The host certificate must contain a private key that should be marked as exportable.
- On a client/FEP station, the user who will launch the Desigo CC client application must have Read rights on the host certificate. You can do this using SMC, when creating/modifying a Client/FEP project.
Tips for Selecting a Certificate for a Web Site
Select a host/self-signed certificate from the Personal tab — Local machine certificate Store location drop-down list for securing the web site.
- If you select a host certificate for a web site, the root certificate of the selected host certificate must be available in the Trusted Root Certification Authorities store of the machine where you are launching the Web/Windows App client.
- If you use the self-signed certificate, the same certificate must be available in the Trusted Root Certification Authorities store of the machine where you are launching the Web/Windows App client.
- If the certificates used for web site and web application are different, you must manually install the web site certificate in the Trusted Root Certification Authorities store on the machine where you are launching the Web/Windows App client.
- Ensure that the certificate selected is issued for the host name provided in the Host name field.
- Example 1: If the host name is ABCXY022PC.dom01.company.net, and you want to use a wildcard certificate in the Certificate Issued To field, it must be in the format *.dom01.company.net.
- Example 2: If you use a multi-host certificate, the certificate name can be anything, but its Subject Alternative Names must contain the host name provided in the Host name field.
- Example 3: If you use SMC-created host or self-signed certificate, the Subject name (issued to) of the certificate should be the same as the host name provided in the Host name field.
Tips for Selecting a Certificate for a Web Application
The website and the web application certificate can be different. You must ensure that, in addition to the website certificate, the web application certificate must also be available in the Trusted Root Certification Authorities of the Windows Certificate store.
Select a host/self-signed certificate having key as exportable from the Personal tab — Local machine certificate/User certificates from the Store location drop-down list for securing the web application.
- If you select a host certificate for a web application, the root certificate of the selected host certificate and the host certificate must be available in the Trusted Root Certification Authorities store (TRCA) of the Windows Certificate store of the machine where you are launching the Web/Windows App client.
- If you use the self-signed certificate, the same certificate must be available in the Trusted Root Certification Authorities store (TRCA) of the machine where you are launching the Web/Windows App client.
- To simplify the configuration of certificates, on the computer where you launch the Web/Windows App client, you should use the same certificates (preferably self-signed) for both securing a web site and signing the web application.
Client/FEP Project Creation Settings
On Client/FEP, using the Management tab, you can create a project in either Automatic configuration or in Manual configuration mode.
Once created, to set up the Client/Server deployment, you need to link the Client/FEP project to the Server project. The communication between the Client/FEP project and the Server project must be secured using certificates, that you configure in Client/FEP project as well.
The following expanders help you create and configure a new project on Client/FEP.
The Server Information expander allows you to configure the Server details, including the Server name, the project that you want to connect to on the server, and the Service port on the server.


Item | Description |
Server name | Allows you to type in the name of the server or browse for it by using the Workstation Picker dialog box. |
Server Service port | Enabled only in Automatic mode. Allows you to configure the server Service port number. You can also use the spin control buttons to increase or decrease the number to match the Service port number of the Server project. |
Workstation Picker Dialog Box
The Workstation Picker dialog box allows you to select a server from the accessible networks, in the domain.
This dialog box displays when you click the Browse button alongside the Server Name field in Automatic configuration or Manual configuration mode.
In the Enter management system name or description field, you can type in the full computer name of the server, if you already know it, or you can type a partial text string. Click Check Name to display a list of all workstations in the selected domain whose name contains the entered string.
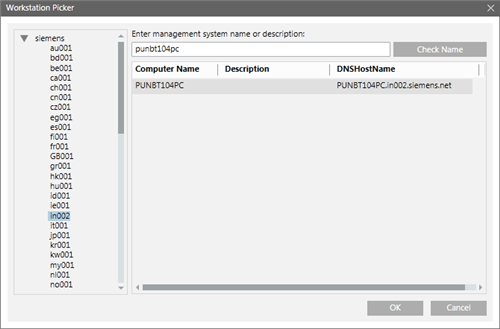
The Workstation Picker dialog box consists of the following elements:
Workstation Picker Dialog Box — Domain | |
Name | Description |
Domains Tree View | A tree view that contains all available network domains. You can select the domain where the station is located. |
Check Name | Enter the station name in the Check Name field. Once the domain is selected, the list of matching stations will display in the Filtered workstation list. |
Filtered workstation | List view that displays the list of all the stations matching the search criteria for the selected domain. |
Projects Information Dialog Box
This dialog box only displays in Automatic configuration mode, that is, when you select a Server and click Projects.
The Projects Information dialog box allows you to select a project from a list of all available projects on the selected Server including the Stand-alone and Unsecured projects. The list does not include the outdated projects on the Server.
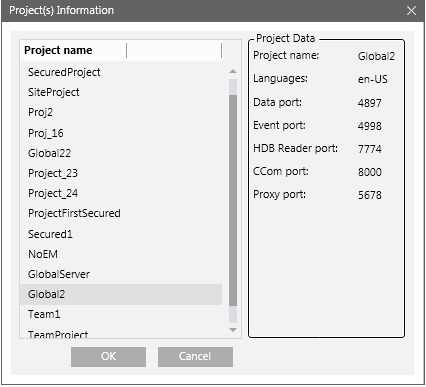
If you choose a Stand-alone Server project, no communication is possible between the Server project and Client/FEP project. For an Unsecured Server project, the communication is Unsecured (without certificates) and hence not recommended.
The Client Project Information expander allows you to configure the details for the selected Server project on the configured Server.
The parameters, for example, languages and the port numbers for Server Data, Server Event and Server HDB Reader ports on the Client/FEP must match the corresponding parameters of the selected Server project. Otherwise the Installed Client does not launch.
The Client Project Information expander is enabled either when you select the Manual configuration check box or when you click Browse and select a Server project in Automatic configuration mode.

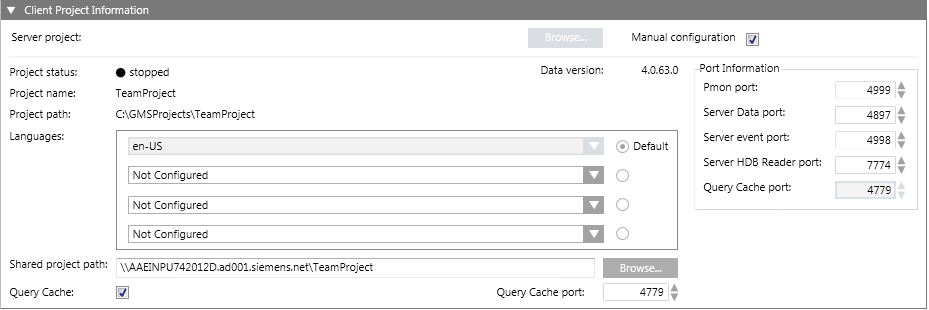

NOTE 1:
In the entry fields of the management platform,
- You can use UTF-8 characters and 7-bit ASCII characters in the file or project names and paths. However, blank spaces and special characters including \\, ;, /, \, :, , =, ^, &, *, ?, “, <, >, |, @, [, ], {, }, $, !, %, ., (, ), ‘ “ ‘, \t are not permitted.
- You must not use any characters other than A through Z, numbers 0 through 9, and a hyphen (-).
- Forward and backward slashes (/ and \) can only be used to separate the names of directories.
- According to WinCCC OA 3.16 Help: Umlaut ("ä","ö", "ü") - cause problems during online backup.
NOTE 2:
If the installation path (shown in the Project path field) includes certain illegal character sequences, for example, #&, ~^, ~&, ~(, ~=, `^, `&, `(, !^, !&, !( this will not be detected by the Installer. However you will not be able to launch the System Management Console. Similarly, if you include illegal characters in the Project Name field while creating a project in the SMC, you cannot create the project.
Item | Description |
Server Project | (Configurable only in Automatic configuration mode) Displays the selected Server project name, if already configured by clicking the Projects button of the Server Information expander. Otherwise, click Browse to select the server project using the Projects Information dialog box. |
Manual configuration | By default, this check box is cleared. When selected, it enables the remaining fields of the Client Project Information and the Communication Security expander of the Project Settings tab allowing you to manually enter the server project details. You cannot edit the Service port in Manual configuration mode. |
Project name | Enabled only in Manual configuration mode. |
Project path | Enabled only in Manual configuration mode. |
Languages | Enabled only in Manual configuration mode. |
Default | Enabled only in Manual confugration mode. |
Pmon port | Enabled only in Manual configuration mode. |
Server Data port | Enabled only in Manual configuration mode. |
Server Event port | Enabled only in Manual configuration mode. |
Server HDB Reader port | Enabled only in Manual configuration mode. |
Shared project path | In Automatic configuration mode it is only enabled, when you select the Server project. It allows you to type the shared Server project path of the Desigo CC server. |
Query Cache | Displays the configuration for Query Cache as per the selected Server project selected. In Automatic configuration mode, you cannot edit it. |
While creating or editing a Client/FEP project, the Communication Security expander allows you to configure the Server Communication details.
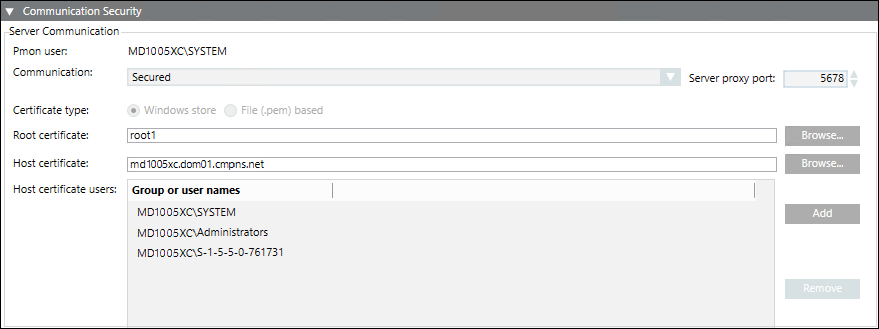
On Client/FEP, the Communication Security expander is enabled only during the Client/FEP project creation and editing.
- In the Automatic configuration mode, when you select a server project, the security settings including the Communication mode, the Server proxy port, and the Certificate type are configured with the same details as those of the selected Server project.
- In the Manual configuration mode, you must manually enter the same communication security details as those of the selected Server project.
- When you configure a server project with Communication mode set to secured, you must provide the same root certificate as the one configured on the server.
The host certificate and host key (only applies to .pem-based certificates) can be different, must be created with the same root certificate provided on Server. Otherwise, the Desigo CC client will not launch.
After Client/FEP project creation using file (.pem) based certificates, the root and host certificates and the host certificate key file used for secure communication are copied to the path ..\[ProjectName]\Config and the config file are updated. In case of Windows store certificates, only the config file is updated.
Project Settings — Communication Security Expander | |
Item | Description |
Communication | By default this field is disabled and set to secured. |
Server proxy port | This is enabled only when you select Client/Server communication type as secured and you are creating/editing a project in Manual configuration mode. |
Certificate type | By default, the Certificate type is set as Windows store. This is enabled only when you select Client/Server communication type as secured. |
Root certificate | By default, it is enabled and the root certificate, if set as default on the Client/FEP machine, is selected. |
Host certificate | By default, it is enabled and the host certificate, if set as default on the Client/FEP machine, is selected. |
Host key | This is enabled only when you select Client/Server communication type as secured and you have selected the certificate type as .pem file. Allows you to browse for the host key certificate from the .pem file based. |
Host certificate users | By default, it displays the group or users of the host certificate that you have set as default on the Client/FEP. Add is always enabled, allowing you to add the user for the selected host certificate. You can also remove a user from the list other than the System user and the Administrator group, if available. |


