Website and Web Application Management on a Remote Web Server (IIS)
Scenario:
On the Desigo CC Server, you have created a Server project using SMC and the project is started. The CCom manager for the project that you want to connect to must be running on the server.
Now, you want to connect a website/web application available on a third-party machine (target machine) to the project on the Desigo CC Server system.
To do this, you must have an intermediate machine (for example, a laptop). On this laptop, before exporting the web application to the third-party system, you perform certain steps.
Workflow diagram:
Prerequisites:
- Desigo CC is installed (on Client/FEP, as source machine)
- IIS is installed and configured (on both source as well as target machine)
- You have installed Application request Routing (ARR) (on both source as well as target machine)
- You have enabled Proxy for the Application Request Routing (ARR) Cache in IIS (on both source as well as target machine).
Steps:
To deploy the web application and website on IIS servers, you must install Microsoft Web Deploy 3.6 on both, the source machine (Desigo CC machine), as well as the target machine (third-party machine).

NOTE:
If you do not have Microsoft Web Deploy 3.6 installed on the source and target machines, you cannot export or import Web Applications. However if the export or import web applications still do not become available, see Enable the Import/Export Web Application
You must only download the Web Deploy x64 version and in the Setup type field, select Complete.
You can download Microsoft Web Deploy 3.6 from http://www.iis.net/downloads/microsoft/web-deploy.
For installing Web Deploy x64, please refer to How to perform a complete install at http://technet.microsoft.com/en-us/library/dd569059(v=ws.10).aspx.
Enable the Import/Export Web Application
To enable the Import/export Web application option in IIS for working with remote web application, you must first enable Management Service feature in IIS. Perform the following procedure to install the Management Service feature in IIS on different OS types.
Windows 7
- From Control Panel > Programs and Features, click Turn Windows feature on or off.
- Expand Internet Information Services and then Web Management Tools and select the feature IIS Management Service.
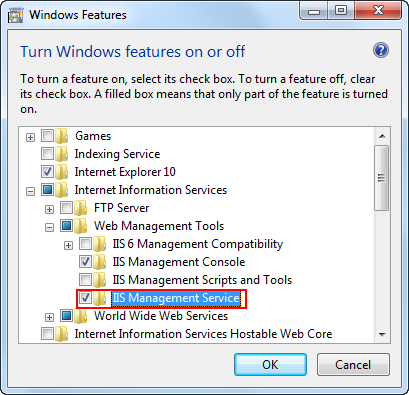
- Click OK.
- Verify that the Import/export Web application option is enabled in IIS.
- Restart the computer, if required.
Windows Server 2012 R2
- Open the Windows Server Manager.
- On the Manage menu, click Add Roles and Features Wizard.
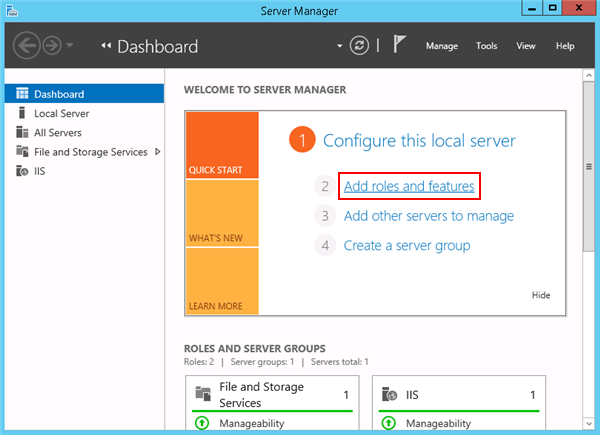
- The Add Roles and Features Wizard window displays.
- In the Server Selection > Server Roles, expand Web Server (IIS) and select Management Service under Management Tools.
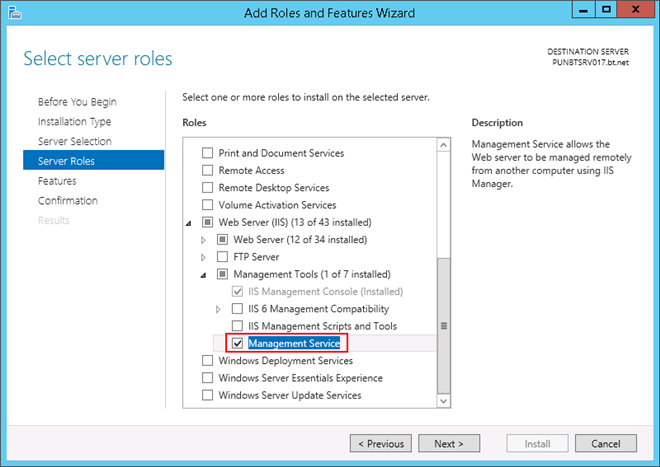
- Click Next.
- Click Next.
- Click Install.
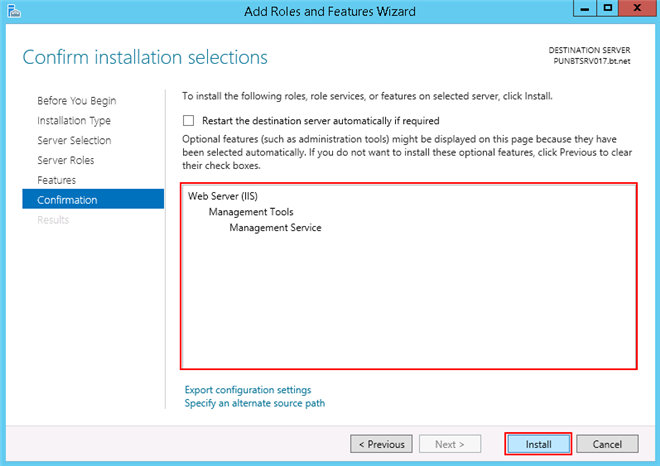
- The feature Management Service is installed.
- Verify that the Import/export Web application option is enabled in IIS.
- You are on the third-party machine.
- A domain user is already created and you want to assign the domain user as a member of the IIS_IUSRS group.
- The user is the same user to which the project is shared.
- From Windows Start menu, select Computer.
- Right-click Computer and select Manage.
- In the Computer Management tree, select System Tools > Local Users and Groups > Groups.
- Right-click IIS_IUSRS group, and click Add to Group.
- The IIS_IURS Properties window displays.
- Click Add.
- The Select Users, Computers, Service Accounts, or Groups window displays.
- Provide the domain user's name in the Enter the object names to select … field.
- Click OK.
- The domain user is added as a member of the IIS_IURS group.
- In the IIS_IURS Properties window, click Apply and OK.
For more information, see http://technet.microsoft.com/en-in/library/cc739265(v=ws.10).aspx
If a website is not available on the third-party machine, you must create one. If a website already exists, you must edit it.
- You are on the third-party machine.
- If there is already an existing website, skip steps 2 to 6.
To create a new website, proceed with step 2.
- Click Start and type IIS in the Search programs and files field.
- Click IIS Manager to open the Internet Information Services (IIS) Manager.
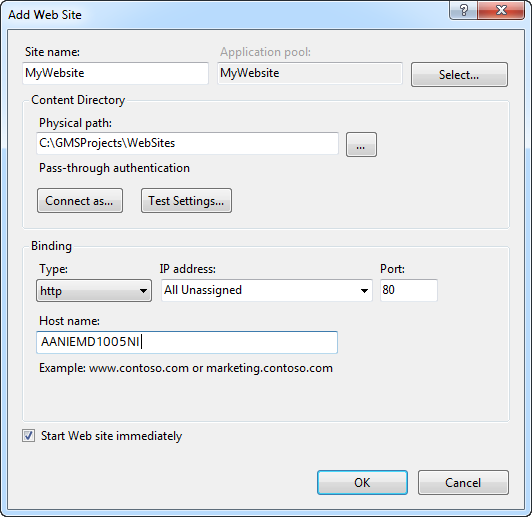
- Right-click the Sites node and select Add Web Site.
- In the Add Web Site dialog box that displays, add the following parameters:
- Site name
- Physical path
- Hostname
- Http port
- Click OK.
- A website is created.
- In the Sites tree, select the website.
- From the Actions pane, click Bindings.
- In the Site Bindings dialog box, click Add.
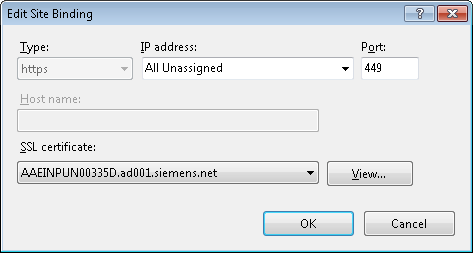
- In the Edit Site Binding dialog box, do the following:
a. Select https from the Type drop-down list.
b. Enter the Port number.
c. From the SSL certificate drop-down list, select a SSL certificate.
- Click OK.
- Click Close.
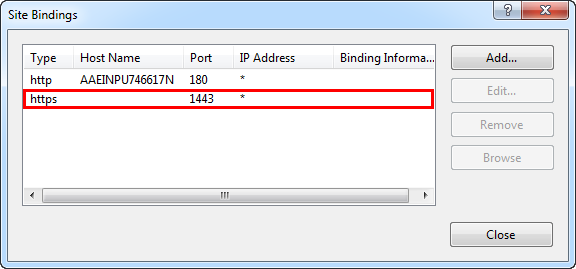
- Binding is successful and the website is configured.
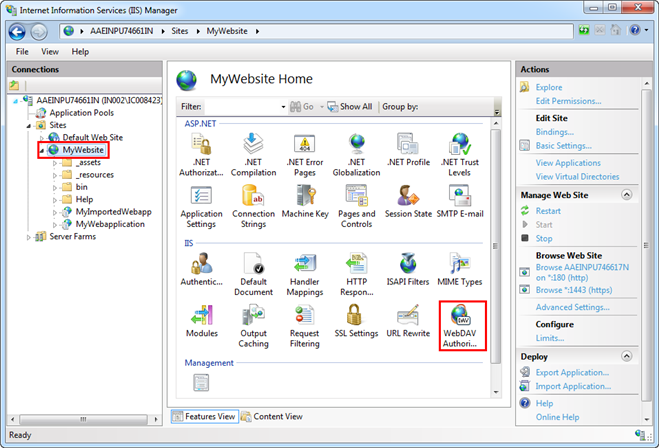
- Select Sites > [Website node] for which you want to enable the WebDAV Authoring Rules and double-click WebDAV Authoring Rules.
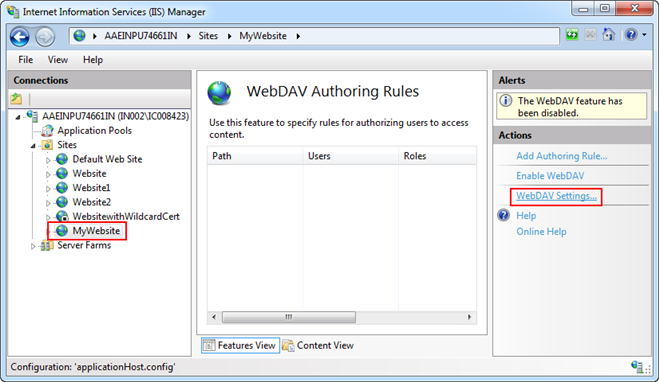
- In the Actions pane, click WebDav Settings.
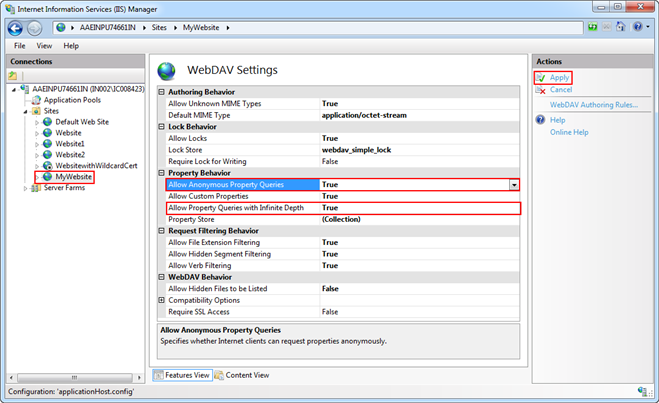
- Set the following two properties as True and click Apply.
- Allow Anonymous Property Queries
- Allow Property Queries with Infinite Depth
- The changes are saved successfully.
- You are on the source machine.
- Create a website using the SMC on the source machine. Provide the host name as the host name of the target machine where you want to export the web application to be created under this website.
- Create a Web Application under the website using the SMC.
- The web application is created under the website whose host name is the same as the host name of the target machine.
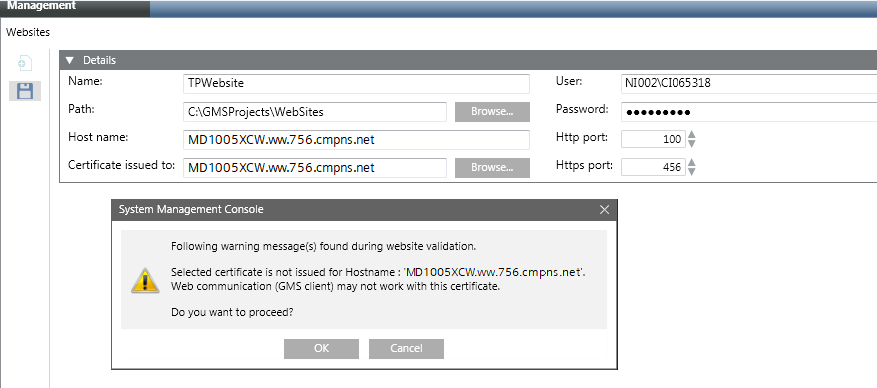
- If one of the following messages displays during website creation, ignore them and click OK.
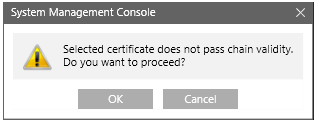
- You are on the source machine.
- A web application is created using the SMC under a parent website with the host name of the Target machine where you want to export the web application.
- Click Start.
- In the Search programs and files field, type IIS.
- Click Internet Information Services (IIS) Manager to open.
- Select Sites > [web application] that you want to export and click Export Application from the Actions pane.
NOTE: The Export Application menu displays only if you have installed Web Deploy.
- The Export Application Package window displays.
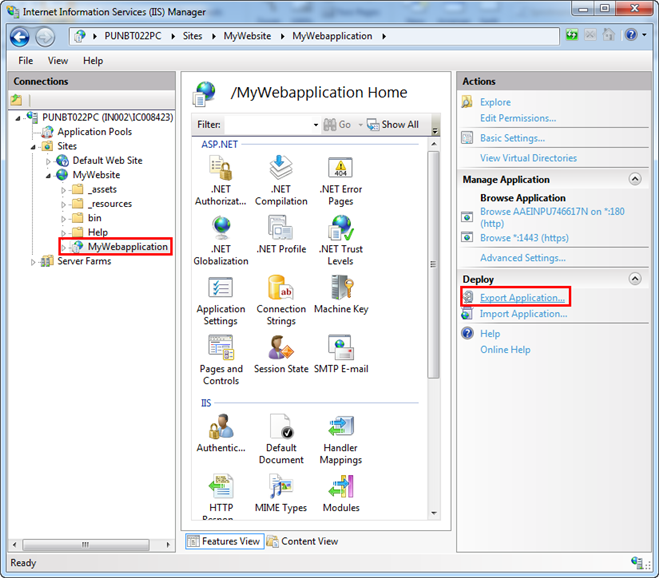
- Click Next and Next again.
- Specify the file name and path to export and click Next.
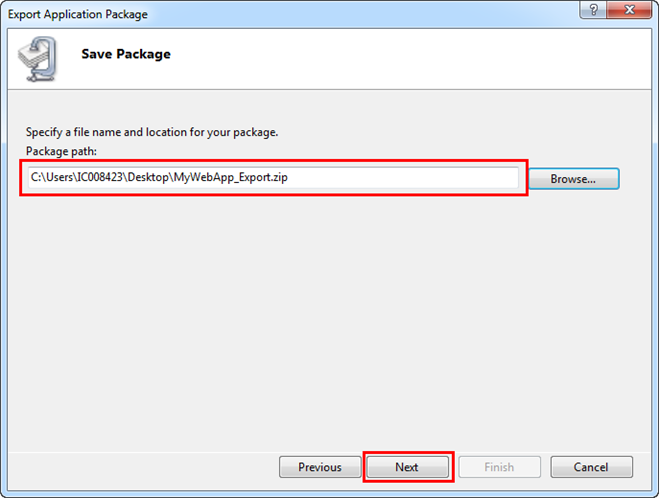
- The Export Progress and Summary window displays. Wait for the export process to complete. This takes approximately one minute.
- The Export Progress and Summary window displays that the web application export was successful.
- Click Finish to exit.

NOTE:
Ensure that you keep backup copies of the IIS exported Web Application that you are about to import.
- You have the zip file of the exported web application that you want to import on the third-party (target) machine.
- You are on the target machine.
- Copy the zip file of the exported web application that you want to import at a desired location on the target machine.
- Open the Internet Information Services (IIS) Manager.
- Select Sites > [website] and click Import Application from the Actions pane.
NOTE: The Export Application menu displays only if you have installed Microsoft Web Deploy 3.6.
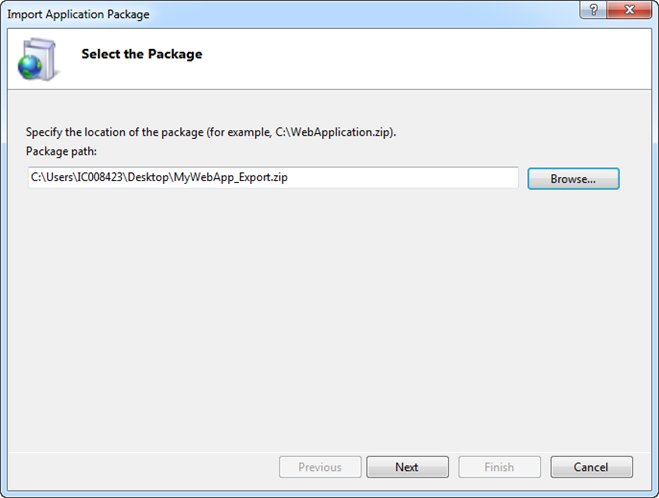
- The Import Application Package window displays.
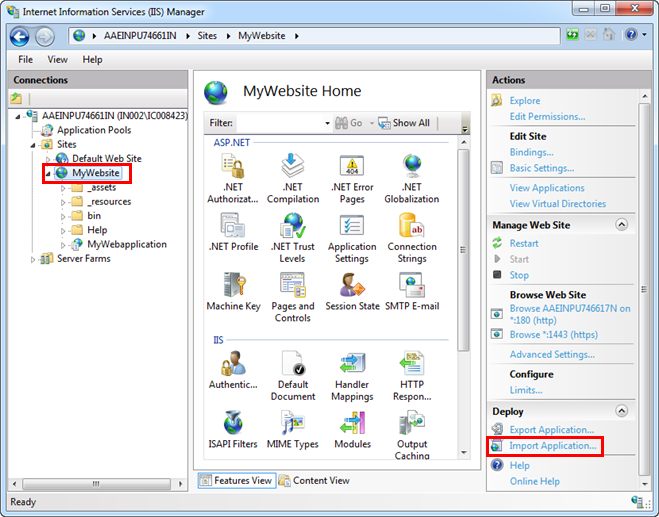
- Browse for the exported web application zip file on the target machine and click Next.
- (Optional) Specify the web application name.
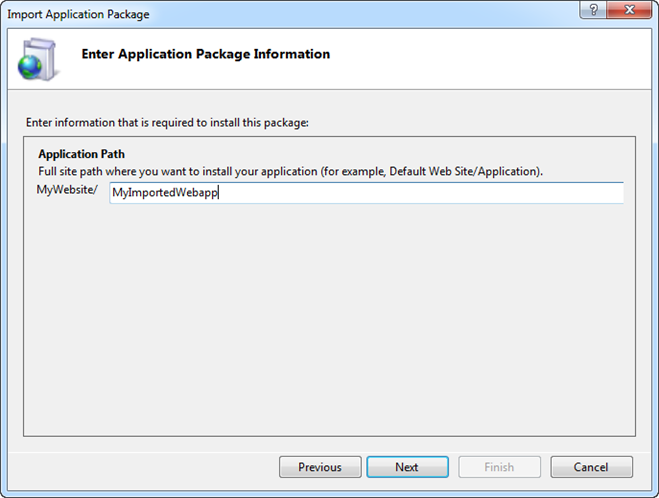
- Click Next.
- A message displays asking you to change the application to run in .Net 4.0 application pool.
- Click Yes.
- Click Finish.
- The web application is added as a child under the website in IIS.
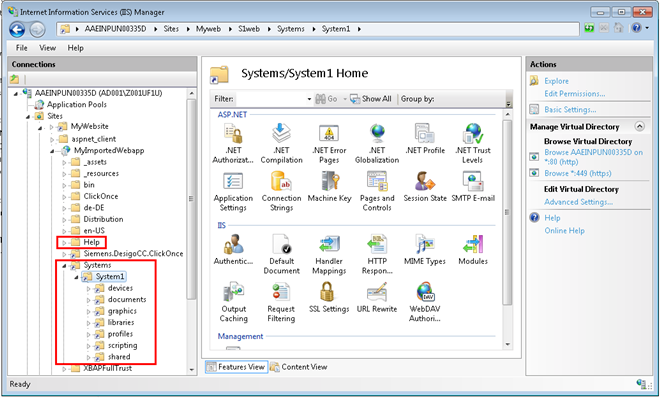
To save objects, such as graphics and journaling objects, you must create virtual directories for the web application that you created. You must create the following virtual directories under [Installation Drive]:\[Installation Folder]\GMSMainProject\_tmpGMSWebSite in IIS on the target machine under the …\Systems\[System Name] folder of the web application.
- devices
- documents
- graphics
- libraries
- profiles
- EM virtual directory, if the EM is installed, for example Scripting
- shared
Additionally you must also create the Help virtual directory under the web application in IIS. You must also copy the Help folder from the …\MainProject (from source) to the web application folder on the target machine.
The following procedure explains how to create all the virtual directories for the newly created web application:
- You are on the target machine and you have successfully imported the web application in IIS.
- Open the Internet Information Services (IIS) Manager.
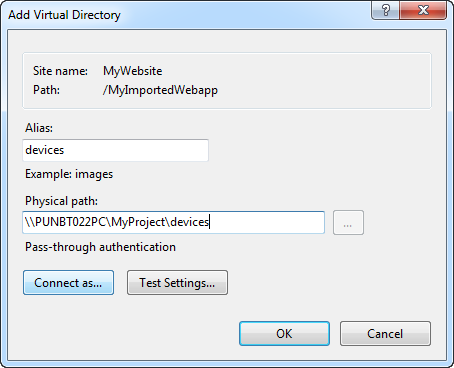
- Select the web application that you have imported and right-click, and select Add Virtual Directory.
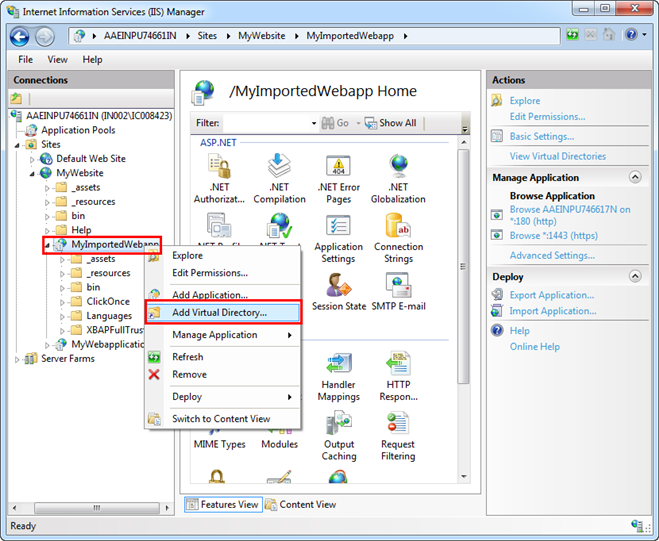
- In the Add Virtual Directory dialog box, enter information into the following fields:
a. Alias as Systems for creating the Systems virtual directory.
b. Physical Path as the local path of the Distribution folder of the web application on the target machine for example …\[Web application name]\Distribution.
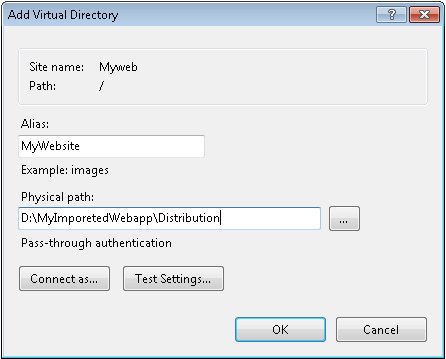
- Click Connect as.
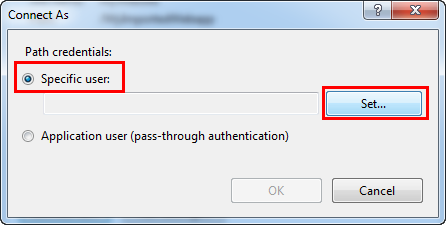
- In the Connect As window, select Specific User and click Set.
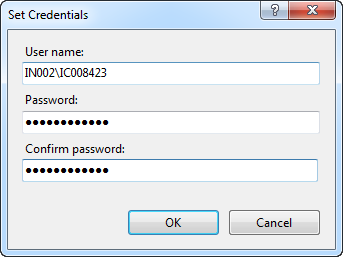
- In the Set Credentials window, do the following:
a. Enter a user name (domain user credential with which you have shared the project, virtual directories and the user should be a member of the IIS_IUSRS group).
b. Enter a password and confirm it.
- Click OK.
- Click OK in the Connect As dialog box.
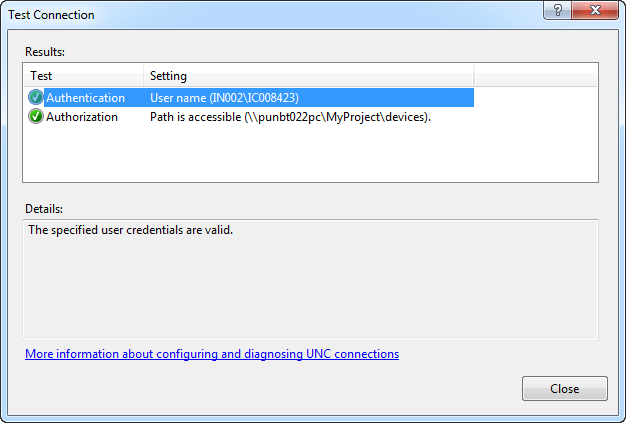
- In the Add Virtual Directory dialog box, click Test Settings to open the Test Connection dialog box.
- Ensure that both results—Authentication and Authorization—are successful and the message
The specified user credentials are validdisplays in the Details section.
- Click Close.
- Click OK.
- The devices virtual directory is added under the Web Application node in IIS.
- Repeat steps 3 to 12 to add the virtual directory [System Name], for example System1 under the Systems virtual directory.
- Repeat steps 3 through 12 to create the virtual directories: documents, graphics, libraries, profiles, and shared under the [System Name] virtual directory. Provide the Alias as the exact name of the virtual directory and Physical Path as the shared path of the source machine where the virtual directories are present, for example,
\\[Machine Name]\[Project Name]\devices.
- The documents, graphics, libraries, profiles, and shared virtual directories are created under the Systems\[System Name] node in IIS on the target machine.

NOTE:
To work with projects in distribution, that is, if the project to which the web application is linked is in distribution with other projects, then you must add the system names of the projects in distribution under the Systems virtual directory (on target machine). Furthermore, under each of the system names you need to add the same virtual directories present under the path [Installation Drive]:\[Installation Folder]\GMSMainProject\_tmpGMSWebSite. The path for these should be the shared path of these individual project directories on the source machine with the shared user.
Create a ClickOnce Virtual Directory
- You are on the target machine.
- You have successfully imported the web application in IIS, created the devices, documents, graphics, libraries, profiles and shared virtual directories.
- To create a ClickOnce virtual directory, you must first obtain the brand name of the product. To do this, proceed as follows:
a. Open the SMC, and from the Header bar, select Menu > About.
b. From the About dialog box that displays, verify the Product name. For example, Desigo CC .This is the brand name.
- Open the Internet Information Services (IIS) Manager.
- Select the Web Application that you have imported and right-click, and select Add Virtual Directory.
- The Add Virtual Directory dialog box displays.
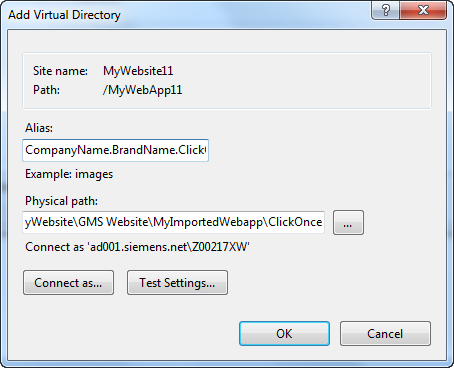
- In the dialog box, do the following:
a. Provide the Alias as [Company Name. + Brand Name + .ClickOnce]
NOTE: Remove any space characters in the brand name.
b. Provide the Physical Path by navigating to the ClickOnce folder of the imported web application on the third-party machine. Provide the physical path as the path of ClickOnce sub-directory under web application directory on the target machine.
- Repeat steps 5 through 12 from Creating Virtual Directories for Web Application in IIS on Target Machine.
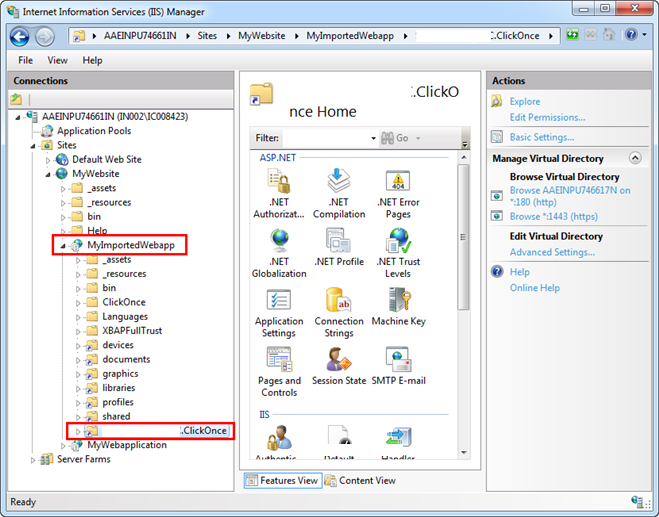
- The ClickOnce virtual directory is added under the web application node in IIS.
- You are on the target machine and the Internet Information Services (IIS) Manager is open.
- Select Sites > [website] for which you want to enable the WebDAV Authoring Rules and double-click WebDAV Authoring Rules.

- Click Enable Web DAV from the Actions pane.
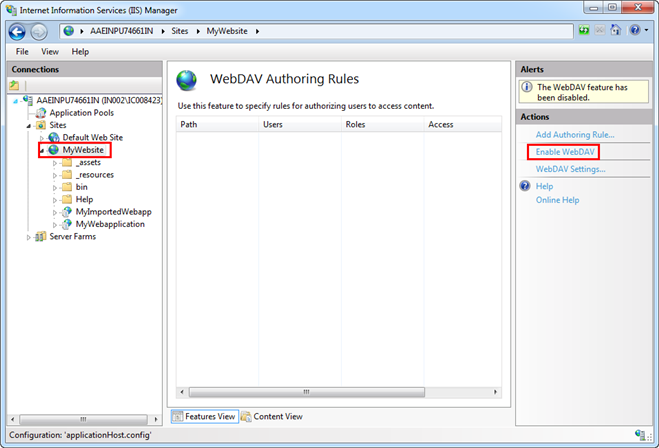
- Set the Web DAV Settings from the Actions pane and set the Properties behavior to True.
- You are on the target machine and the Internet Information Services (IIS) Manager is open.
- Select Sites > [website] > [web application] > [Virtual Directory] for which you want to enable the WebDAV Authoring Rules and double-click WebDAV Authoring Rules.
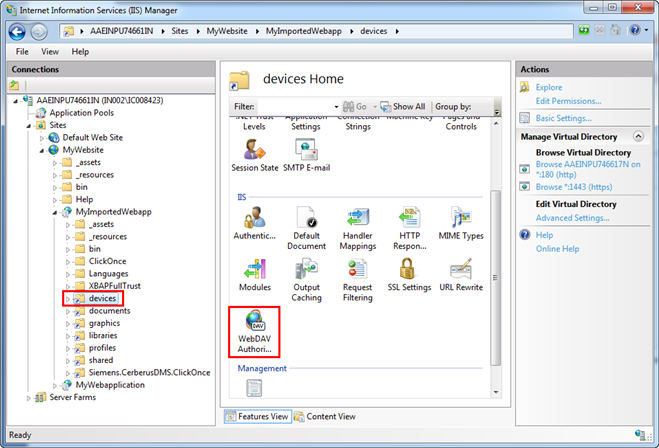
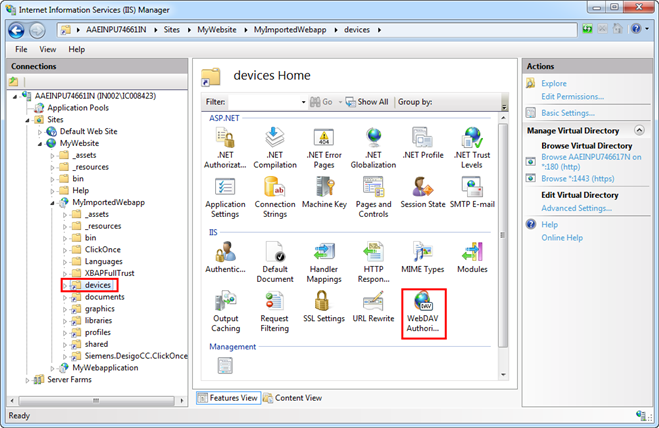
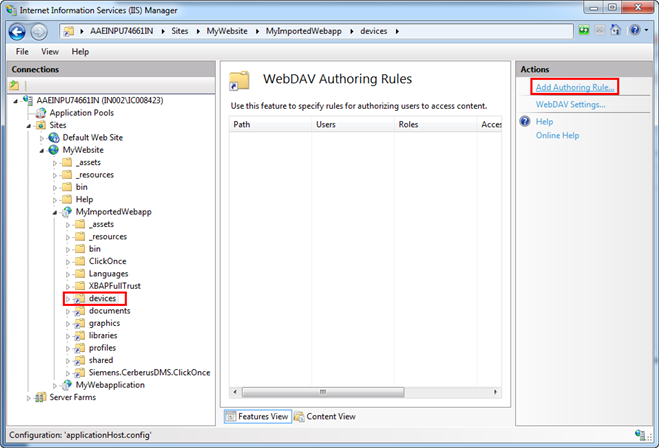
- In the Actions pane, click Add Authoring Rule.
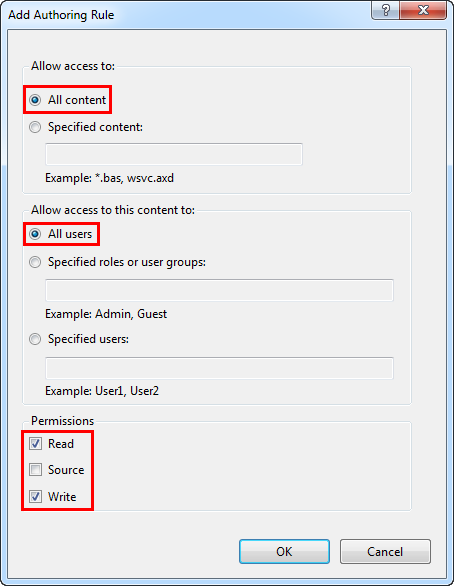
- The Add Authoring Rules dialog box displays.
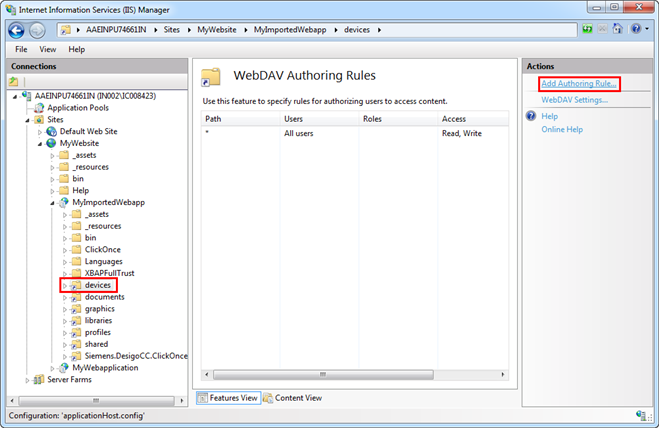
- In the Add Authoring Rule dialog box, do the following:
- In the Allow access to section, select the All Content.
- In the Allow access to this content to section, select All users.
- To set the permissions in the Permissions section do the following:
a. Go to the path [Installation Drive]:\[Installation Folder]\GMSMainProject\_tmpGMSWebSite\[virtual directory] on the source machine.
b. Open the config file.
c. Check the access rights in this file.
d. In the Permissions section of the Authoring Rules dialog box, select the exact permissions, Read, Source, and Write.
For example, for the devices virtual directory you must open the config file located at path
[Installation Drive]:\[Installation Folder]\GMSMainProject\_tmpGMSWebSite\devices and the access entry is access = rw”, where r = read, and w = write permissions. In the Permissions section of the Add authoring Rule dialog box, you must select the Read and Write check boxes.
- Click OK.
- The WebDAV Authoring Rule entry is added successfully.
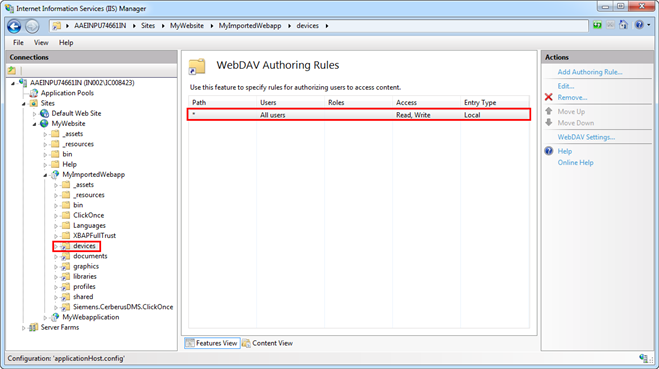
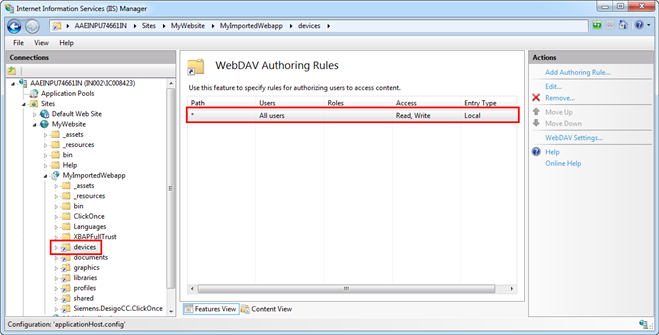
- Repeat steps 3a to 3d for each virtual directory. For the ClickOnce virtual directory, in step 3d, set the Permission as Read.
- The WebDAV Authoring Rule entries are added successfully for all the virtual directories, including ClickOnce.
The web application pool version of the source and target machine must match, if it does not match, then you must create a new one that matches the settings on the source machine. The following procedure describes how to verify this, and create a new web application pool, if required.
- You are on the third-party machine.
- A website is available on the third-party machine.
- Click Start and type IIS in the Search programs and files field.
- Click IIS Manager to open the Internet Information Services (IIS) Manager.
- To verify the Application Pool .Net Framework Version, go to the Connections pane on the source machine and select the web application that you want to export, and from the Actions pane select Basic Settings.
- The Edit Application window displays.
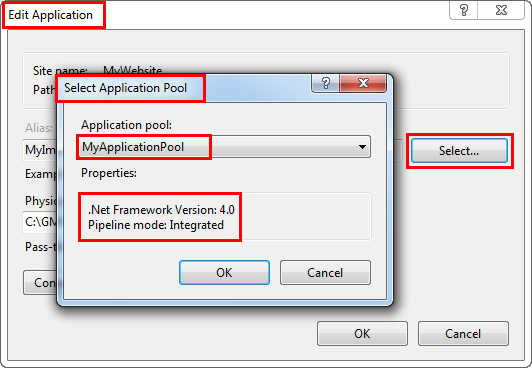
- Click Select.
- In the Select Application window, under the Properties field, check the .Net Framework Version and Managed Pipeline Mode.
- On the target machine, open the IIS Manager and from the Connections pane, select Application Pools.
- Ensure that the version of the web application Pool (check for .Net Framework Version and Managed Pipeline Mode) is the same as available.
- To create a Web Application Pool with the .NET framework version and Managed Pipeline Mode settings the same as the source machine, proceed as follows:
a. From the Connections pane, select Application Pool.
b. From the Actions pane, click Add Application Pool.
- In the Add Application Pool window that displays, do the following:
a. Provide the Application Pool Name.
b. Select the .NET framework version to be the same as source machine.
c. Select the Managed Pipeline Mode as Integrated.
d. Click OK.
- After successful creation, the entry is added in the Application Pool.
- You are on the third-party machine.
- IIS is opened and you have selected the imported web application in IIS.
- In the Actions pane, click Basic Settings.
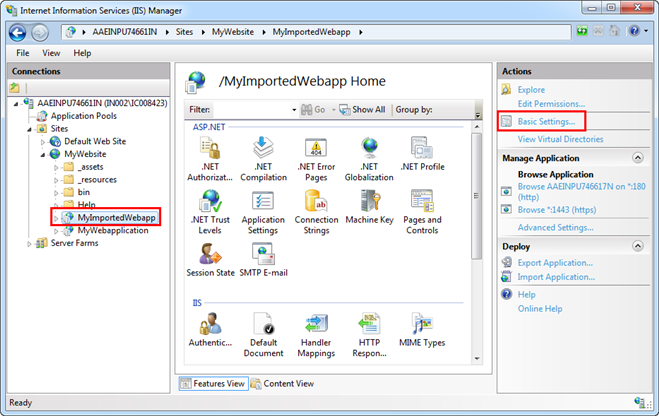
- In the Edit Application dialog box, click Select.
- In the Select Application dialog box, ensure that the version of Application Pool: .Net Framework Version and Managed Pipeline Mode is the same as the application pool version on the source machine.
- Click OK.
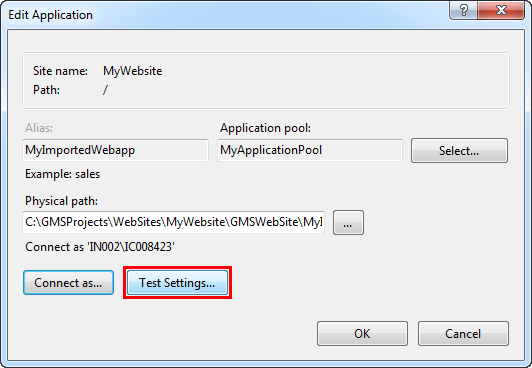
- In the Edit Application dialog box, click Connect as.
- In the Connect As window, select the Specific User option and click Set.

- In the Set Credentials window, enter a user name (domain user credentials with which you have shared the project and virtual directories) and a password and confirm it.

- Click OK.
- Click OK.
- In the Edit Application dialog box, click Test Settings.
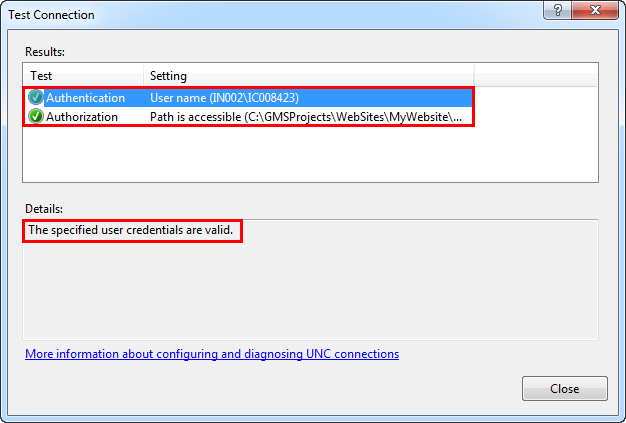
- In the Test Connection dialog box, ensure that both results—Authentication and Authorization—are successful and the message
The specified user credentials are validdisplays in the Details section.
- Click Close.
- Click OK.
- You are on the source machine.
- A web application is created and available in IIS.
- IIS is open.
- Expand the Web Server node, and the Sites folder.
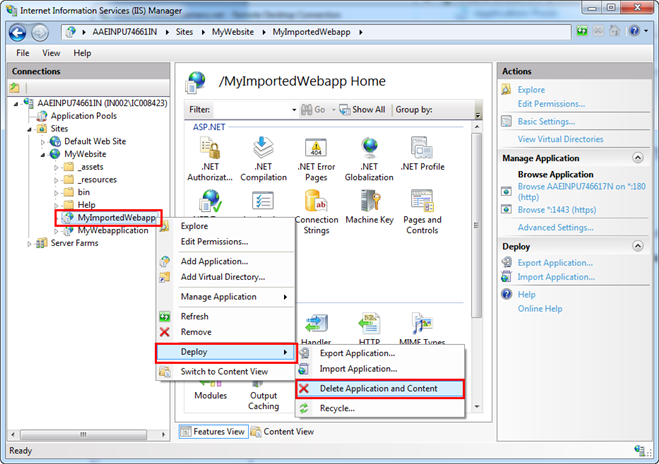
- Right-click the web application you want to delete, and select Deploy > Delete Application and Content.
- Click Yes.
- Close the Internet Information Services (IIS) Manager window.
