Setting up an Identified Web Client
Scenario: You want to be able to run Desigo CC as a secure web client or Windows app client, from a computer that identifies itself to the Desigo CC server with a host certificate. To do this, you must configure a root certificate and a host certificate. Then you must deploy the root certificate (with its public key) on the Desigo CC server, and the host certificate (with its private key) on the identified web client.
Reference: For details about how these clients operate, see Types of Management Station.
Workflow diagram:
Prerequisites:
- You installed the Desigo CC software and started up a project.
- Desigo CC is configured with an IIS web server, to support web clients and Windows app clients.

Self-signed certificates and host certificates created with SMC are supported to allow local deployments without the overhead of obtaining commercial certificates. When using self-signed certificates, the owner of the Desigo CC system is responsible for maintaining their validity status, and for manually adding them to and removing them from the list of trusted certificates.
Self-signed certificates must only be used in accordance with local IT regulations (several CIO organizations do not allow them, and network scans will identify them). Importing of commercial certificates follows the same procedures.
Steps:
This root certificate identifies the source of certificates used for communication between all the computers in the system. It must therefore be the same for all the host certificates and must be made known to the Desigo CC server station and to all the client stations.
- On the Desigo CC server station, launch the System Management Console (SMC).
- In the SMC tree, select the Certificates tab.
- Click Create Certificate
 and select Create Root Certificate (.pfx).
- In the Root Certificate Information expander, do the following:
a. In the Certificate file name fields, enter the certificate .pfx and .cer file names, and the path to your Certificates folder.
b. In the Certificate password (pfx), enter a password and confirm it. Note it down for later use.
c. (Optional) In the Expiration field, set the expiry date.
d. Change the default Subject name (GMS Root Certificate) to a text easier to identify later, for example, <SYSTEM#> Root Certificate.
e. (Optional) Enter information data in the remaining fields.
- Click Save
 .
.
- The root certificates (.pfx and .cer files) are created and stored in the Certificates folder at the defined path.
- On the Desigo CC server station, in the SMC tree, select Certificate.
- Click Import
 .
.
- In the Import Certificate expander, do the following:
a. In the Certificate type field, select Root certificate.
b. Click Browse.
c. From your Certificates folder, select the root certificate .cer file.
d. Click Open.
e. Select the Set as default check box.
- Click Save .
- The root certificate .cer file is imported in the following Windows certificate stores:
- Local machine certificates: Trusted Root Certification Authorities
- User certificates: Trusted Root Certification Authorities
The host certificates must be specific. Each computer in the system (server, client, FEP, or web server stations, as well as any identified web clients) must have its own distinct host certificate.
- On the Desigo CC server station, in the SMC tree, select Certificate.
- Click Create Certificate and select Create Host Certificate (.pfx).
- In the Host Certificate Information expander, do the following:
a. Complete the following fields: Root Certificate password, Certificate file name (.pfx) and its password, Certificate file name (.cer), and Path (path to your Certificates folder). Note down the password for later use.
b. (Optional) In the Expiration field, set the expiry date.
c. Change the default Subject name to the fully qualified domain name of the identified web client.
d. Enter values in the remaining fields.
NOTE: If an individual web client is used as identified web client in two different projects which are identified by two certificates (and not by one), use certificates with distinguished subject name. This means that the value in the Subject name field can be the same, but fields like Organization Unit, Organization, or Department must be different.
- Click Save .
- The host certificates (.pfx and .cer files) are created and stored in the Certificates folder at defined path.
When renewing an identified web client host certificate, do not change the subject name. Otherwise, you will have to reconfigure the certificate of the identified web client station within Desigo CC (see Configure the Identified Web Client Station, below).
Due to system limits it is not possible to browse the identified web client to find the required certificate. Consequently, the host certificate must also be installed in the Windows certificates store of the server.
- On the Desigo CC server station, in the SMC tree, select Certificate.
- Click Import .
- In the Import Certificate expander, do the following:
a. In the Certificate type field, select Host certificate.
b. Click Browse.
c. From your Certificates folder, select the host certificate .pfx file.
d. Click Open.
e. Enter the password.
- Click Save .
- The host certificate .pfx file is imported into the Windows Local Computer Personal Certificates store of the Desigo CC server.
- On the identified web client station, from Windows, start the Microsoft Management Console (MMC) and set it to view and manage the Local Computer certificates (Certificates > Computer account). For instructions on how to do this, see:
https://msdn.microsoft.com/en-us/library/ms788967(v=vs.110).aspx
- In the Console Root window, select Certificates (Local Computer) > Personal folder.
- Right-click the Certificates folder, and select All Tasks > Import.
- The Certificate Import Wizard starts.
- Click Next.
- In the File to Import dialog box, browse to your Certificates folder, select to display the Personal Information Exchange file type, and select the identified web client host certificate .pfx file.
- Click Open.
- Click Next.
- Enter the certificate password.
- Click Next.
- The Personal store as location for the certificate is already selected.
- Click Finish to complete the operation.
- When the certificate import is successfully completed, the certificate is stored in the Local Computer Personal Certificates store of the Desigo CC server.
- Right-click the imported certificate and select All Tasks > Manage Private Keys.
- The Permission for <certificate> private keys dialog box displays.
- Make sure that the web client user has the read permission (Allow/Read check box selected).
- If the web client user is not present, click Add, enter the user name, and click OK to add it.
- If the web client user has no read access, select the Allow/Read check box.
- Click OK.
NOTE: Enable all users that will use the web client.
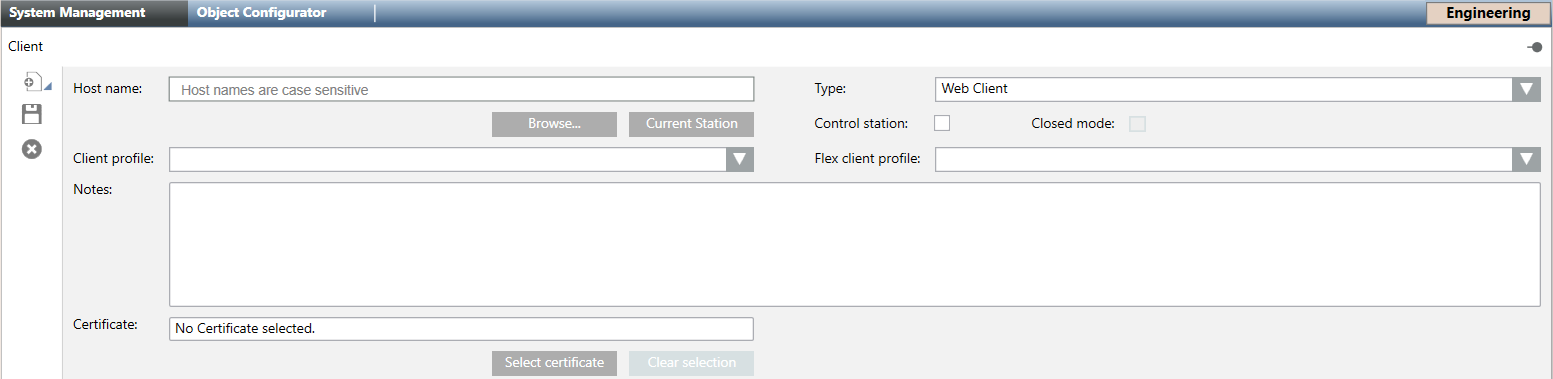
- System Manager is in Engineering mode.
- In System Browser, select Management View.
- Select Project > Management System > Clients.
- The Object Configurator tab displays.
- Click New and select New Station.
- In the New Object dialog box, enter a name and description and click OK.
- The new station object is added to System Browser.
- Select the System Management tab.
- The Closed mode check-box is read-only.
- Specify the Host name in one of the following ways:
- Manually enter the computer host name.
NOTE: Host name without domain suffix needed.
- Search for a computer on the network:
a. Click Browse.
b. In the Browse for computer network dialog box, select a host name from the network.
c. Click OK.
NOTE: Hostname without domain suffix needed.
- Click Current Station to obtain the host name of the current computer.
- From the Type drop-down list, select Web client.
- Click Select Certificate.
- The Select Certificate dialog box displays, and shows the certificate store.
- Locate and select the host certificate for the identified web client that was previously imported into the server station. Typically, you can find the correct certificate in the Personal or in the Trusted Root Certification Authorities tabs, depending on the security infrastructure in place. To clear a certificate and pick a new one, click Clear selection and repeat the previous and the current step.
- The selected certificate appears in the Certificate field.
- (Optional) Specify the following setting:
- Client profile
- Control station
- (Optional) In the Notes field, enter any additional information.
- Click Save .
- In the Extended Operation tab, the Operational Status property indicates
Enabled. This means that logging onto Desigo CC from that computer is allowed.
- Define the scope and application rights for this identified web station as follows:
- Set up a station group for identified web clients, if one does not already exist, and define appropriate scope and application rights for that group. Also, add the identified web station you created here to that group. See New Station Group for Identified Web Clients.
- From the computer that you plan to use as a web client or Windows app client, do the following:
- The first time you log onto Desigo CC from that computer, follow the instructions in Browsing a Website or Web Application URL.
- Subsequently, operators can log on as instructed in Starting and Exiting the System.