Incidents
This section describes the procedures to configure incidents. For background information on incidents, see the Incidents section.
Prerequisites:
- System Manager is in Engineering mode.
- System Browser is in Application View.
This section describes the procedures to configure a launch group.
Create a Launch Group
- At least one incident template is created.
- Select Applications > Notification > Incident Templates > [incident template].
- Select the Incident Template Editor tab.
- Open the Incident Template Structure expander.
- Click Add to add a launch group to the incident template.
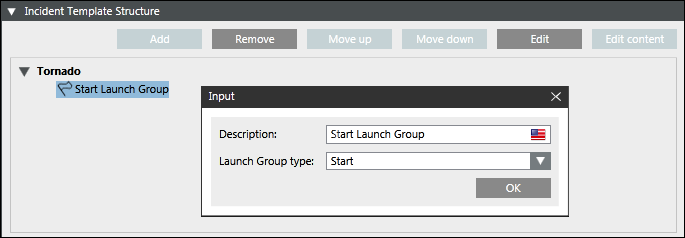
- By default, the Start launch group is created.
- Double-click the launch group to change its group type.
- The Input message box displays.
- In the Description field, edit the name of the launch group.
- (Optional) From the Launch Group Type drop-down list, select either of the following options to set a different launch group type:
– All Clear
– Escalation
– Manual
– Start
- Click OK.
- The launch group is created.

NOTE 1:
Only one Start launch group and All Clear launch group can be created for an incident template.
NOTE 2:
When an incident template is triggered by an event, all notification templates contained in the Start launch group are automatically launched.
For incidents initiated by operators, the launch incident wizard preselects all notification templates from the Start launch group. The operator can then manually customize which notification templates will be launched.
Associate a Notification Template with a Launch Group
- You have created the launch group with which you want to associate the notification template.
- Select Applications > Notification > Incident Templates> [incident template].
- Click the Incident Template Editor tab and open the Incident Template Structure expander.
- The incident template along with the launch groups display.
- Navigate to Applications > Notification > Notification Templates in System Browser, and drag a notification template onto a launch group.
- The notification template is associated with the launch group and displays below the group.
NOTE: You can re-arrange notifications within the same launch group or move them to different launch groups using Move up and Move down.
- Click Save
 .
.
Assign a Notification Template for Escalation
- One or more notification templates are assigned to the Escalation launch group.
- Select Applications > Notification > Incident Templates.
- Select the incident template.
- The Incident Template Editor tab displays.
- Open the Incident Template Structure expander.
- Select the notification template.
- Click Edit.
- The Notification Editor tab displays.
- Open the Control Options expander.
- Select the Enable escalation check box.
- Select the notification template for escalation from the Notification template drop-down list.
NOTE: A warning message box displays, if the Enable escalation check box is selected and a notification template is not assigned for escalation in the Notification template field.
- Click Save
 .
.
- The corresponding notification template is assigned for escalation.
Update a Launch Group
- One or more incident templates are configured.
- Select Applications > Notification > Incident Templates.
- Select the incident template to be updated.
- The Incident Template Editor tab displays.
- Open the Incident Template Structure expander.
- Perform any of the following steps:
- To add a launch group, click Add.
- To remove a launch group, select the required launch group and click Remove.
- To re-arrange notifications within the same launch group or move them to different launch groups, select the notification and thereafter, click Move up or Move down. Drag the corresponding notification template within the same launch group or across different launch groups assigned to a corresponding incident template.
- To edit the settings of a notification template associated with a launch group, select the notification template and click Edit. (See Configure the Message / Live Announcement Template in Creating and Configuring Notification Template).
- The edit the content of a notification template associated with a launch group, select the notification template and click Edit Content. (See Configure the Message / Live Announcement Template in Creating and Configuring Notification Template).
- Click Save
 .
.
- The incident template is updated.
This section describes procedures for configuring incident trigger rules.
Create an Incident Trigger Rule
- Select Applications > Notification > Incident Templates > [incident template].
- Open the Incident Template Trigger expander.
- Select the Enable triggering check box.
- Specify the parameters in the Startup Parameters expander (see Incident Template Trigger Expander).
- Open the Time and Organization Mode expander and specify the time parameters for triggering the Incident template (see Incident Template Trigger Expander).
- Configure the trigger rule by specifying the values in the Trigger Rules expander (see Incident Template Trigger Expander).
NOTE: The incident template is not saved if the Enable check box is selected and the active trigger rules are set to the default values for Scope, Category, Discipline or Subdiscipline.
If the Enable check box is selected and the filter rule is set to [All] for Scope, Category, Discipline or Subdiscipline and you try to save the incident trigger then a warning message displays indicating an incident template trigger is configured to match all events.
- (Available only for Reno Plus and MNS license users) Specify the values in the Message Optimization Parameters expander (see Incident Template Trigger Expander).
- The incident trigger rule is created and configured.
Update or Delete an Incident Trigger Rule
- One or more incident templates are configured.
- Select Applications > Notification > Incident Templates.
- Select the configured incident template.
- Open the Incident Template Trigger expander.
- Select the incident trigger rule to be updated or deleted. Do one of the following:
- Update the incident trigger rule by changing the required fields.
NOTE: For more information, see Create an Incident Trigger Rule.
- Click Remove to delete the selected trigger rule. Click Yes to confirm.
- Click Save
 .
.
- The incident trigger rule is updated or deleted.
Initiate an Incident when an Event is Generated from a BACnet or Xnet Interface
Scenario: You want to automatically initiate an incident (for example, Incident_BACnet or Incident_Xnet) when an event is generated from either the BACnet or Xnet interface.
- An event is configured from the BACnet or Xnet interface.
- Select Applications > Notification > Incident Templates.
- Click Create
 .
.
- The Create New Object dialog box displays.
- Select Incident Template from the Child Type drop-down list.
- Enter a name in the Name field (for example, Incident_BACnet or Incident_Xnet) and thereafter click OK.
- The Incident Template Editor tab displays.
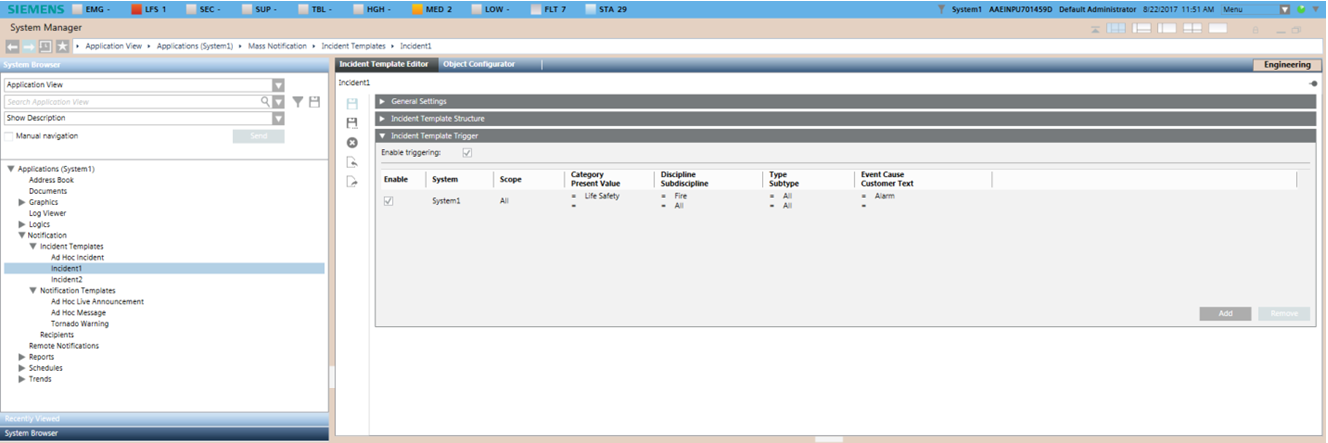
- Open the Incident Template Trigger expander.
- Select the Enable Triggering check box and thereafter open the Trigger Rules expander.
- Click Add to add a new row.
- Select the Enable check box and configure the parameters. For information, see Incident Template Trigger Expander.
NOTE: Enter the text representing the cause of the event in the Event Cause field and select the Like operator from the drop-down list.
- Click Save
 .
.
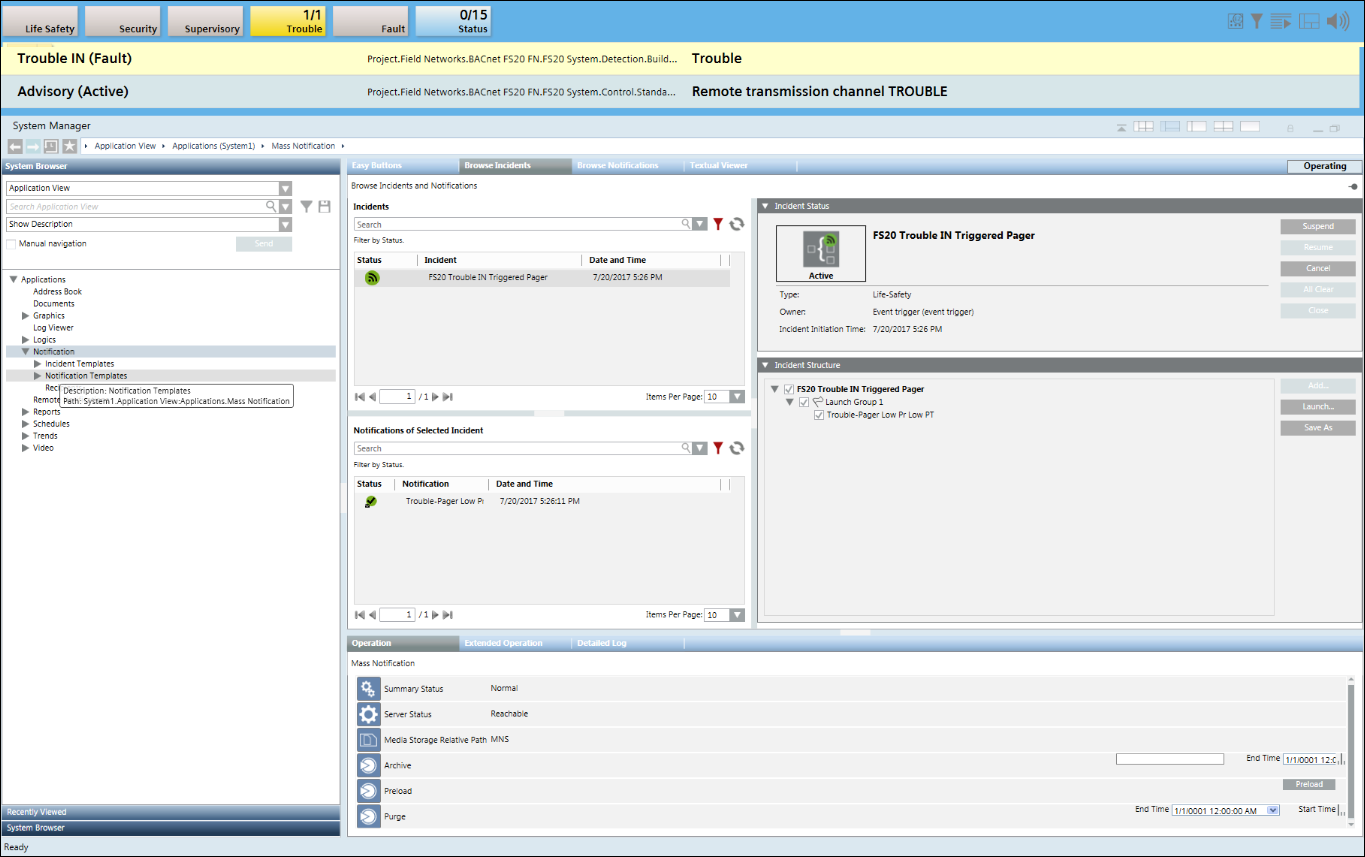
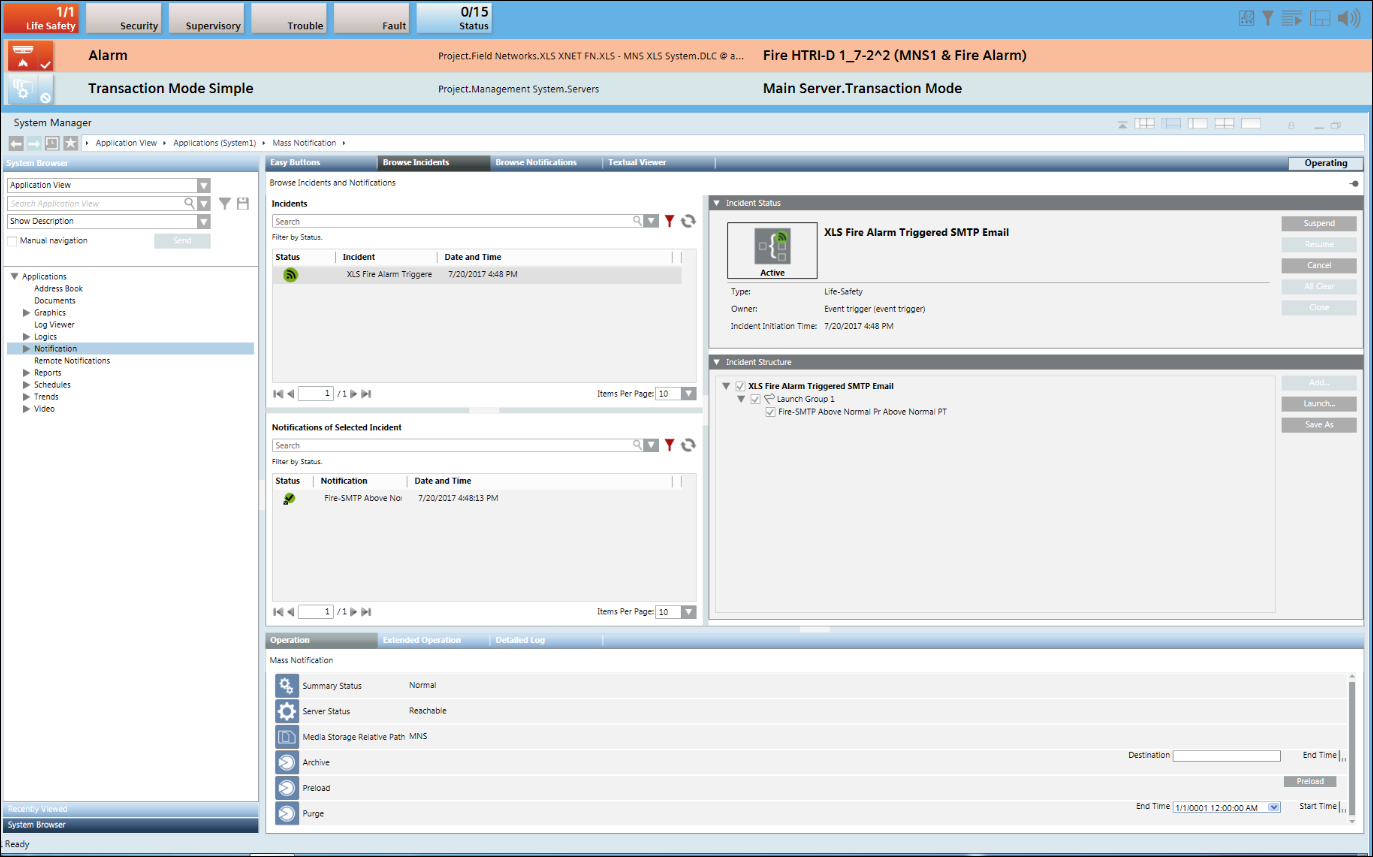
- When an event from the BACnet or Xnet interface is generated, the incident you created in step 4 (Incident_BACnet or Incident_Xnet) is initiated and can be verified from the Browse Incidents tab by selecting Applications > Notification > Browse Incidents.
NOTE: It is mandatory to enable trigger at project level to automatically initiate an incident. For more information, refer to Enable or Disable Triggers for Notification section in Incidents.


This section describes procedures to configure an incident template.
Update or Delete an Incident Template
- One or more incident templates are configured.
- Select Applications > Notification > Incident Templates.
- Select the incident template to be updated or deleted.
- The Incident Template Editor tab displays.
- Perform either of the following steps:
- Update the required parameters in the General Settings, Incident Template Structure, and Incident Template Trigger expander.
- Delete the Incident Template by clicking Delete
 .
.
- Click Save
 .
.
- The incident template is updated or deleted.
This section describes the importing and exporting of Incidents.
Import an Incident Template/Incident Template Hierarchy
- A file with an exported incident template folder or an incident template is available, and the name and location is known to you. Example of the file name and format are: IncidentTemplateFolder21EC2020-3AEA-1069-A2DD-08002B30309D.zip or IncidentTemplate21EC2020-3AEA-1069-A2DD-08002B30309D.zip.
- Select Applications > Notification > Incident Templates.
- Click Import
 .
.
- The Select file dialog box displays.
- Browse to the exported ZIP file location.
- Select the ZIP file, and click Open.
- The Incident Template / Incident Template Hierarchy is imported.
Export an Incident Template/Incident Template Hierarchy
- One or more incident templates / incident template folders are configured.
- Select Applications > Notification > Incident Templates.
- Select the incident template / incident template folder you want to export.
- Click Export
 .
.
- The Select a folder dialog box displays.
- Select the folder to export the incident template / incident template folder.
- Click OK.
- The incident template / incident template hierarchy is exported.
This section describes procedures to initiate an incident.
Initiate an Incident using Command
- Select Applications > Notification > Incident Templates.
- Select the configured incident template to be initiated.
NOTE: The incident template should be configured with at least one Start launch group.
- In the Extended Operation tab, navigate to the Initiate Incident property and perform any of the following steps to initiate the incident:
NOTE: Only one Initiate Incident property is available at one time.
- If the selected incident template does not contain a user variable, click Initiate to initiate the incident template.
- If the selected incident template contains a user variable, enter variable text in the Variable Value field and click Initiate to initiate the incident template.
- The selected Incident Template is initiated.
NOTE: In order to view the command results after the command execution in the Primary pane. You must refresh the user interface by re-selecting the incident template from the System Browser.
Initiate an Incident using Reaction
- Select Applications > Logics > Reactions.
- The Reaction Editor tab displays.
- From Applications > Notification > Incident Template, drag the incident template, for example, Earthquake, on the Action expander of the Output expander.
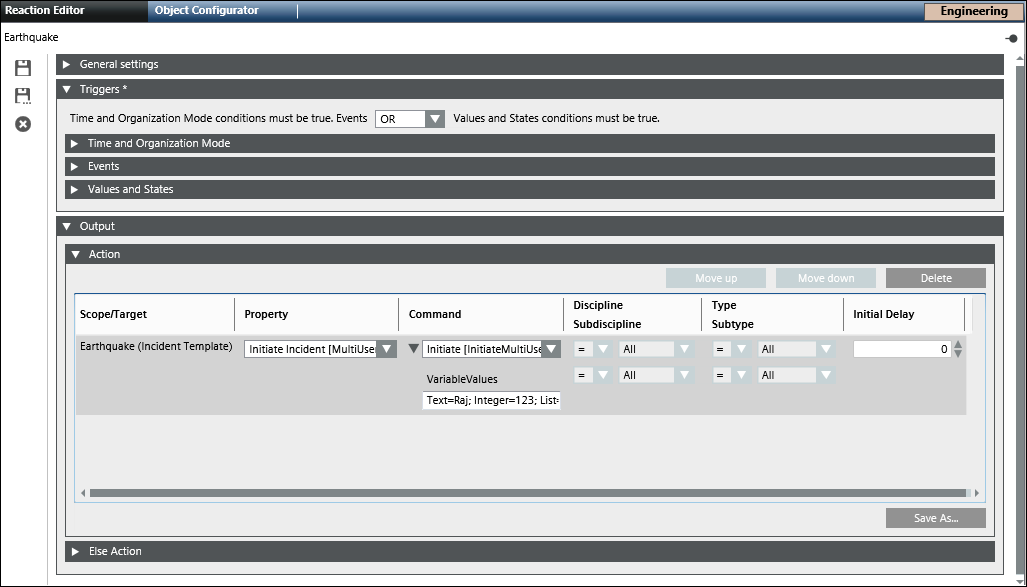
- Do one of the following to select the required command from the Property drop-down list.
- Select Initiate Incident [NoUserVariableCommand], to initiate the incident without any user variable value.
- Select Initiate Incident [SingleUserVariableCommand], to initiate the incident with user variable value.
NOTE: For a single variable user value, enter the variable value in the Variable Value field. The variable value entered is used to fill all user variables present in the selected template during the initiate operation. It means the values of all user variables will be replaced by same value entered in the Variable Value field. If the provided variable value is not compatible with the type of a given user variable, the value of the affected user variable will be filled with the variable’s default value and will not be replaced with the entered text.
- Select Initiate Incident [MultiUserVariableCommand], to initiate the incident with a multi user variable value
NOTE 1: For multi user variable value, enter the values as a series of key-value pairs.
Format of key-value pair string:
[User Variable Name]=[Value]; [User Variable Name]=[Value];…
NOTE 2: For multi-select user variables, enter the variable values separated by a comma and a space after the comma. For example, List=0, 1, 2
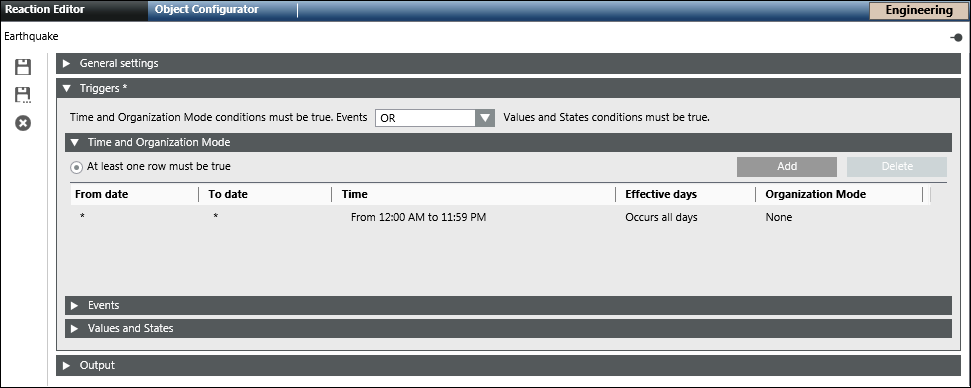
- In the Triggers expander, specify if the conditions specified in both, Events as well as Values and States expanders, must be true or if the conditions specified in either of the expanders must be true by selecting the appropriate operator (AND, OR) in the drop-down list.
- Open the Time and Organization Mode expander.
- Click New to add a new time row and enter a new time or schedule that periodically triggers the Initiate Incident command.
- Click Save As
 .
.
Notification can send notifications for events, for example, a fire alarm in Building A, depending on the time, date, type of day (working day or weekend) and the organization mode. This is possible using the incident triggering command functionality.
This section describes procedures to enable incident triggering.
Enable Incident Triggering using Reaction
- Select Applications > Notification > Incident Templates > [incident template].
- In the Operation tab, set the Incident Triggering command to True.
- Select Applications > Logics > Reactions.
- The Reaction Editor tab displays.
- Open the Output expander and thereafter, open the Action expander.
- From System Browser, drag the incident template, for example, Earthquake, into the Action expander.
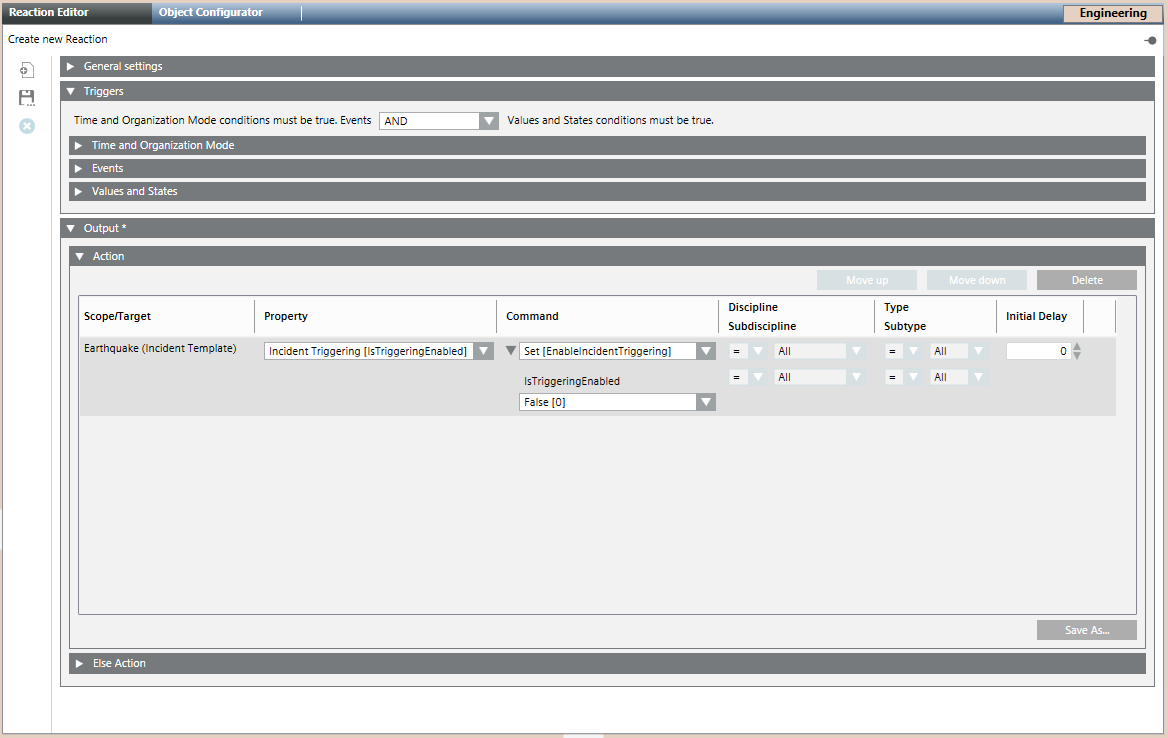
- From the Property drop-down list, select Incident Triggering [IsTriggeringEnabled] to configure the trigger for the selected incident template.
- From the Command drop-down list, select Set [EnableIncidentTriggering].
- Set the value of the IsTriggeringEnabled command to True in the check box that displays below the Command drop-down list. To disable the incident triggering, set the value of this command to False.
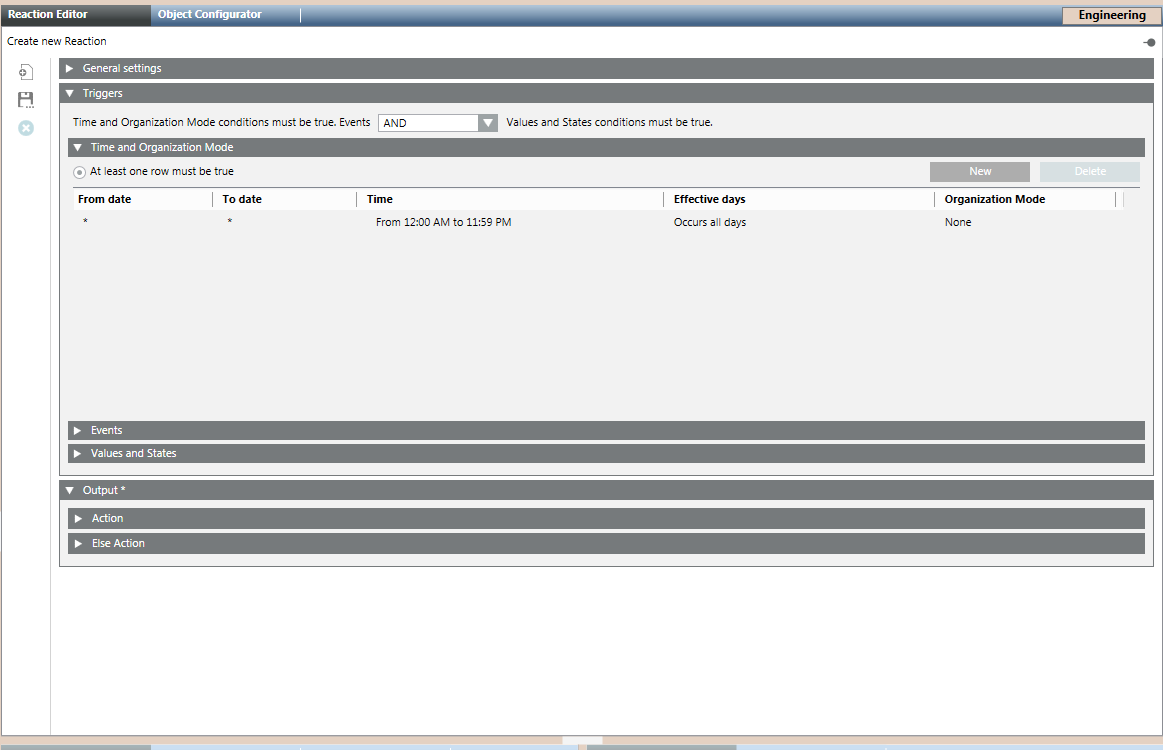
- In the Triggers expander, specify if the conditions specified in both, Events as well as Values and States, expanders must be true or if the conditions specified in either of the expanders must be true by selecting the appropriate operator (AND, OR) in the drop-down list.
- Open the Time and Organization Mode expander.
- Click New to add a new row and specify a new time or schedule, when you want to trigger the Initiate Incident command.
- Click Save As and enter a name and description for the incident triggering reaction.
- The new incident triggering reaction is added to System Browser.
Enable Incident Triggering for a Specific Period using Reactions
You want to enable the ‘University Update' incident to send out notifications from the university. It is expected that the Notification system triggers University Update incidents only during the 1st shift from 6.00 A.M to 6.00 P.M.
- The incident template University Update is created and configured.
- Select Applications > Notification > Incident Templates > [incident template].
- In the Operation tab, set the Incident Triggering command to True.
- Select Applications > Logics > Reactions.
- The Reaction Editor tab displays.
- In the Time and Organization Mode expander, set the value of Set Start Time and Set End Time to 6.00 A.M. and 6.00 P.M. respectively.
- Open the Output expander and thereafter, open the Action expander.
- From System Browser, drag the University Update incident template, into the Action expander.
- From the Property drop-down list, select Incident Triggering [IsTriggeringEnabled] to configure the trigger for the University Update incident template.
- From Command drop-down list, select Set [EnableIncidentTriggering].
- Set the value of the IsTriggeringEnabled command to True in the check box that displays below the Command drop-down list. To disable the incident triggering, set the value of this command to False.
- From System Browser, drag the University Update incident into the Else Action tab.
- Set the IncidentTriggering command to False.
- The incident University Update is available for triggering only in the specified time period.
Enable Incident Triggering using Command
- Select Applications > Notification > Incident Templates > [incident template].
- In the Operation tab, set the Incident Triggering command to True if you want to enable the incident trigger for the selected Incident. Set the value to False to disable the trigger. If set to False, for an incident, then the incident is not initiated even when an event matching its trigger rule occurs in the system.
- Click Set.
- The selected incident template is initiated when any event matching its trigger rule occurs in the system.
NOTE: In order to view the command results after command execution, you need to refresh the user interface by re-selecting the incident template from System Browser.
Enable or Disable Triggers for Notification
You can enable or disable triggers at project level.
- System Manager is in Engineering Mode.
- The Notification project level node is selected.
- In the System Browser, select Application View.
- Select Application > Notification.
- Select the Extended Operation tab.

- In Incidents Triggering, select the Enable or Disable buttons to enable or disable the trigger respectively.
- The trigger status displays in the Incident Triggering section.
This section describes the procedure to suspend, resume, cancel, and close an incident. This example (Suspend All) is common to all the commands.
- Select Applications > Logics > Reactions.
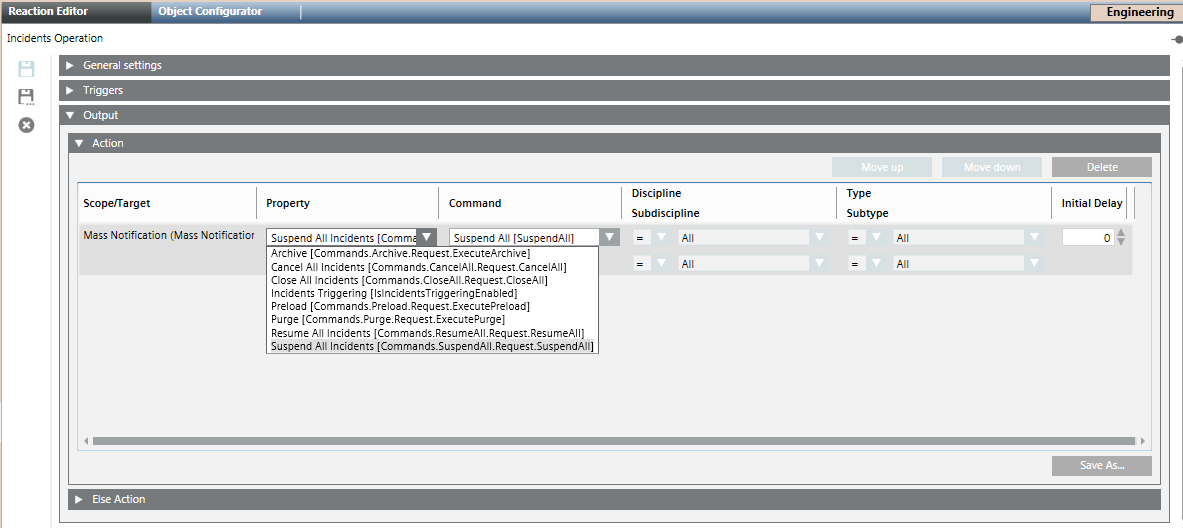
- Open the Output expander and thereafter, open the Action expander.
- From System Browser, drag a notification node to the Action expander.
- From the Property drop-down list, select any of the following commands:
- To suspend all the active incidents, select Suspend All Incidents. The command structure [Commands.SuspendAll.Request.SuspendAll] varies for other commands respectively.
- To resume all the suspended incidents, select Resume All Incidents.
- To cancel all incidents, select Cancel All Incidents.
- To close all incidents, select Close All Incidents.
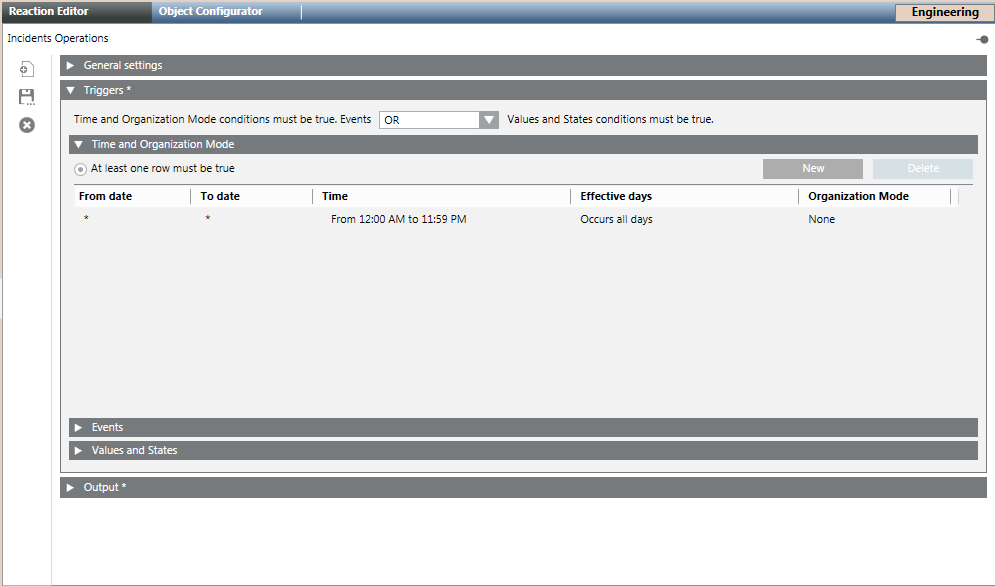
- Open the Triggers expander and specify if the conditions specified in both, Events as well as Values and States, expanders must be true or if the conditions specified in either of the expanders must be true by selecting the appropriate operator (AND, OR) in the drop-down list.
- Open the Time and Organization expander.
- Click New to add a new row and specify a new time or schedule, when you want to trigger the initiate incident command.
- Click Save As
 .
.
- In the Save Object As dialog box, enter a name and description.
- Click OK.
- The reaction is saved under the Reaction node in the System Browser.
